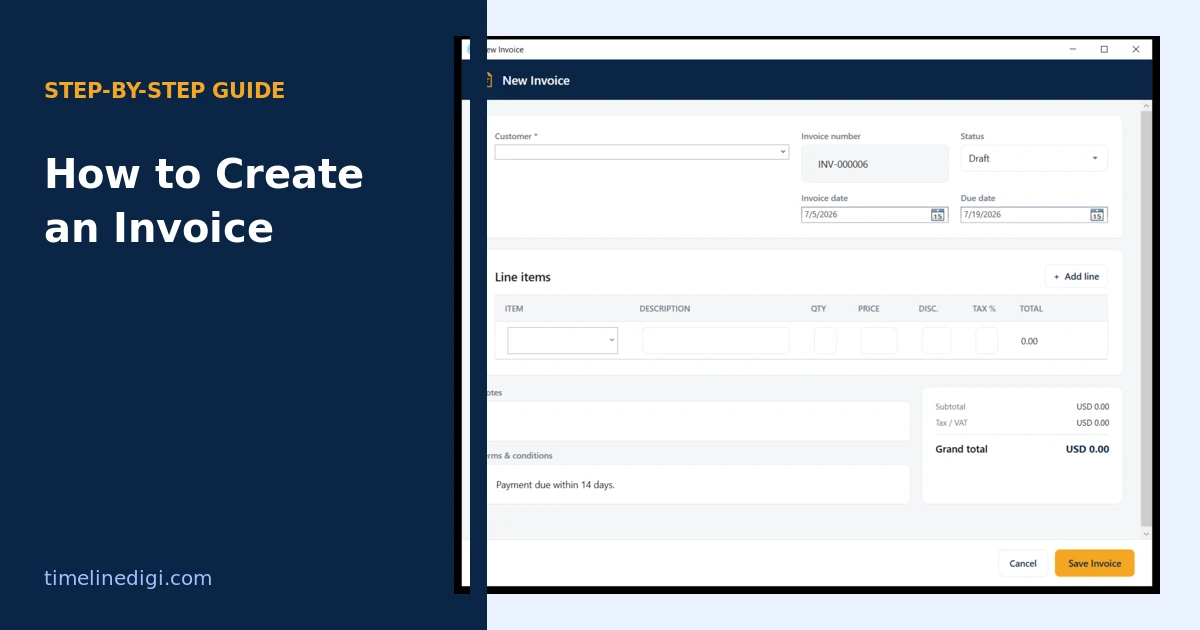
To create an invoice, put seven things on the page: your business details, your client details, a unique invoice number and issue date, an itemised list of the products or services with quantities and prices, the subtotal, any tax and the total due, your payment terms and due date, and how you want to be paid. Save it as a PDF so it cannot be altered, then send it. You can do all of this by hand in a document, from a template, or automatically with free invoice software.
An invoice is a formal request for payment that records what you sold, to whom, for how much, and by when payment is due. Getting it right matters for two reasons: a clear invoice gets paid faster, and a properly numbered, tax-correct invoice keeps your books clean at year end. Here is exactly what goes on one and how to produce it.
What information goes on an invoice?
Every professional invoice carries the same core fields. Miss one and clients either delay payment or come back with questions.
| Field | What it is |
|---|---|
| Business details | Your name or company name, address, phone, email, and logo |
| Client details | The customer name, company, and billing address |
| Invoice number | A unique, sequential reference such as INV-000001 |
| Dates | The issue date and the payment due date |
| Line items | Each product or service with a description, quantity, unit price, and line total |
| Totals | Subtotal, tax (VAT, GST, or sales tax), and the final amount due |
| Payment terms | When and how to pay, plus accepted methods |
Step 1: Add your business and client details
Start with who is billing whom. Put your business name, address, and contact details at the top, with your logo if you have one. Directly below or opposite, add the client's name, company, and billing address. Accurate client details matter because an invoice addressed to the wrong entity can be rejected by an accounts department and sent back for correction.
Step 2: Add a unique invoice number and dates
Give every invoice its own number and never repeat one. Sequential numbers such as INV-000001, INV-000002 make your records easy to search and reconcile. Add the issue date and a due date so the payment clock is unambiguous. "Net 15" or "Net 30" means payment is due 15 or 30 days after the issue date.
Step 3: List the products or services
This is the part clients read most closely. Give each item its own line with a plain description, the quantity, the unit price, and the line total. Avoid vague labels like "services rendered." "Website homepage design, 12 hours at 40 per hour" tells the client exactly what they are paying for and heads off disputes before they start.
Step 4: Calculate the subtotal, tax, and total
Add the line totals to get a subtotal. Apply any discount, then add tax as its own clearly labelled line so the client sees the rate and the amount. Different countries use VAT, GST, or sales tax, so show whichever applies to you. The final figure, the amount due, should be the largest and most obvious number on the page.
Step 5: Set payment terms and methods
Tell the client how to pay and by when. List your accepted methods, whether bank transfer, card, cheque, or a mobile wallet, and include the account details or a payment link. Clear terms remove the most common reason invoices sit unpaid: the client is not sure how you want the money.
Step 6: Review, then save as a PDF
Check the numbers, the client name, and the totals before anything leaves your desk. Then export the invoice as a PDF. A PDF looks the same on every device, cannot be edited by accident, and reads as more professional than a raw spreadsheet or document file.
Step 7: Send it and track payment
Send the PDF the way your client prefers, usually email, and keep a copy for your records. Then track it: mark it as sent, and later as paid or partially paid, so you always know what is outstanding. This last step is where doing invoices by hand starts to hurt, because a folder of PDFs will not tell you who still owes you money.
The fastest way: use free invoice software
You can build an invoice in a word processor, but you will retype your details every time, do the maths yourself, and lose track of what is paid. Free invoice software does all seven steps for you. It stores your company profile and item prices, numbers invoices automatically, calculates tax and totals as you type, exports a branded PDF in one click, and tracks payment status.
Timeline Invoice is a free offline app for Windows that does exactly this, with quotations built in and no subscription or sign-up. If you send more than a handful of invoices a month, software pays for itself in saved time immediately, and it removes the arithmetic mistakes that hand-made invoices invite. For a full walkthrough of the fields, see what to include on an invoice, and if you send quotes first, read the difference between a quote, an estimate, and an invoice.