User guide · 18 video lessons · Version 2.0.1

How to use Timeline Restaurants POS

To use Timeline Restaurants POS, install it on one Windows PC or Mac, finish the three-step setup, then take orders, take payment and print receipts. This guide has 18 short video lessons, about 74 minutes in total. Each lesson also has written steps, so you can follow along without watching.

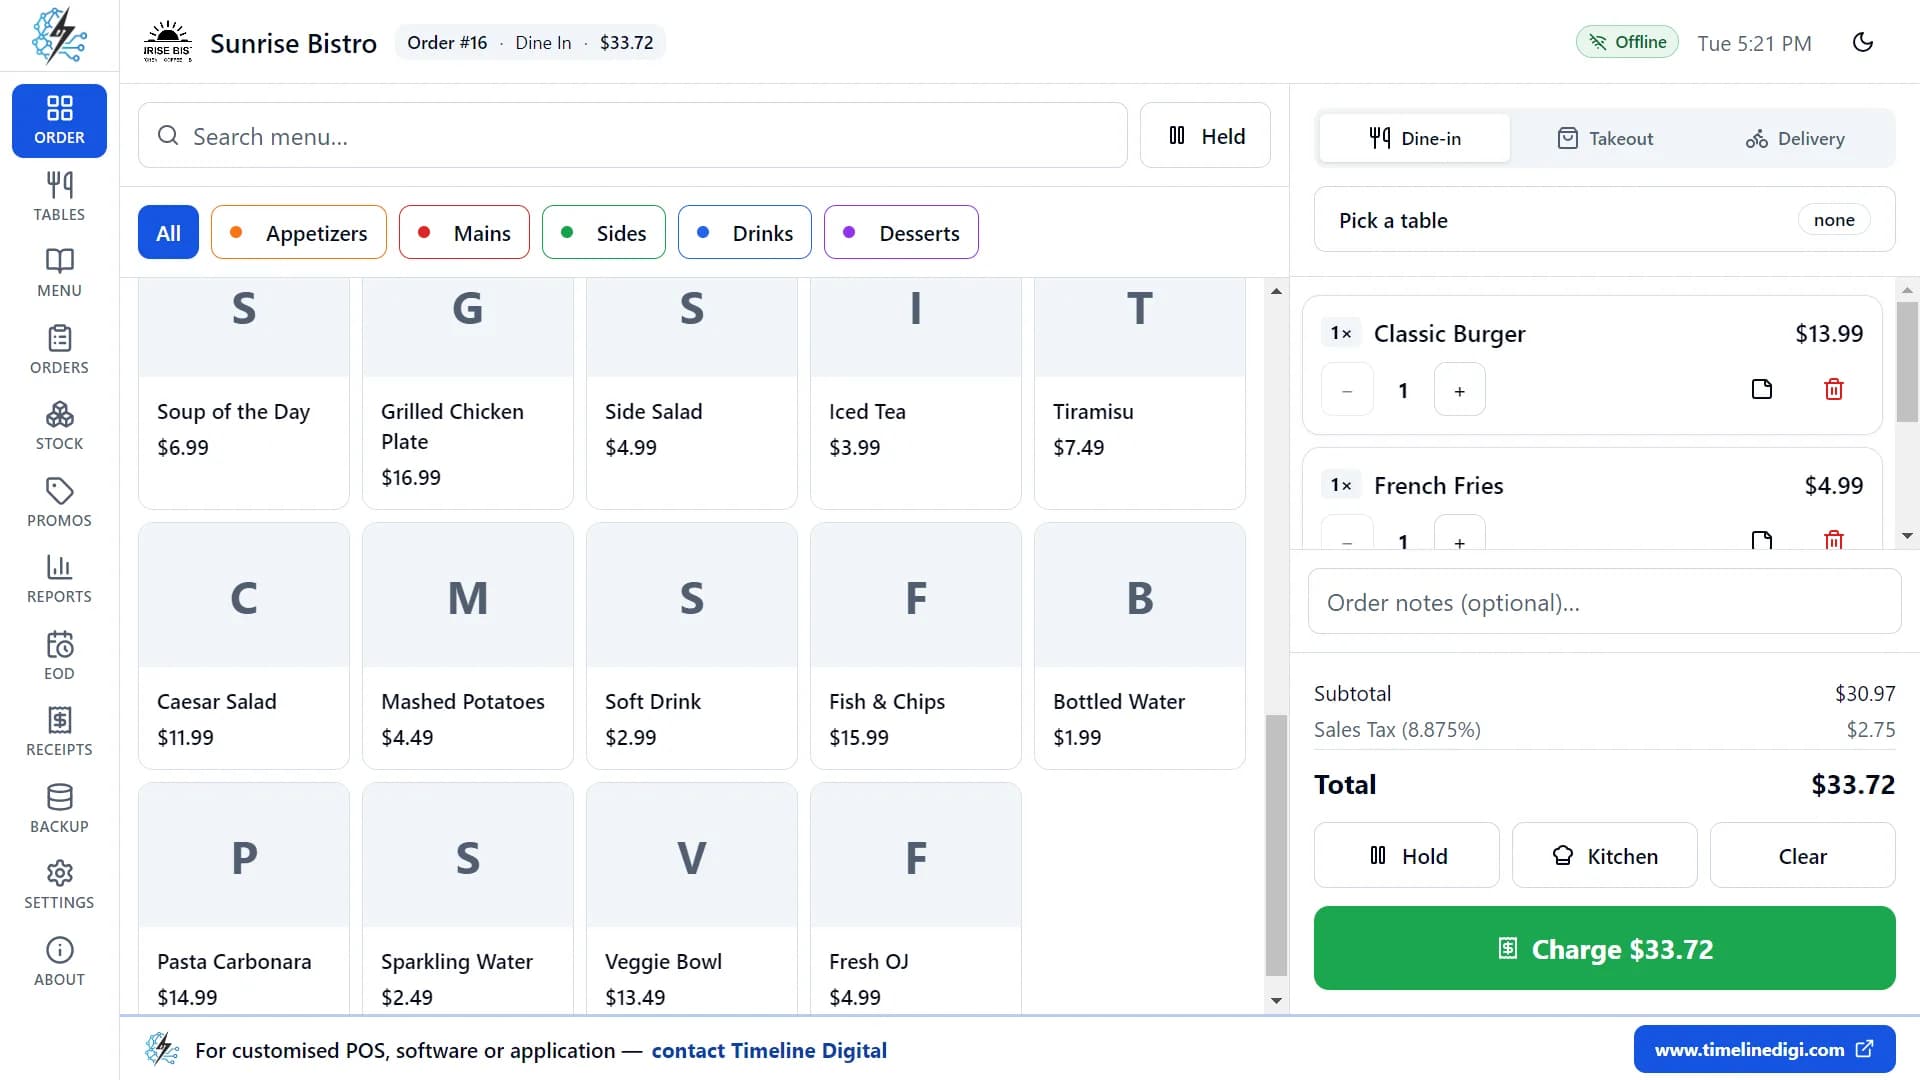
Timeline Restaurants POS: order screen with items added and the subtotal, tax and total shown
Tap items to build an order, with tax and total shown live

Not installed yet? Get the app from the free restaurant POS download page. To see what it can do first, read the Timeline Restaurants POS product page or the full feature list. You can also watch all the lessons as a YouTube playlist.

Part 1 of 4 · Lessons 1 to 2

Getting started

Set the app up and learn where everything is.

Lesson 1 of 183:03 video

How to set up Timeline Restaurants POS for the first time

The first time you open the app, a short three-step wizard sets everything up. It takes about two minutes.

In this video: Set up your restaurant, tax and sample menu.

  1. Step 1: Open the app. The setup wizard starts on its own.
  2. Step 2: Enter your restaurant's name, the owner's name, city, phone or WhatsApp number, and email.
  3. Step 3: Choose your type of business, such as Restaurant, Café / Coffee Shop, Fast Food, Bakery, Bar / Pub or Food Truck.
  4. Step 4: Pick your country from the searchable list of 173 countries and regions. The app then sets your currency, number and date formats, a 12 or 24 hour clock, and a starting tax rate.
  5. Step 5: Check the tax name and rate for your country, and change them if needed. For example, the United States uses "Sales Tax" added at checkout, and Germany uses "MwSt" 19% included in prices.
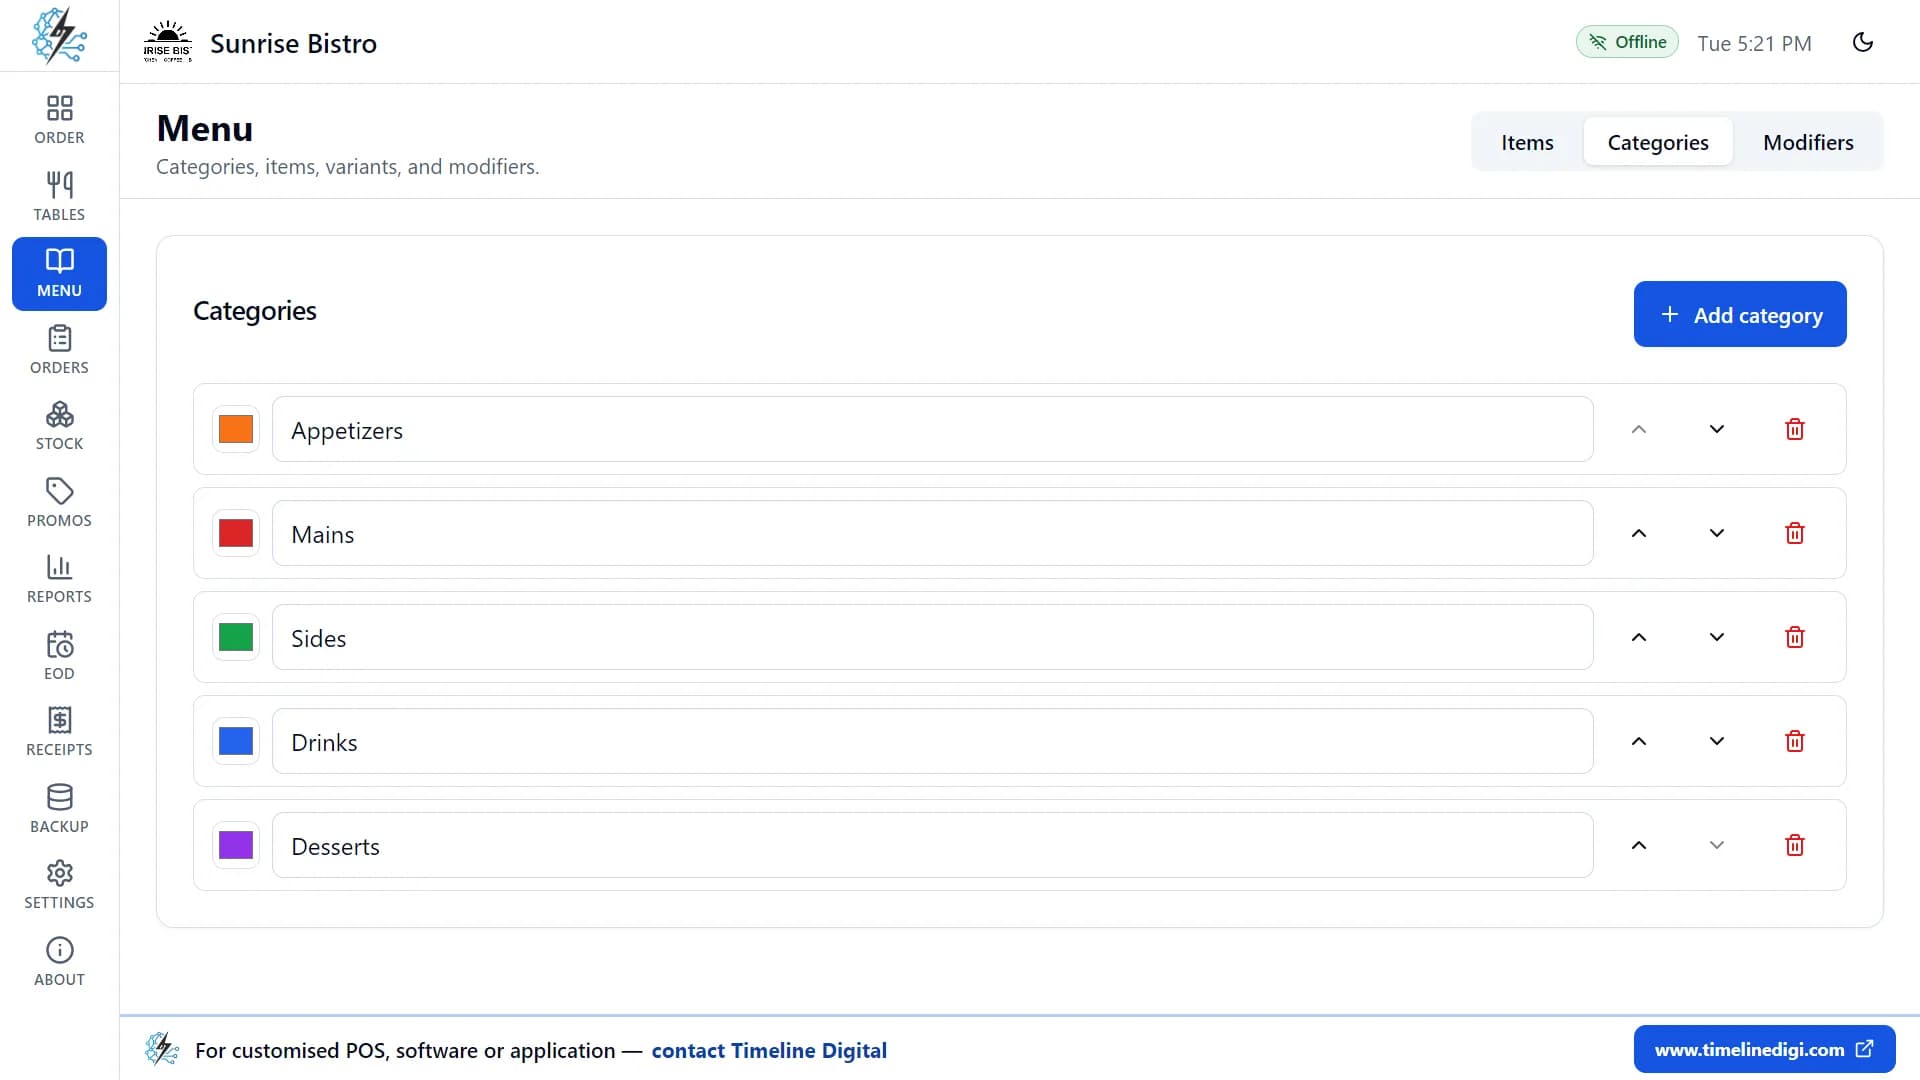
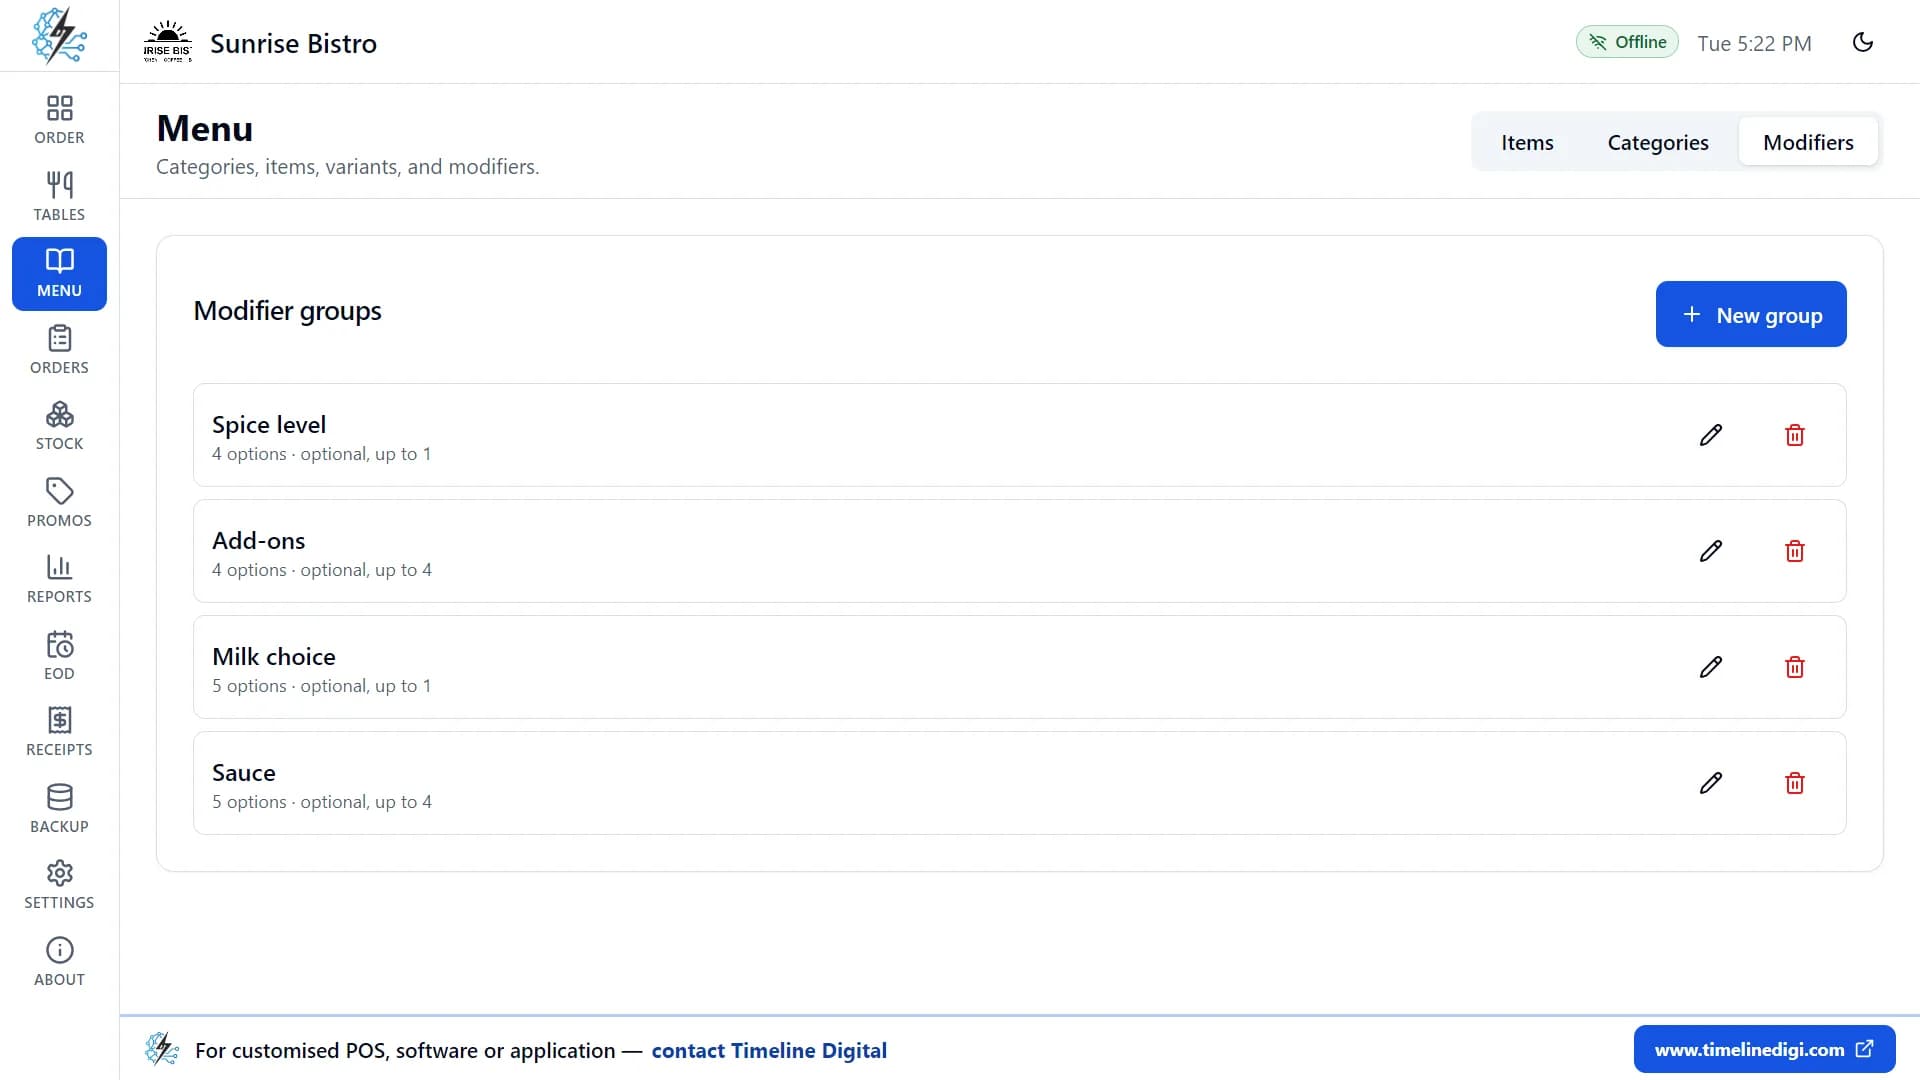
  6. Step 6: Turn on the sample data switch to load 34 items in 5 categories, 4 modifier groups and 11 tables, so you can practise straight away. You can delete the sample data later.
  7. Step 7: Finish the wizard. You are ready to take your first order.
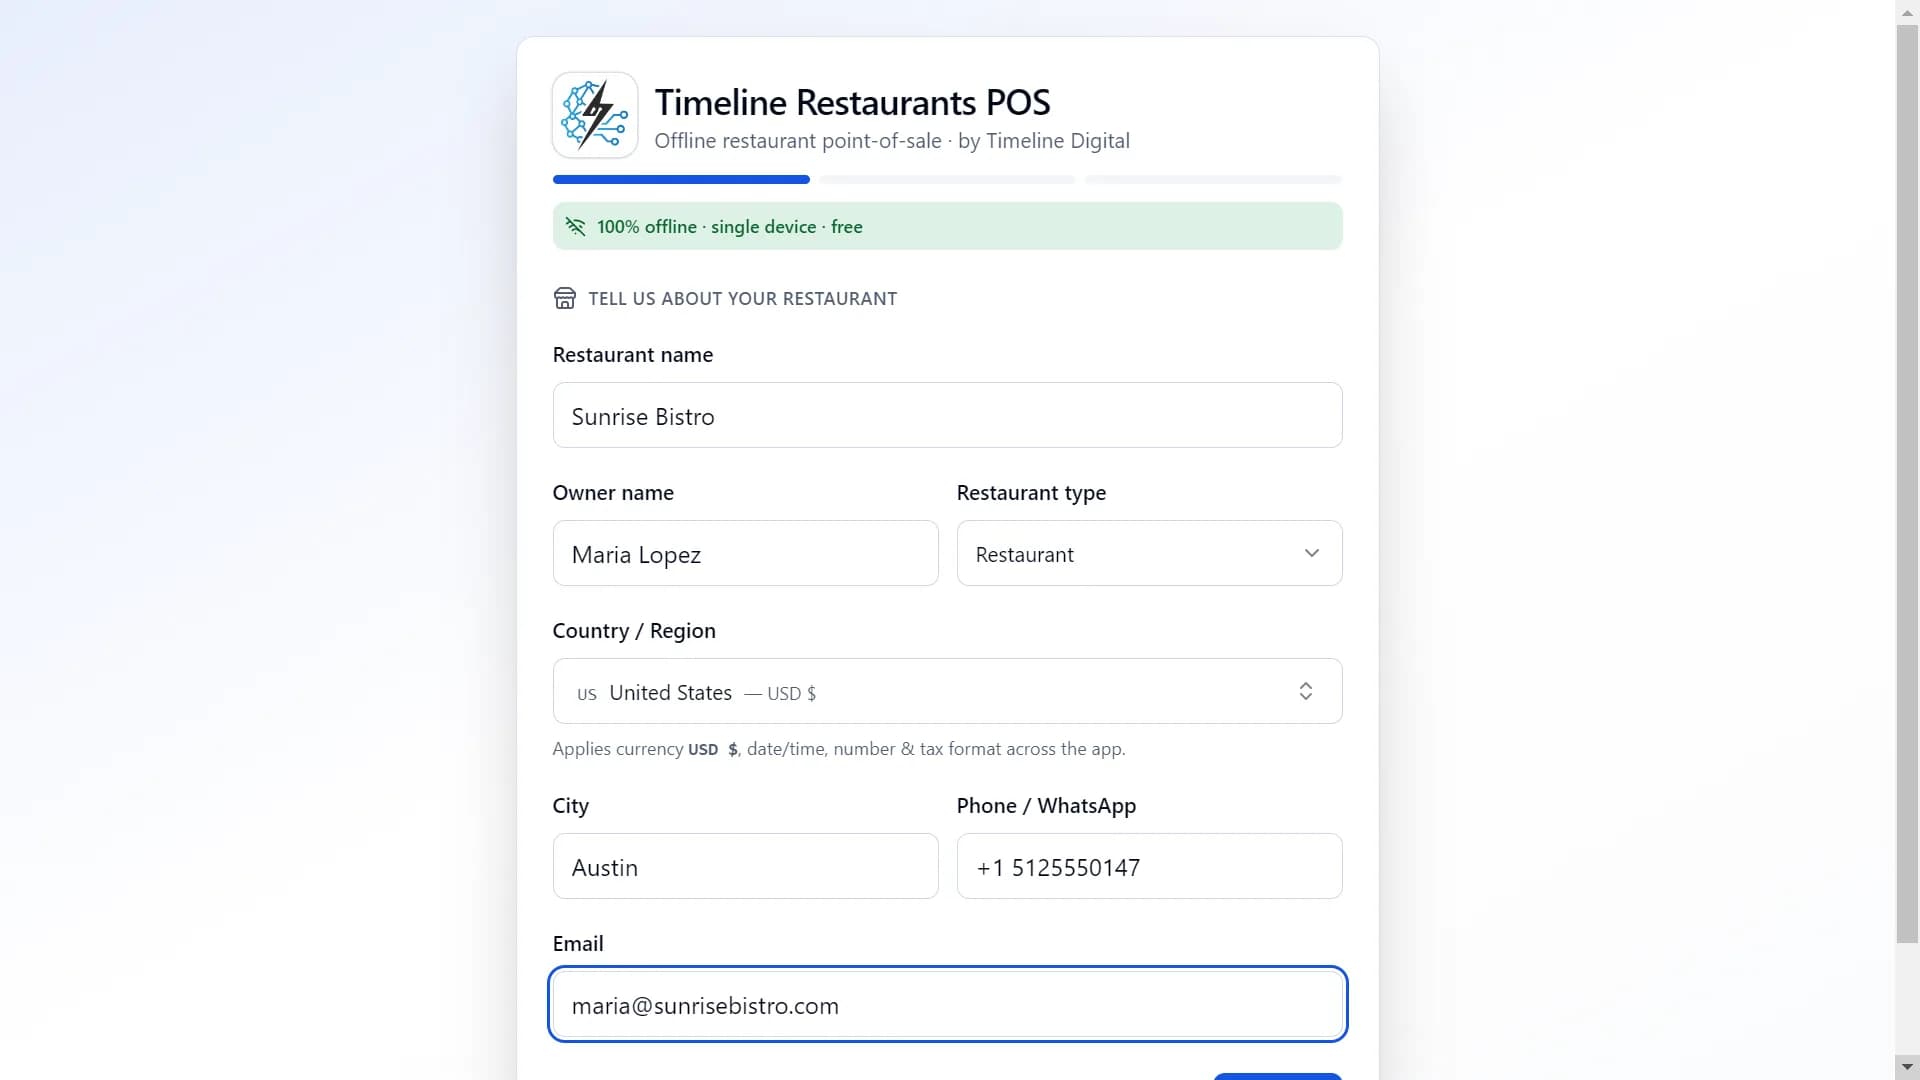
Timeline Restaurants POS: setup step 1: restaurant name, owner, type of business, city and country
Set up your restaurant in under two minutes

Lesson 2 of 184:34 video

How to find your way around the main screen

Everything starts from the order screen. This lesson shows you where things are.

In this video: Where everything is.

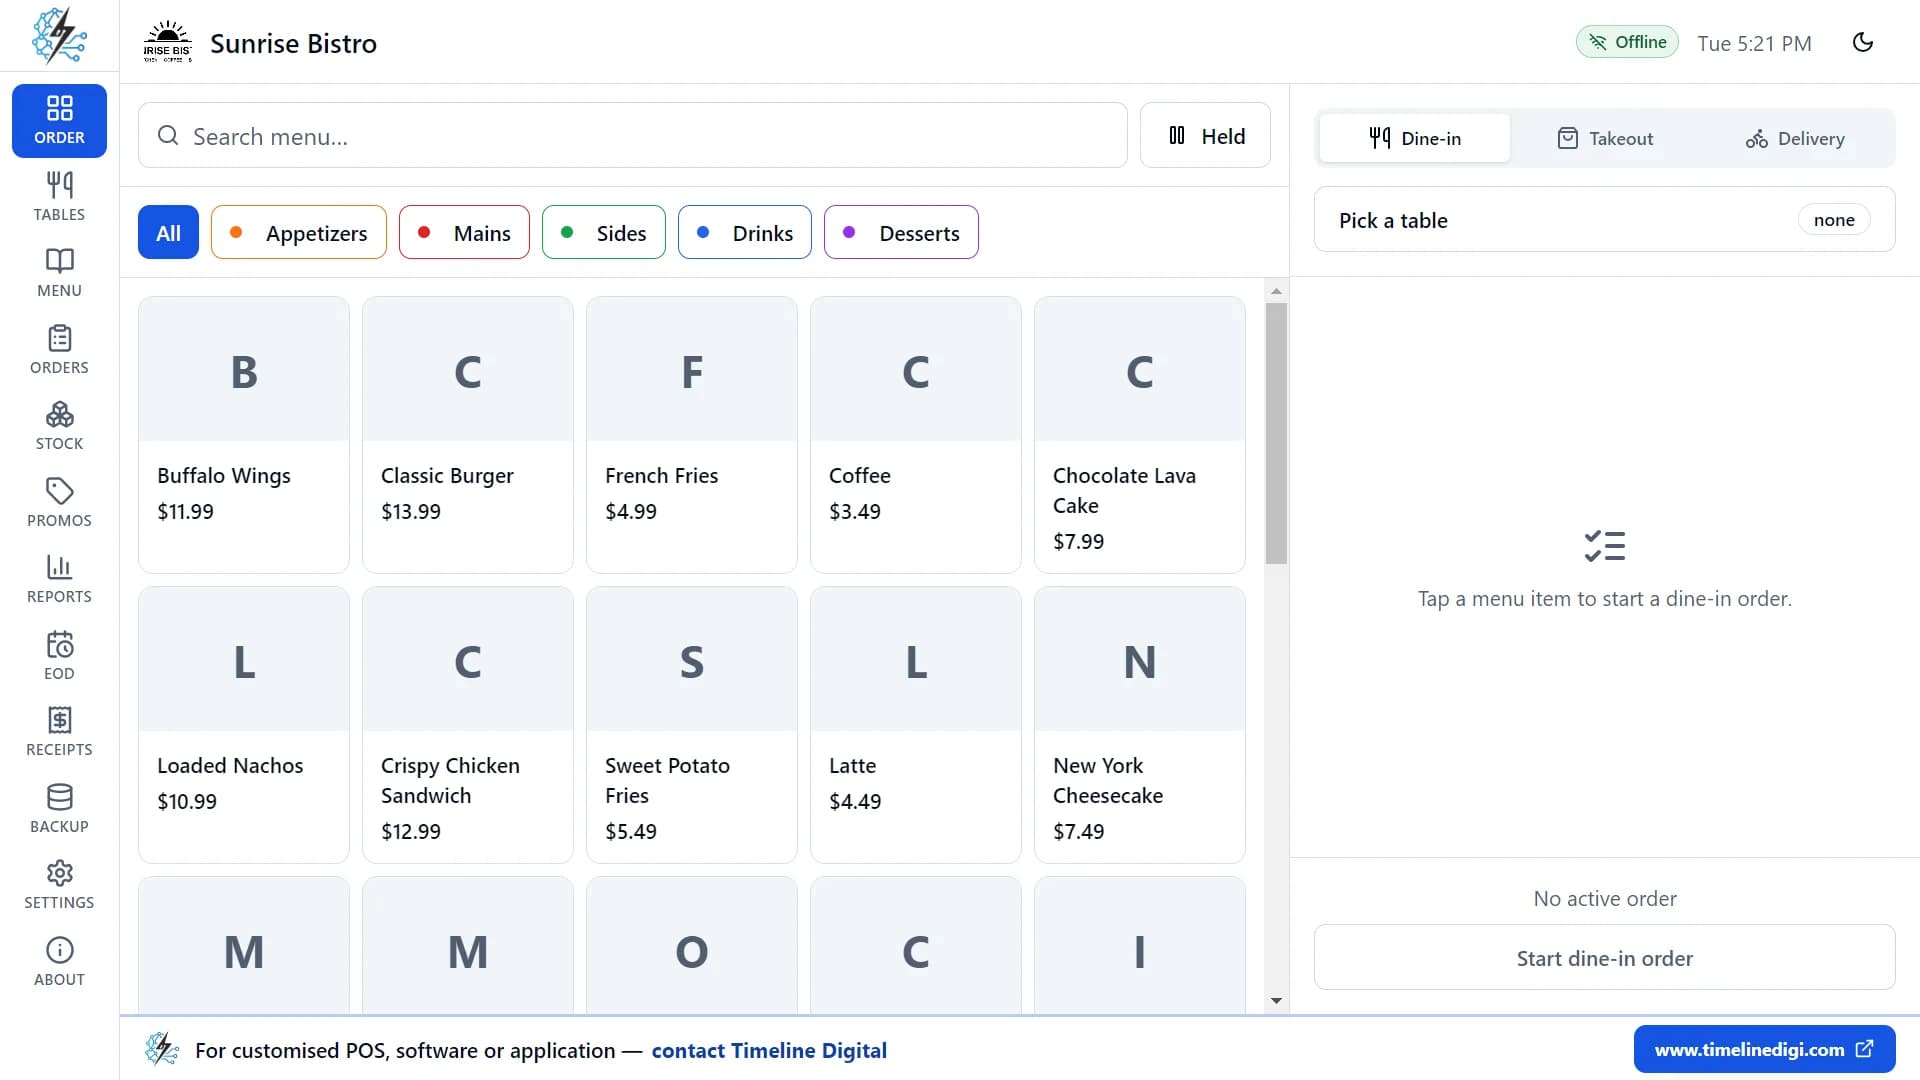
  1. Step 1: Look at the order screen. Your menu is on the left and the current order is on the right.
  2. Step 2: Tap a category to filter the menu, or type in the search box to find an item by name.
  3. Step 3: Look at the top bar. It always shows your restaurant name and logo, the current order (number, type, table and total), an "Offline" badge and a live clock.
  4. Step 4: Use the theme switch in the top bar to change between light and dark.
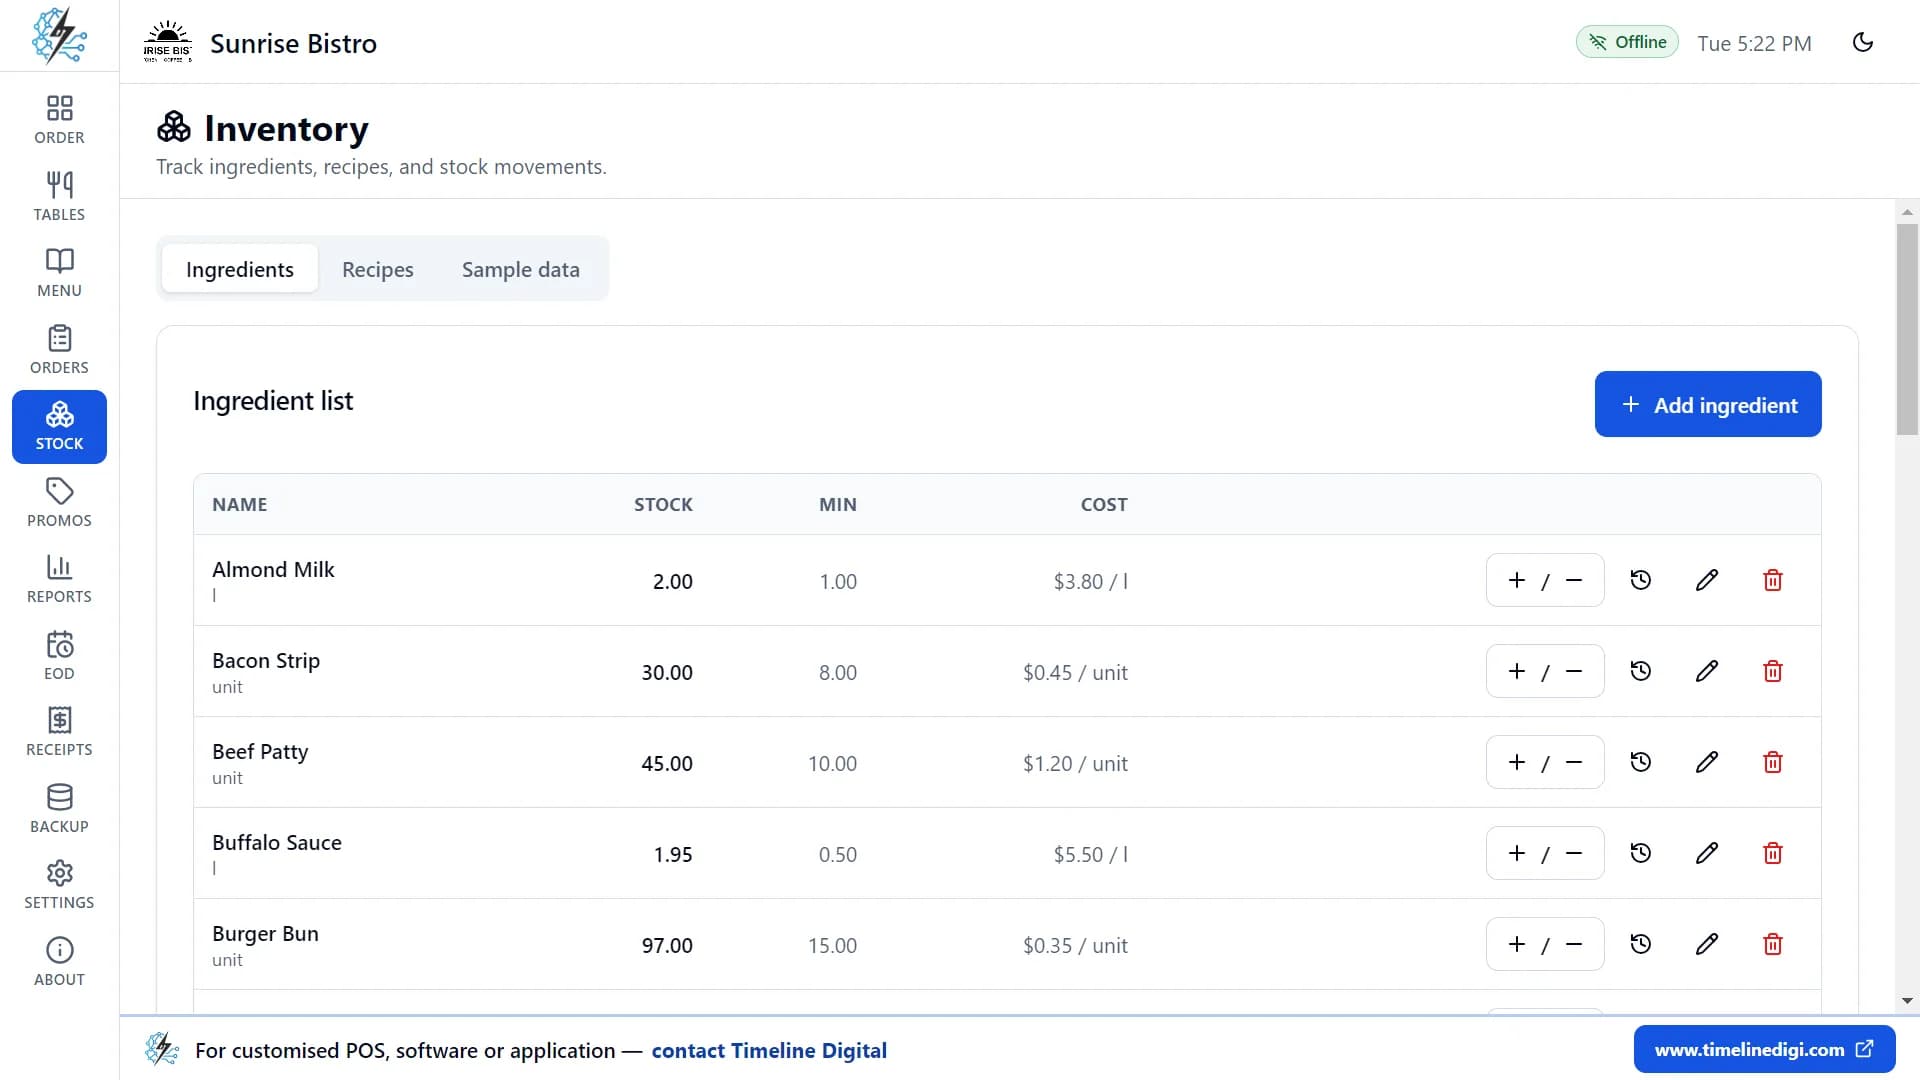
  5. Step 5: Open the other pages when you need them: Tables, Orders, Menu, Stock, Promotions, Reports, End of day, Receipts, Backup and Settings.
  6. Step 6: Close the app and open it again. It opens straight back where you left it, and the window remembers its size and position.
Timeline Restaurants POS: order screen with the menu on the left and an empty order on the right
The order screen: menu on the left, order on the right
Part 2 of 4 · Lessons 3 to 7

Taking orders and payment

What your staff do all day: orders, tables, payment and receipts.

Lesson 3 of 185:14 video

How to take a dine-in order

A dine-in order belongs to a table. You add items, choose their options and send a ticket to the kitchen.

In this video: Tables, options, sizes, notes and kitchen tickets.

  1. Step 1: Choose Dine-in as the order type and pick a table. You can also tap a free table on the Tables page to start its order.
  2. Step 2: Tap an item to add it. Items without options go straight into the order. Tap the same item again to add one more.
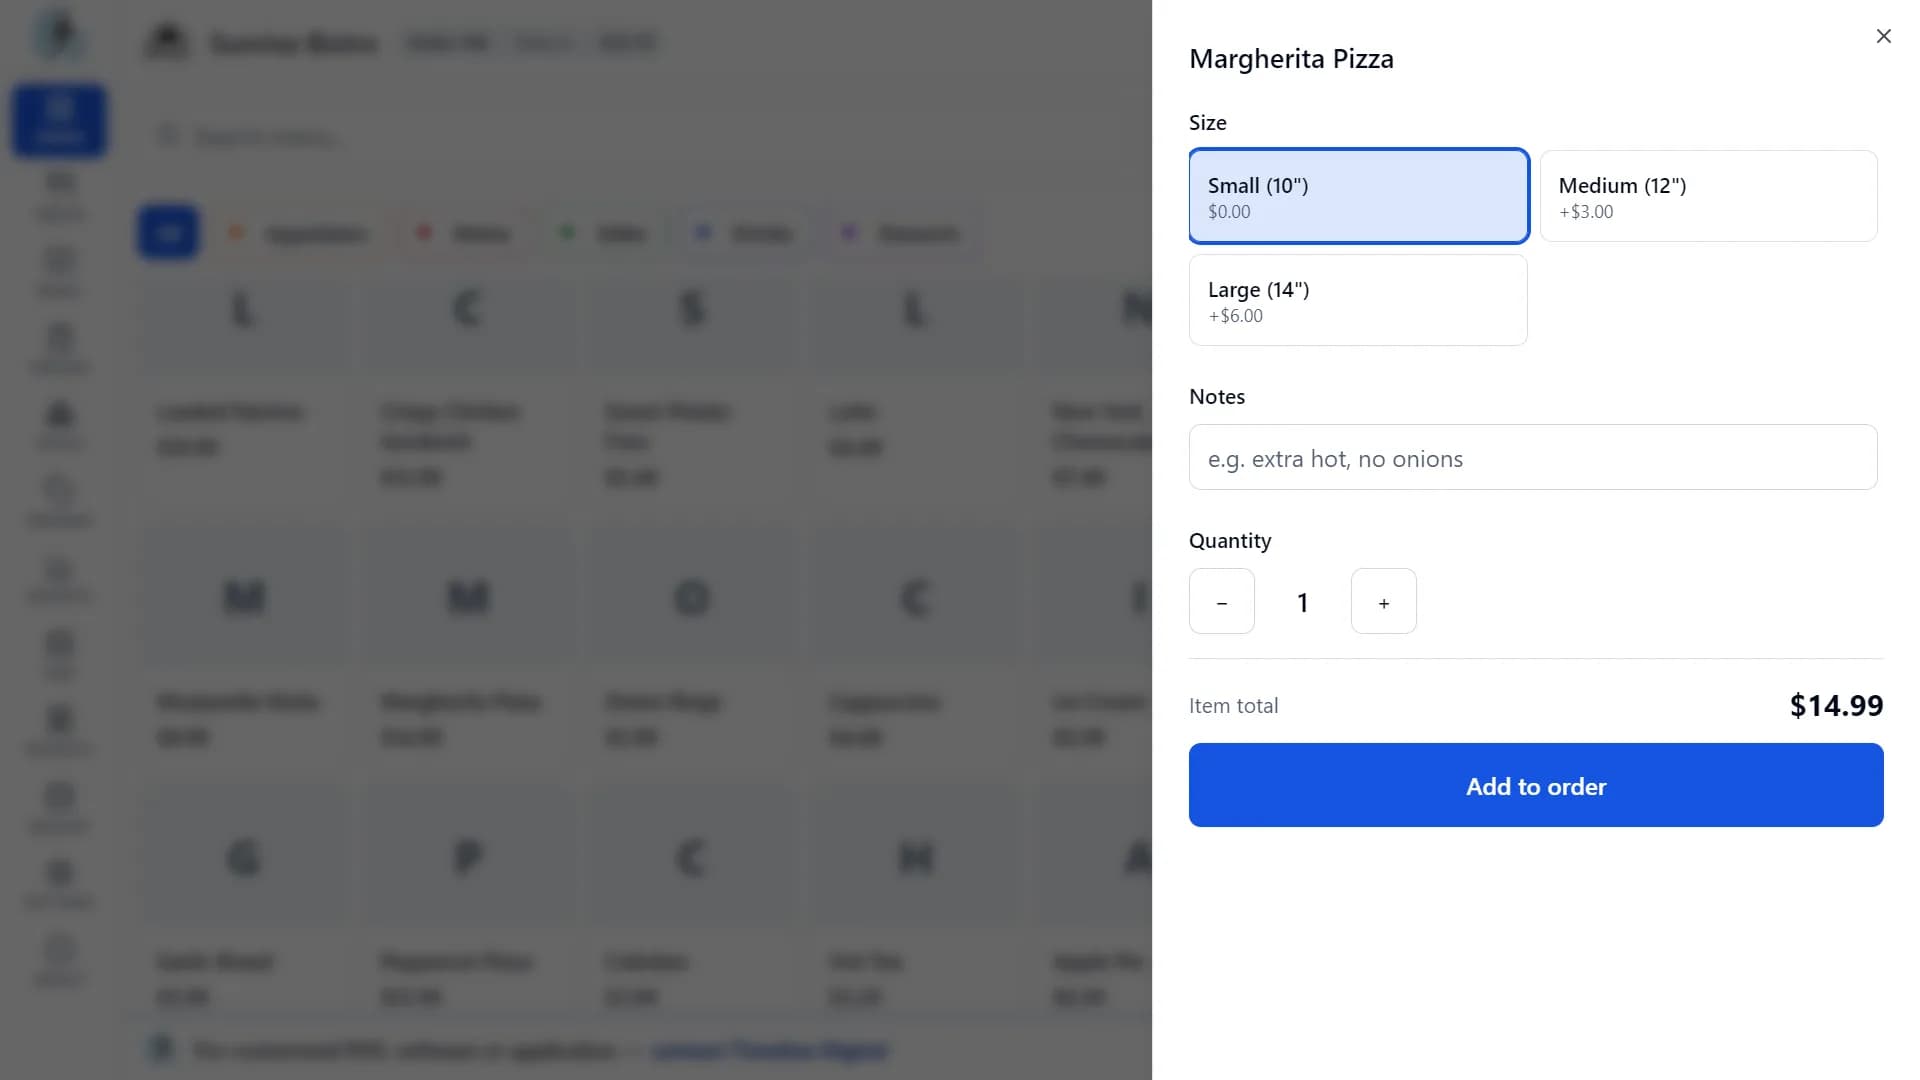
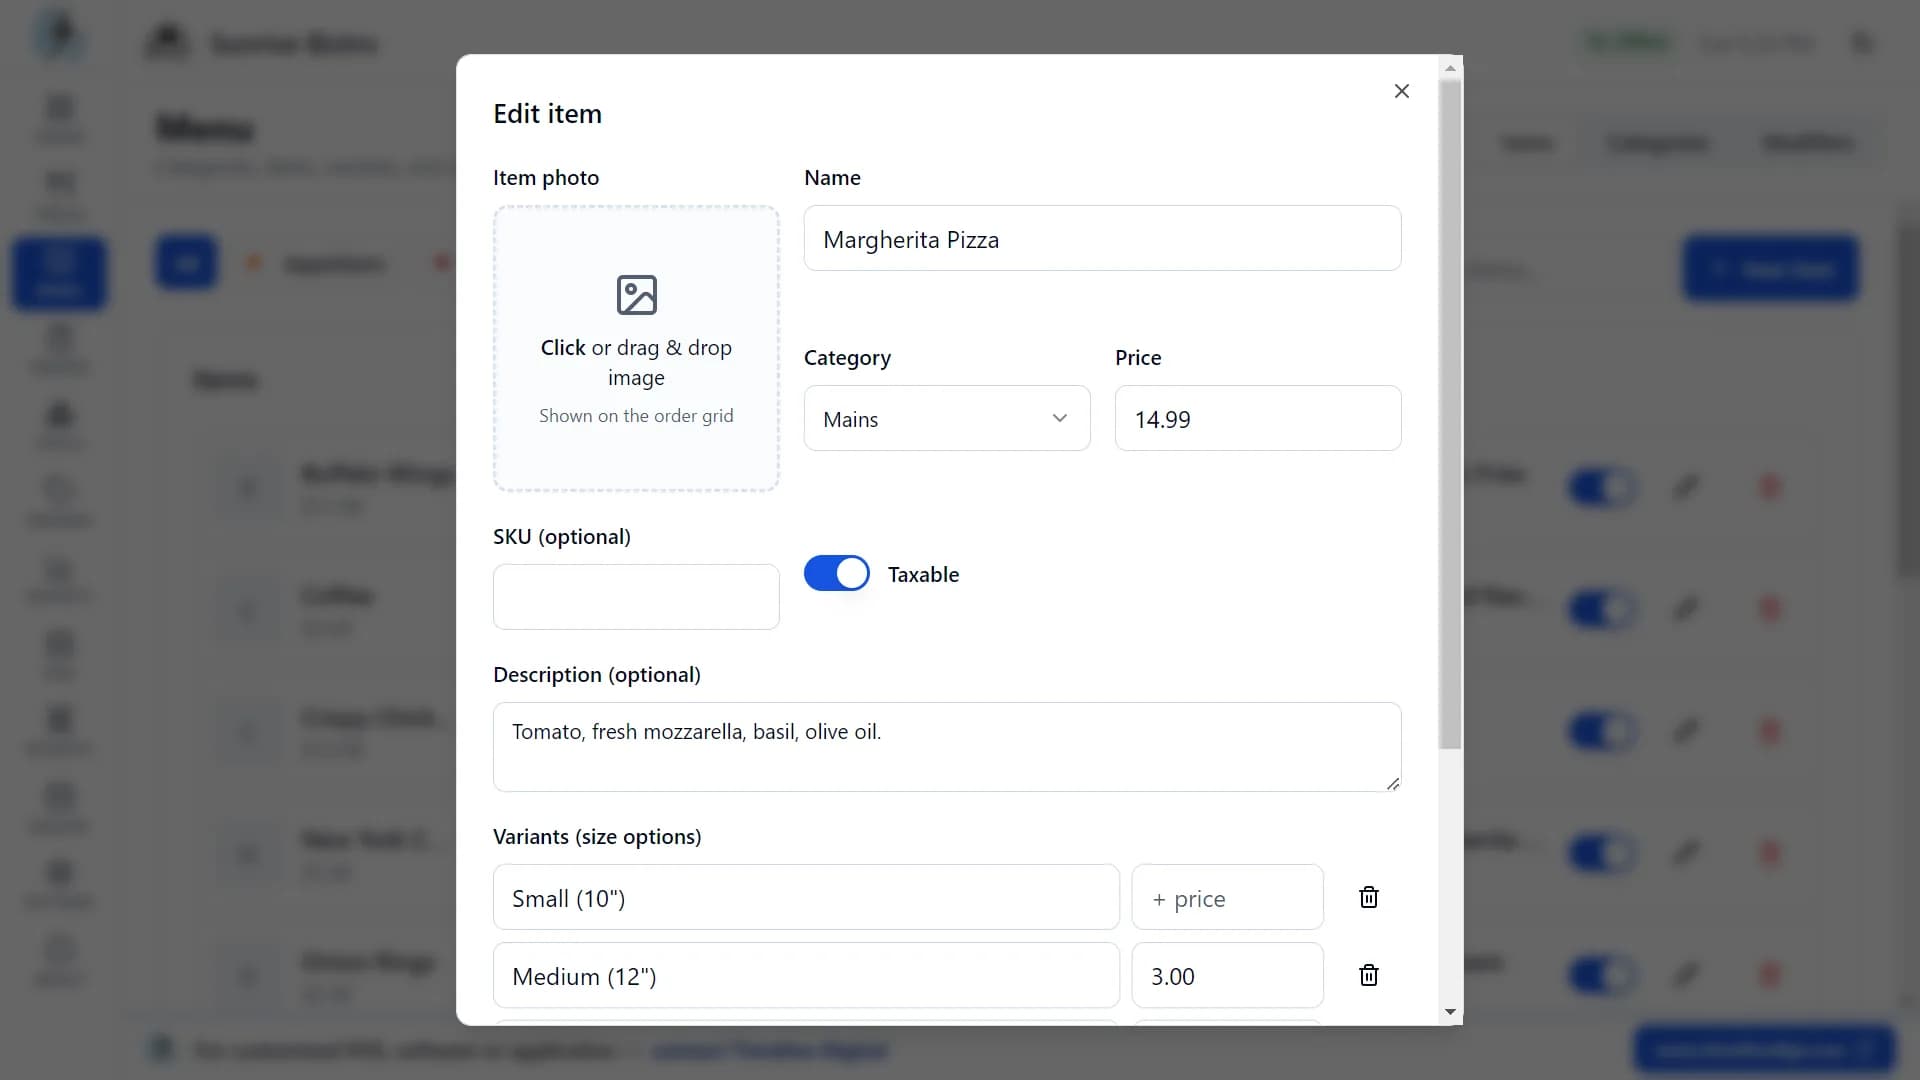
  3. Step 3: When an item has sizes or extras, a side panel opens. Choose the size, pick extras such as toppings, sauces or milk, add a note (for example "extra hot, no onions") and set the quantity. The price updates as you choose.
  4. Step 4: Pick every required choice. The item cannot be added until you do, so nothing is forgotten.
  5. Step 5: Change quantities with the plus and minus buttons, add a note to any line, or remove a line.
  6. Step 6: Add a note for the whole order if you need one. The subtotal, discount, tax and total update as you go.
  7. Step 7: Tap Kitchen to print a kitchen ticket. It shows the order number, table, order type and time, every item with its size, extras and notes, and the order note.
Timeline Restaurants POS: side panel for choosing an item's size, extras, note and quantity
Choose sizes, extras, notes and quantity

Lesson 4 of 184:26 video

How to take takeout and delivery orders, and hold an order

Takeout and delivery orders work like dine-in orders, without a table. Hold lets you park an order and serve the next customer.

In this video: Order types, customer notes, hold and resume.

  1. Step 1: Choose Takeout or Delivery as the order type. You can switch at any time, even after items are added. The app remembers the type you used last.
  2. Step 2: Add items the same way as for a dine-in order.
  3. Step 3: Use the order note for the customer's name, phone number and address.
  4. Step 4: Is the customer still deciding? Tap Hold. The order is saved and set aside, and the screen is clear for the next customer.
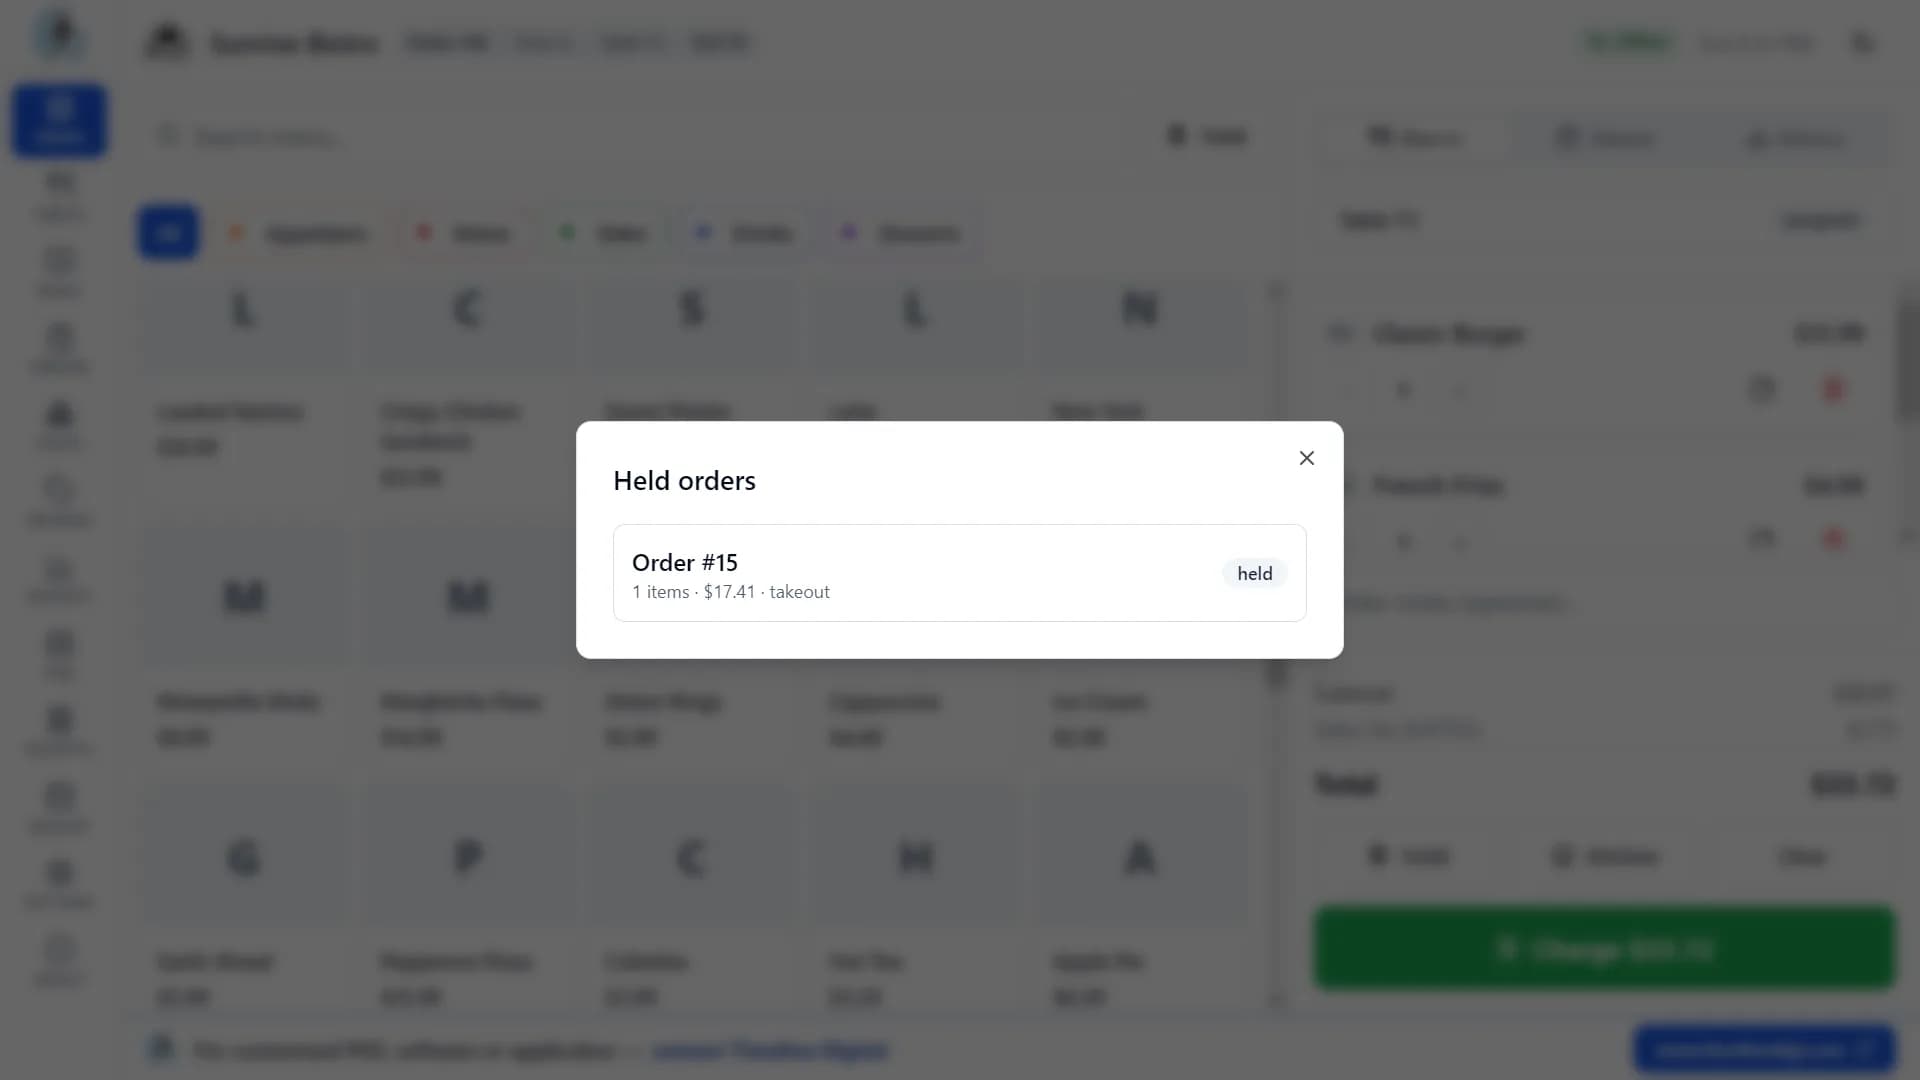
  5. Step 5: Tap Held to see every parked order, with its item count, total and order type.
  6. Step 6: Tap a held order to bring it back and carry on.
  7. Step 7: If you hold a dine-in order, its table is freed. When you resume it, it goes back to the same table if that table is still free.
Timeline Restaurants POS: list of held orders with item count, total and order type
Park an order and bring it back later

Lesson 5 of 184:57 video

How to take payment and print the receipt

When the guests are ready to pay, one screen handles cash, card, tips and discounts.

In this video: Cash, card, tips, discounts and receipts.

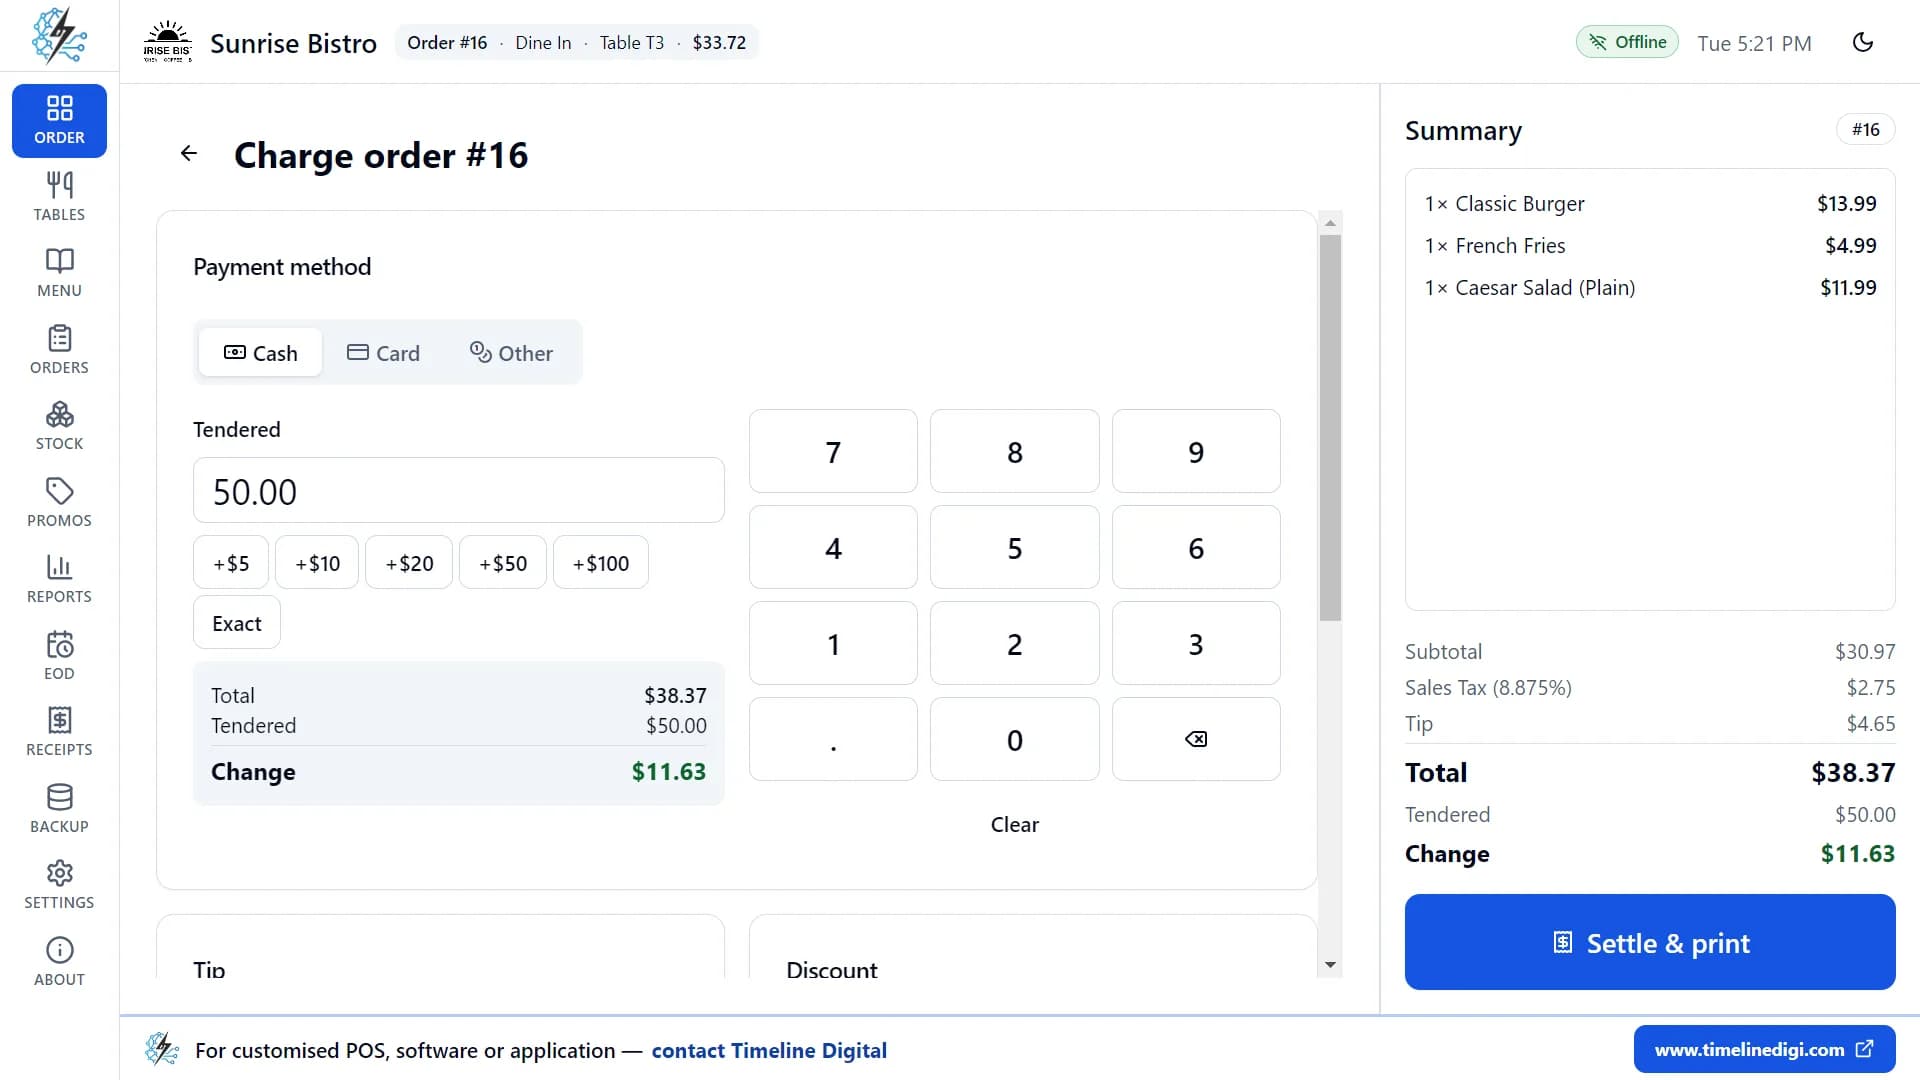
  1. Step 1: Tap Charge. The payment screen shows the full bill on the right and the payment options on the left.
  2. Step 2: For cash, type the amount the customer hands you or use the on-screen number pad. Quick buttons add 5, 10, 20, 50 or 100, and Exact fills in the exact amount. The change is worked out for you.
  3. Step 3: For card, take the payment on your own card terminal, then mark it paid. You can type a reference, such as the last four digits. The app does not connect to card terminals.
  4. Step 4: Use Other for gift cards, vouchers or staff meals, with an optional reference.
  5. Step 5: Add a tip with one of the tip buttons, type a custom amount, or choose No tip. Tips are shown on the receipt.
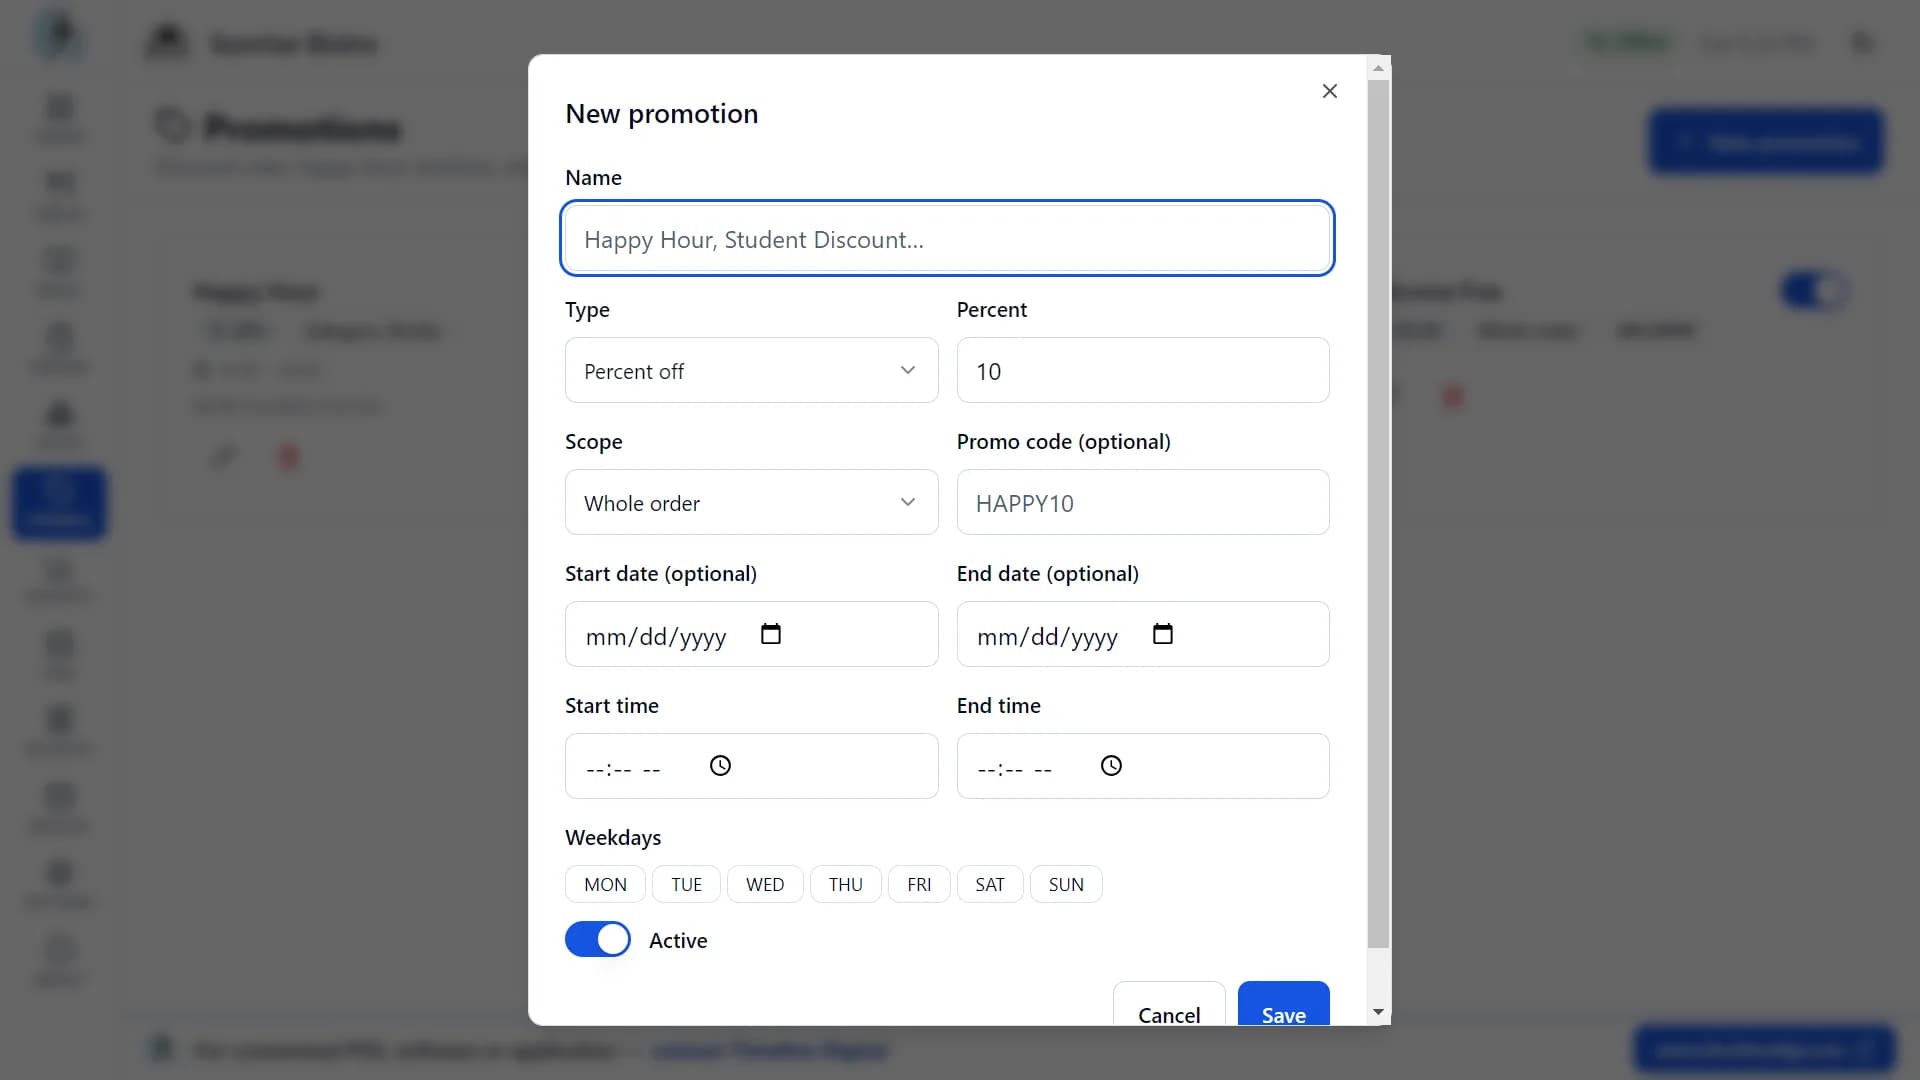
  6. Step 6: Check the discount. Automatic promotions are applied for you. You can also type a promo code, or add a manual discount as a percentage or a fixed amount.
  7. Step 7: Tap Settle and print. This finishes the sale, frees the table, updates your stock, prints the receipt and opens the cash drawer for cash payments if you have one connected.
  8. Step 8: If the printer fails, the sale is still saved and you can reprint the receipt later.
Timeline Restaurants POS: cash payment with a tip selected and the change calculated
Tips in one tap, with change worked out for you

Lesson 6 of 183:17 video

How to find an order and reprint a receipt

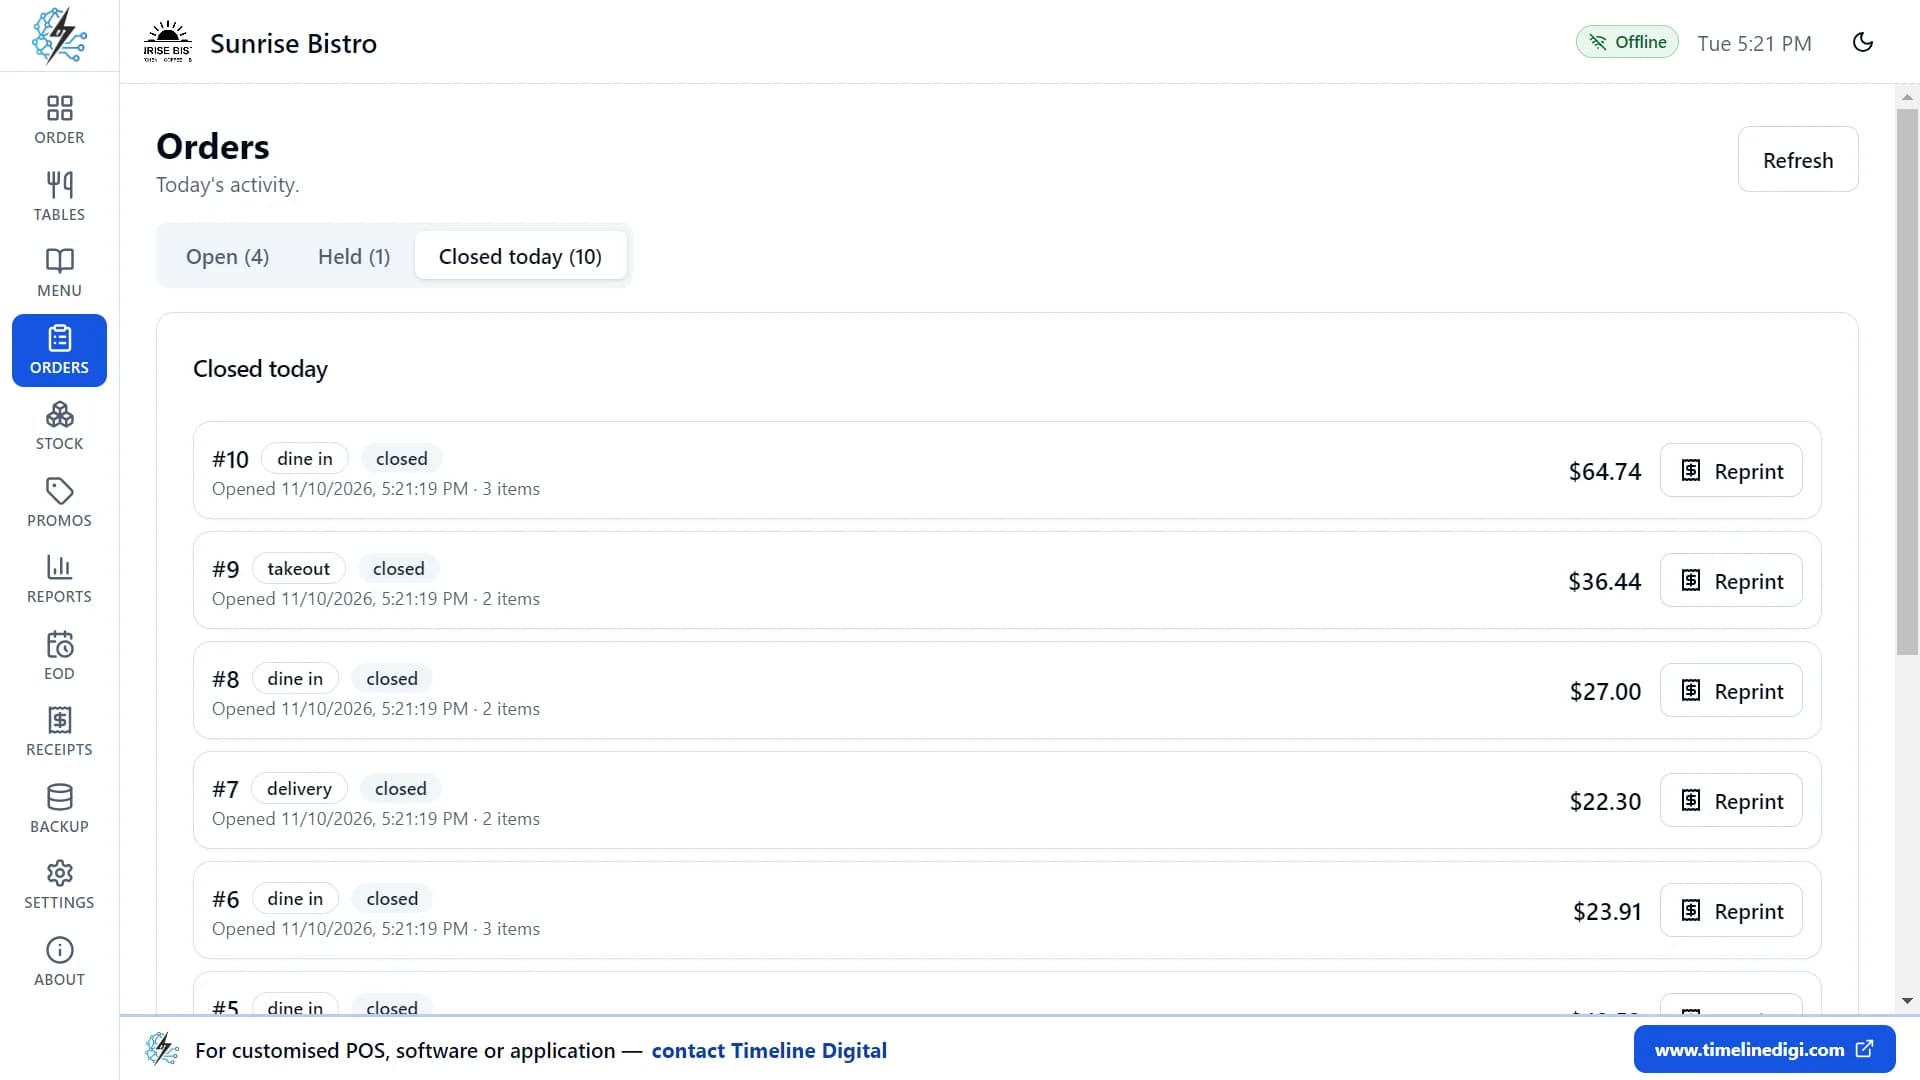
The Orders page shows today's activity in three tabs.

In this video: Open, held and closed orders; reprinting.

  1. Step 1: Open the Orders page.
  2. Step 2: Open tab: these orders are still running. Tap Open to continue one.
  3. Step 3: Held tab: these orders are parked. Tap Resume to bring one back.
  4. Step 4: Closed today tab: these orders are paid. Tap Reprint to print a copy of any receipt. The copy is clearly marked "REPRINT".
  5. Step 5: Read each row to check an order: its number, type, status, table, the time it was opened, the number of items and the total.
  6. Step 6: To look at earlier days, use Reports.
Timeline Restaurants POS: orders page, Closed today tab, with a Reprint button on each paid order
Reprint the receipt of any paid order

Lesson 7 of 183:46 video

How to manage tables and your floor plan

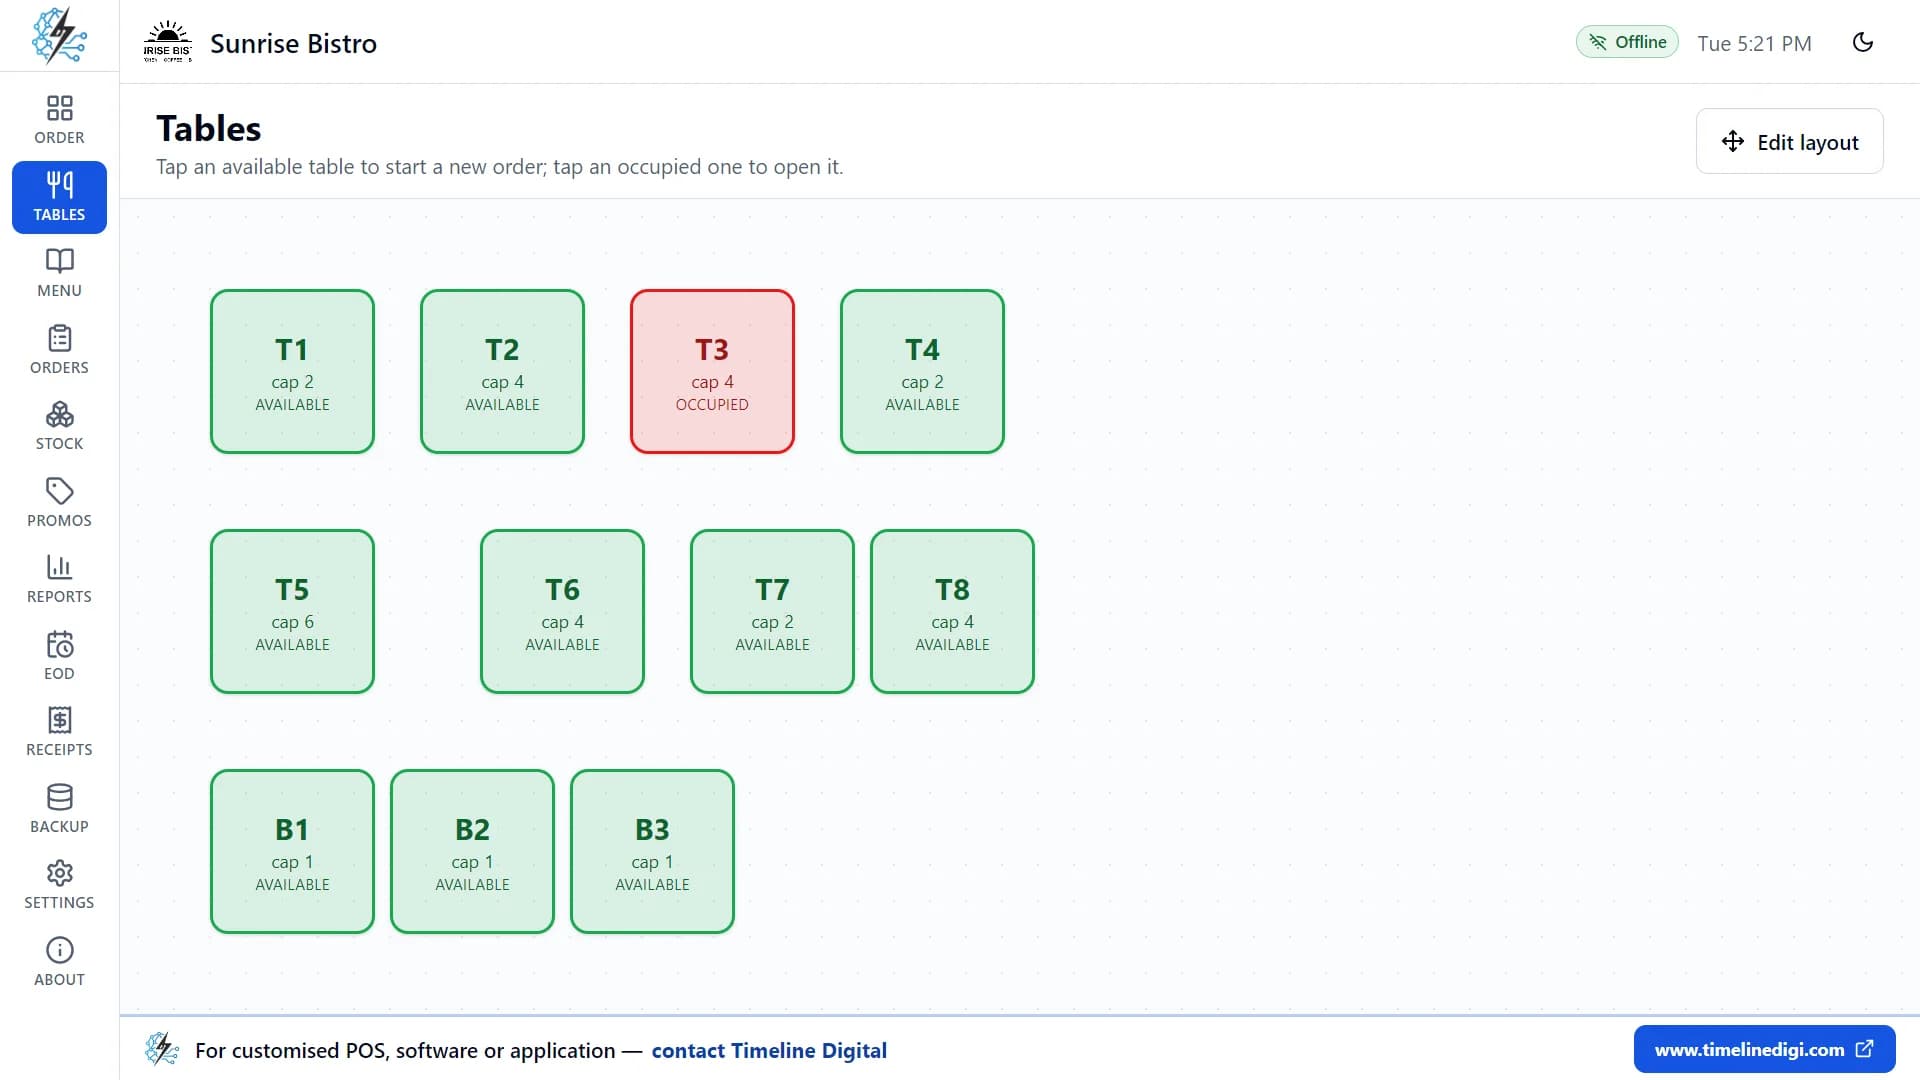
The Tables page shows your whole dining room, and you can arrange it to match the real one.

In this video: Floor plan, statuses and layout.

  1. Step 1: Open the Tables page. Every table shows its name, number of seats and status.
  2. Step 2: Read the colours: green is available, red is occupied, amber is reserved and blue is being cleaned.
  3. Step 3: Tap a free table to start a dine-in order for it. Tap a busy table to open its order.
  4. Step 4: Right-click a table to mark it reserved or being cleaned.
  5. Step 5: You do not need to mark tables busy by hand. A table turns red when an order is open on it, and is freed when the bill is paid.
  6. Step 6: Turn on Edit layout and drag the tables to where they really are.
  7. Step 7: While Edit layout is on, add new tables with a name and number of seats, or delete tables you no longer use.
Timeline Restaurants POS: floor plan showing each table's seats and status in colour
See every table's status at a glance
Part 4 of 4 · Lessons 13 to 18

Reports, printing, settings and backup

Read your sales, close the day, connect your printer and keep your data safe.

Lesson 13 of 183:07 video

How to read your sales reports

Reports show what you sold, what sells best and how customers paid.

In this video: Totals, best sellers, payments and export.

  1. Step 1: Open the Reports page and choose a date range: Today, the last 7 days, the last 30 days, or any custom range.
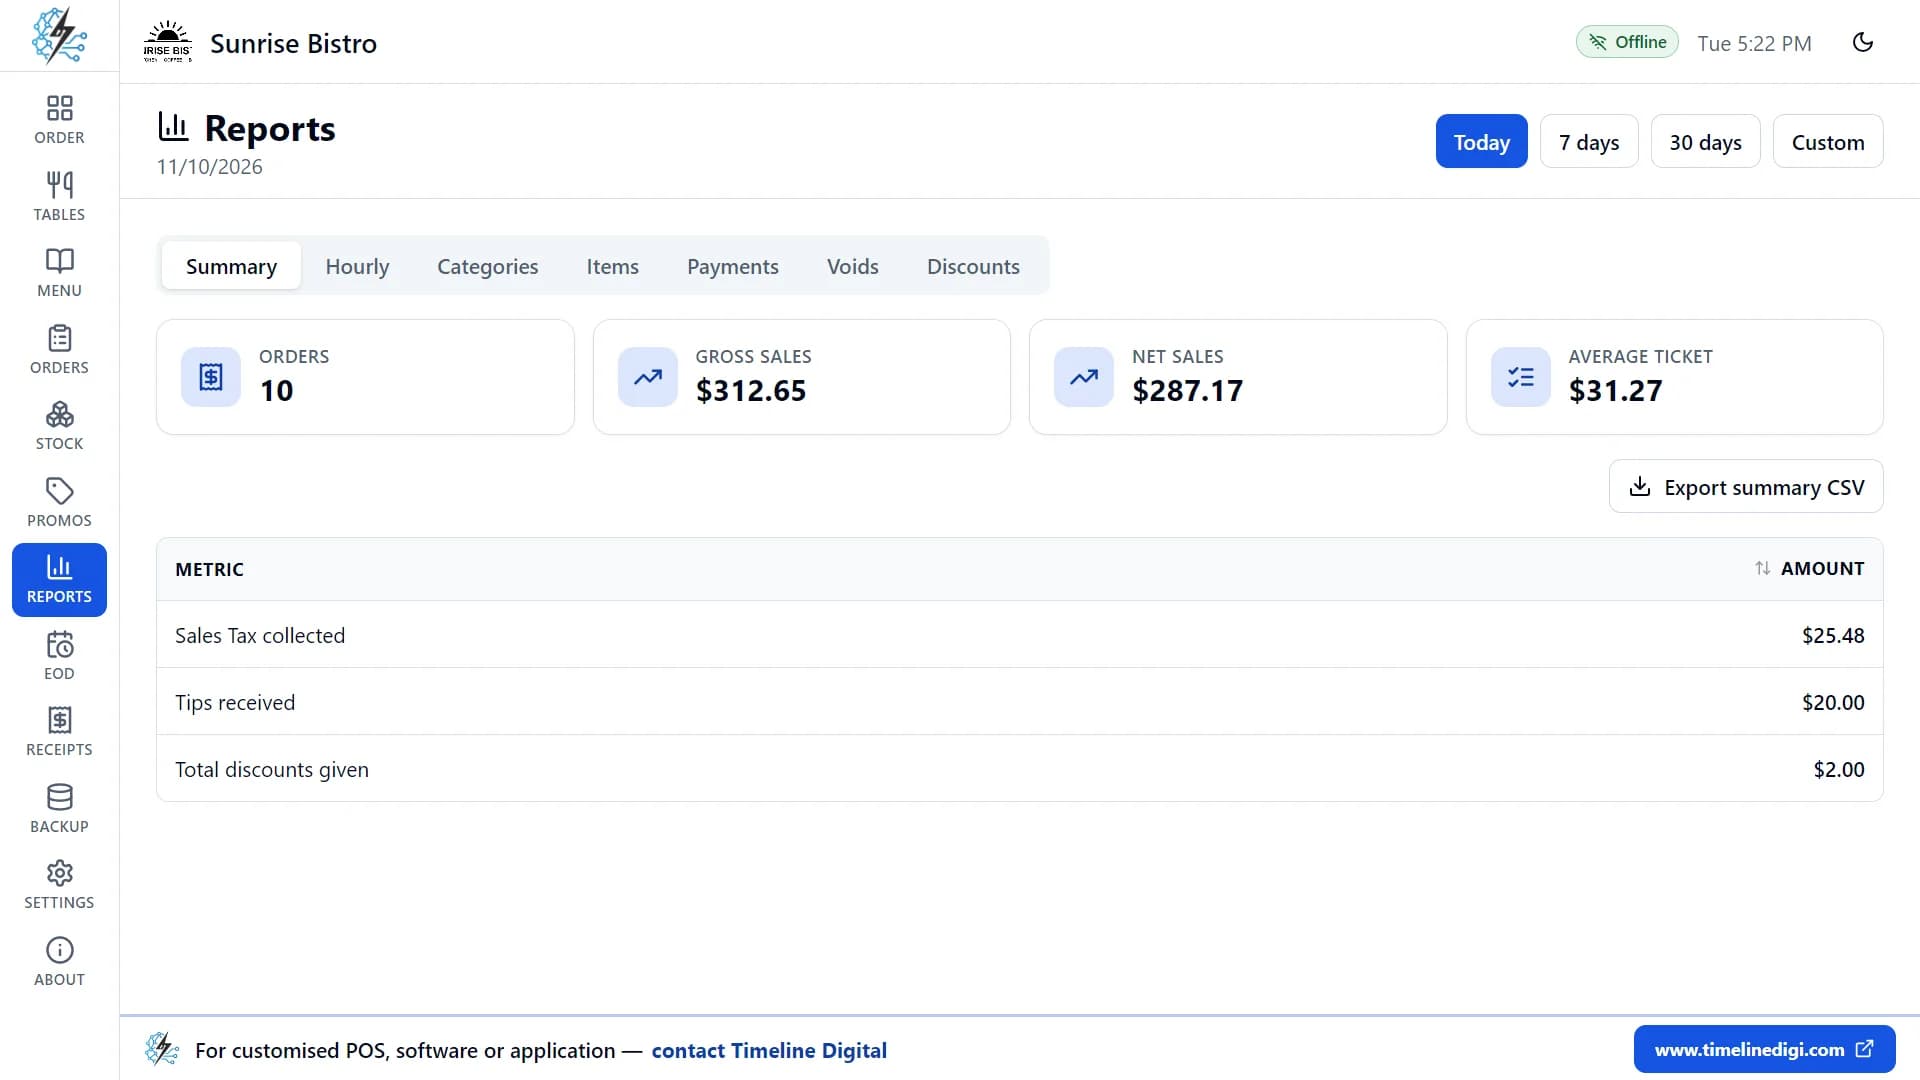
  2. Step 2: Read the Summary: number of orders, gross sales, net sales (without tax and tips), average ticket, tax collected, tips received and discounts given.
  3. Step 3: Open Categories to see what each category sold.
  4. Step 4: Open Items to see your best sellers, by quantity and sales.
  5. Step 5: Open Payments to see the totals for cash, card and other payments.
  6. Step 6: Open Discounts to see every discount given, by order.
  7. Step 7: Sort or search any table to find what you need.
  8. Step 8: Export any report to a CSV file. It opens in Excel or Google Sheets.
Timeline Restaurants POS: sales summary with orders, gross and net sales, average ticket, tax and tips
Today's orders, sales, average ticket, tax and tips

Lesson 14 of 183:59 video

How to close the day and print a Z-report

A shift tracks the cash in your drawer from opening to closing. The Z-report is the summary you print at the end.

In this video: Shifts, cash in and out, cash count, Z-report.

  1. Step 1: Open the End of day page and open a shift with the cash you start with in the drawer.
  2. Step 2: During the day, record cash added to or taken from the drawer as paid in or paid out, with a reason, for example "Fresh herbs from the market".
  3. Step 3: At the end of the day, close the shift. Count the cash in the drawer and enter the amount.
  4. Step 4: Check the result. The app shows the expected cash, your counted cash and any difference. Add a note if you need to.
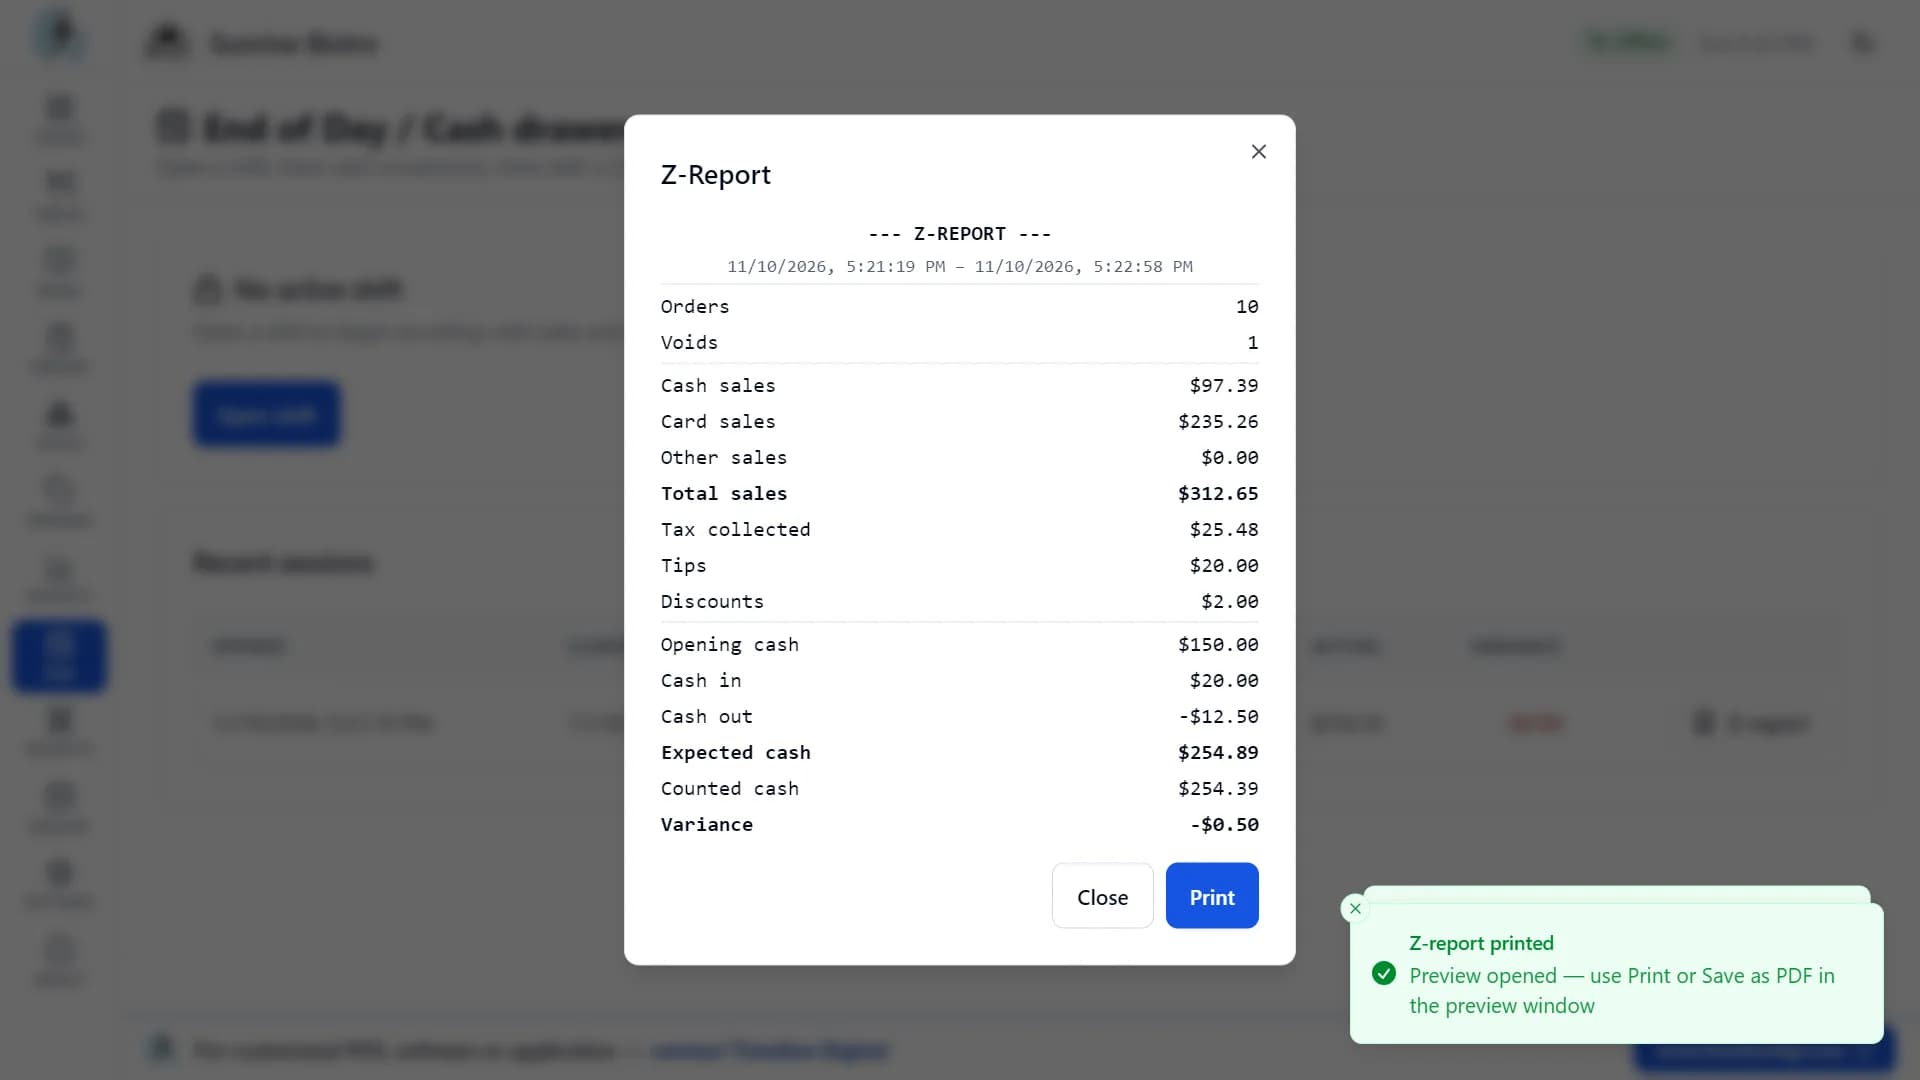
  5. Step 5: Print the Z-report. It shows the number of orders, cash, card and other sales, total sales, tax, tips and discounts, opening cash, cash in and cash out, and the expected cash, counted cash and difference.
  6. Step 6: Use the shift history to see your recent shifts with their cash counts. You can reopen or reprint any Z-report.
Timeline Restaurants POS: z-report on screen with expected cash, counted cash and the difference
Count the cash and see any difference

Lesson 15 of 184:00 video

How to design your receipt

Put your own name, logo and message on every receipt.

In this video: Logo, header, footer and paper size.

  1. Step 1: Open Settings and go to the Business tab. Add your logo, and check your restaurant name, address and phone number. They are printed on the receipt.
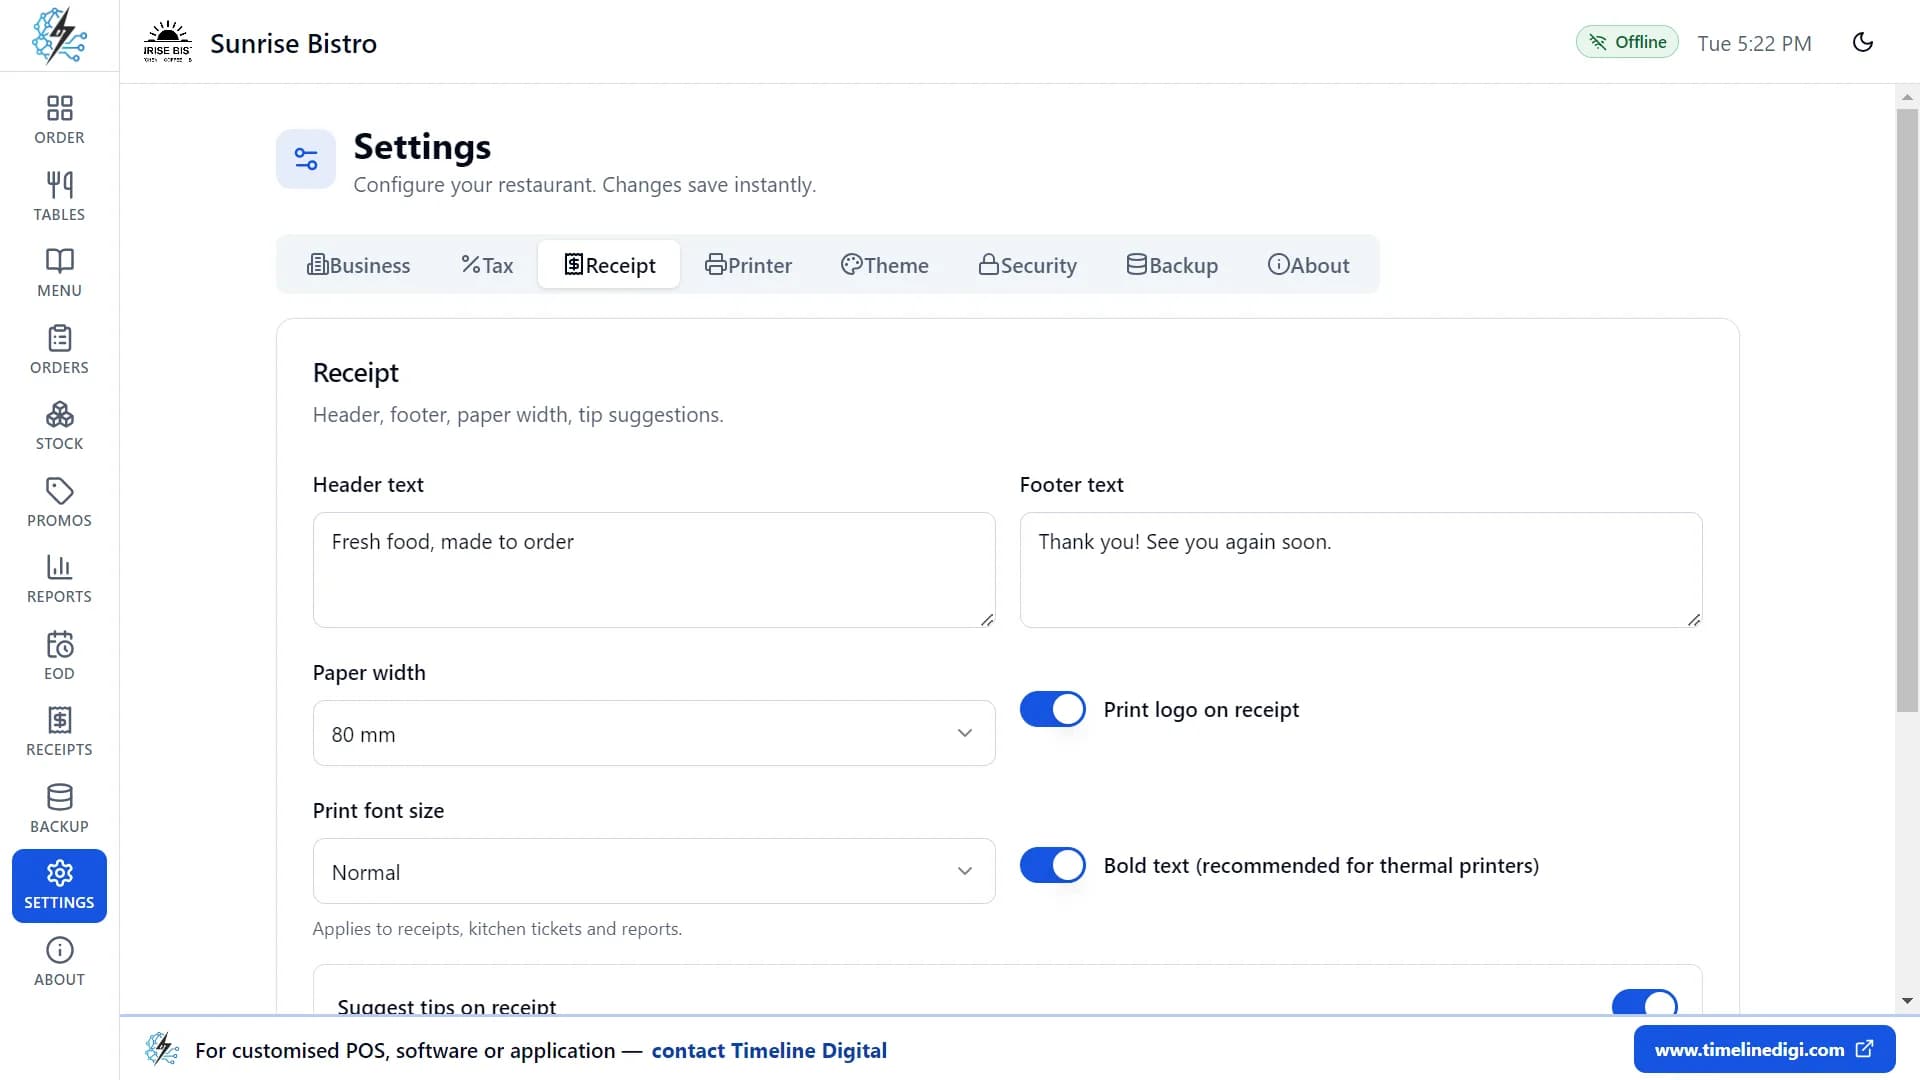
  2. Step 2: Go to the Receipt tab. Switch the logo on or off.
  3. Step 3: Type your header text, for example "Fresh food, made to order".
  4. Step 4: Type your footer text, for example "Thank you! See you again soon".
  5. Step 5: Choose your paper width: 58 mm and 80 mm are both supported.
  6. Step 6: Choose small, normal or large text. Bold text is recommended for thermal printers.
  7. Step 7: Choose the tip buttons shown at checkout: 15/18/20%, 18/20/25%, 10/15%, or your own.
  8. Step 8: Open the Receipts page to reprint the last receipt and see the result.

Good to know: The bottom of every receipt shows a short "Powered by Timeline Restaurants POS" line. This cannot be removed.

Timeline Restaurants POS: settings, Receipt tab: receipt design options
Design your receipt

Lesson 16 of 184:43 video

How to connect your receipt printer and cash drawer

Open Settings, go to the Printer tab and choose the connection that matches your printer.

In this video: Windows, network and serial printers; cash drawer.

  1. Step 1: Windows, USB printer or any printer installed in Windows: install the printer's Windows driver first. Choose "Windows printer (recommended)", pick your printer from the list, and click Save & send test page.
  2. Step 2: Network thermal printer: find the printer's IP address (most thermal printers print it on a self-test page). Choose "Network thermal printer" and enter the address, for example 192.168.1.50:9100.
  3. Step 3: Windows, serial or shared printer: choose "Serial port / shared printer" and enter the port (for example COM3) or the shared printer path.
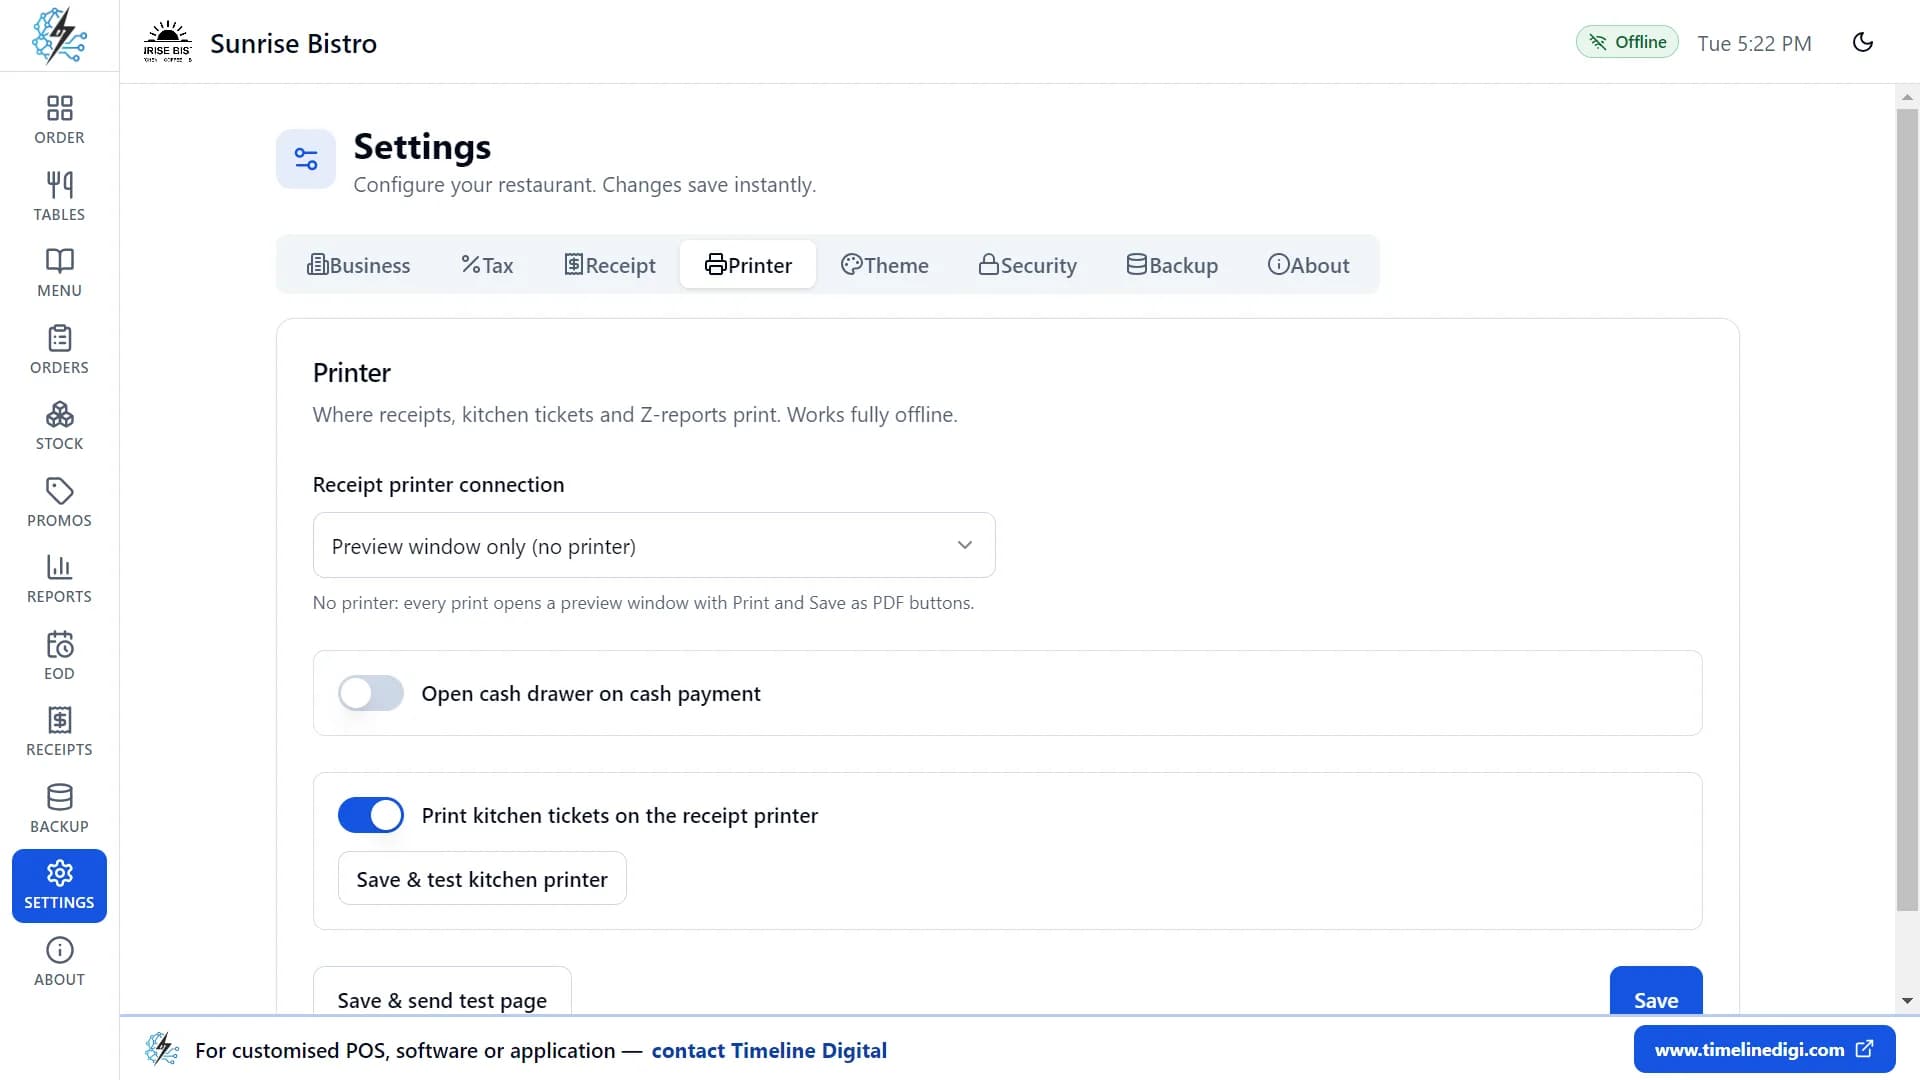
  4. Step 4: No printer yet? Choose the preview window. Every receipt opens in a preview, where you can print it or save it as a PDF. This is perfect for testing.
  5. Step 5: Cash drawer: turn on "Open cash drawer on cash payment", then use Open drawer to test it. The drawer works through your printer or a separate port.
  6. Step 6: Kitchen printer: print kitchen tickets on the receipt printer, or on a separate kitchen printer with its own settings.
  7. Step 7: Send a test page at any time to check the printer.

Good to know: Using a Mac? The "Windows printer" and COM port steps are for Windows PCs. The written steps and the video show the app on Windows. On a Mac, open the same Printer tab, choose the connection that matches your printer and send a test page to check it.

For more detail, read the receipt printer setup guide.

Timeline Restaurants POS: settings, Printer tab: receipt printer, kitchen printer and cash drawer
Connect your receipt and kitchen printers

Lesson 17 of 184:25 video

How to change your settings

Settings are grouped in tabs. This lesson walks through each one.

In this video: Every settings tab.

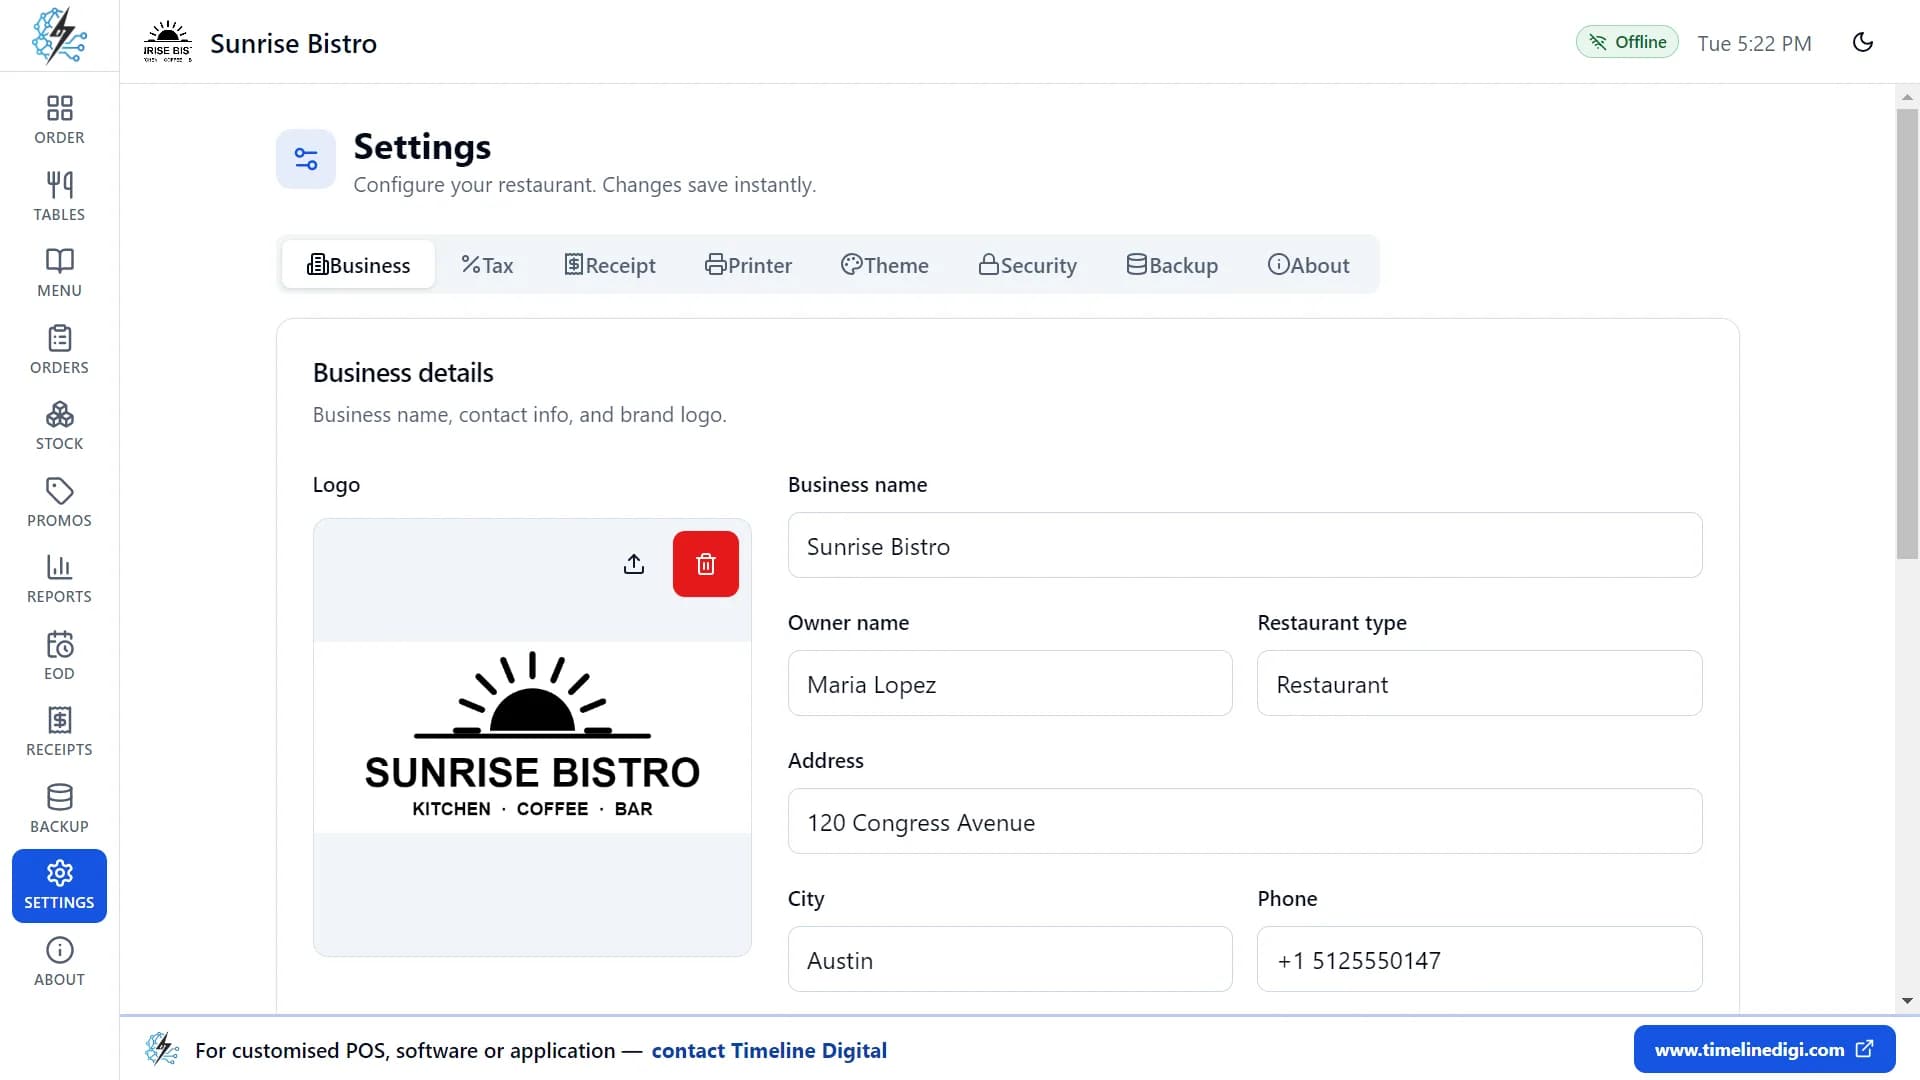
  1. Step 1: Business: your logo, business name, owner name, type of business, address, city, phone and email. Changing the country or region updates the currency, formats and tax.
  2. Step 2: Tax: choose whether tax is added at checkout (like US sales tax) or included in prices (like VAT), and set the tax name and rate. One tax rate applies to all items.
  3. Step 3: Receipt: the receipt design and the tip buttons shown at checkout (see lesson 15).
  4. Step 4: Printer: the receipt printer, kitchen printer and cash drawer (see lesson 16).
  5. Step 5: Theme: light, dark, or follow your system. You can also switch from the top bar.
  6. Step 6: Backup: the backup folder and automatic backup (see lesson 18).
  7. Step 7: About: version information and the sample data tools. Load the sample menu, clear all data while keeping your settings, or reset everything to the sample data.
Timeline Restaurants POS: settings, Business tab: logo, business details and region
Your logo, business details and region

Lesson 18 of 183:17 video

How to back up and restore your data

A backup is one zip file with your whole restaurant in it. Keep one on a USB drive and a broken computer cannot lose your data.

In this video: Backups, USB drives and restoring.

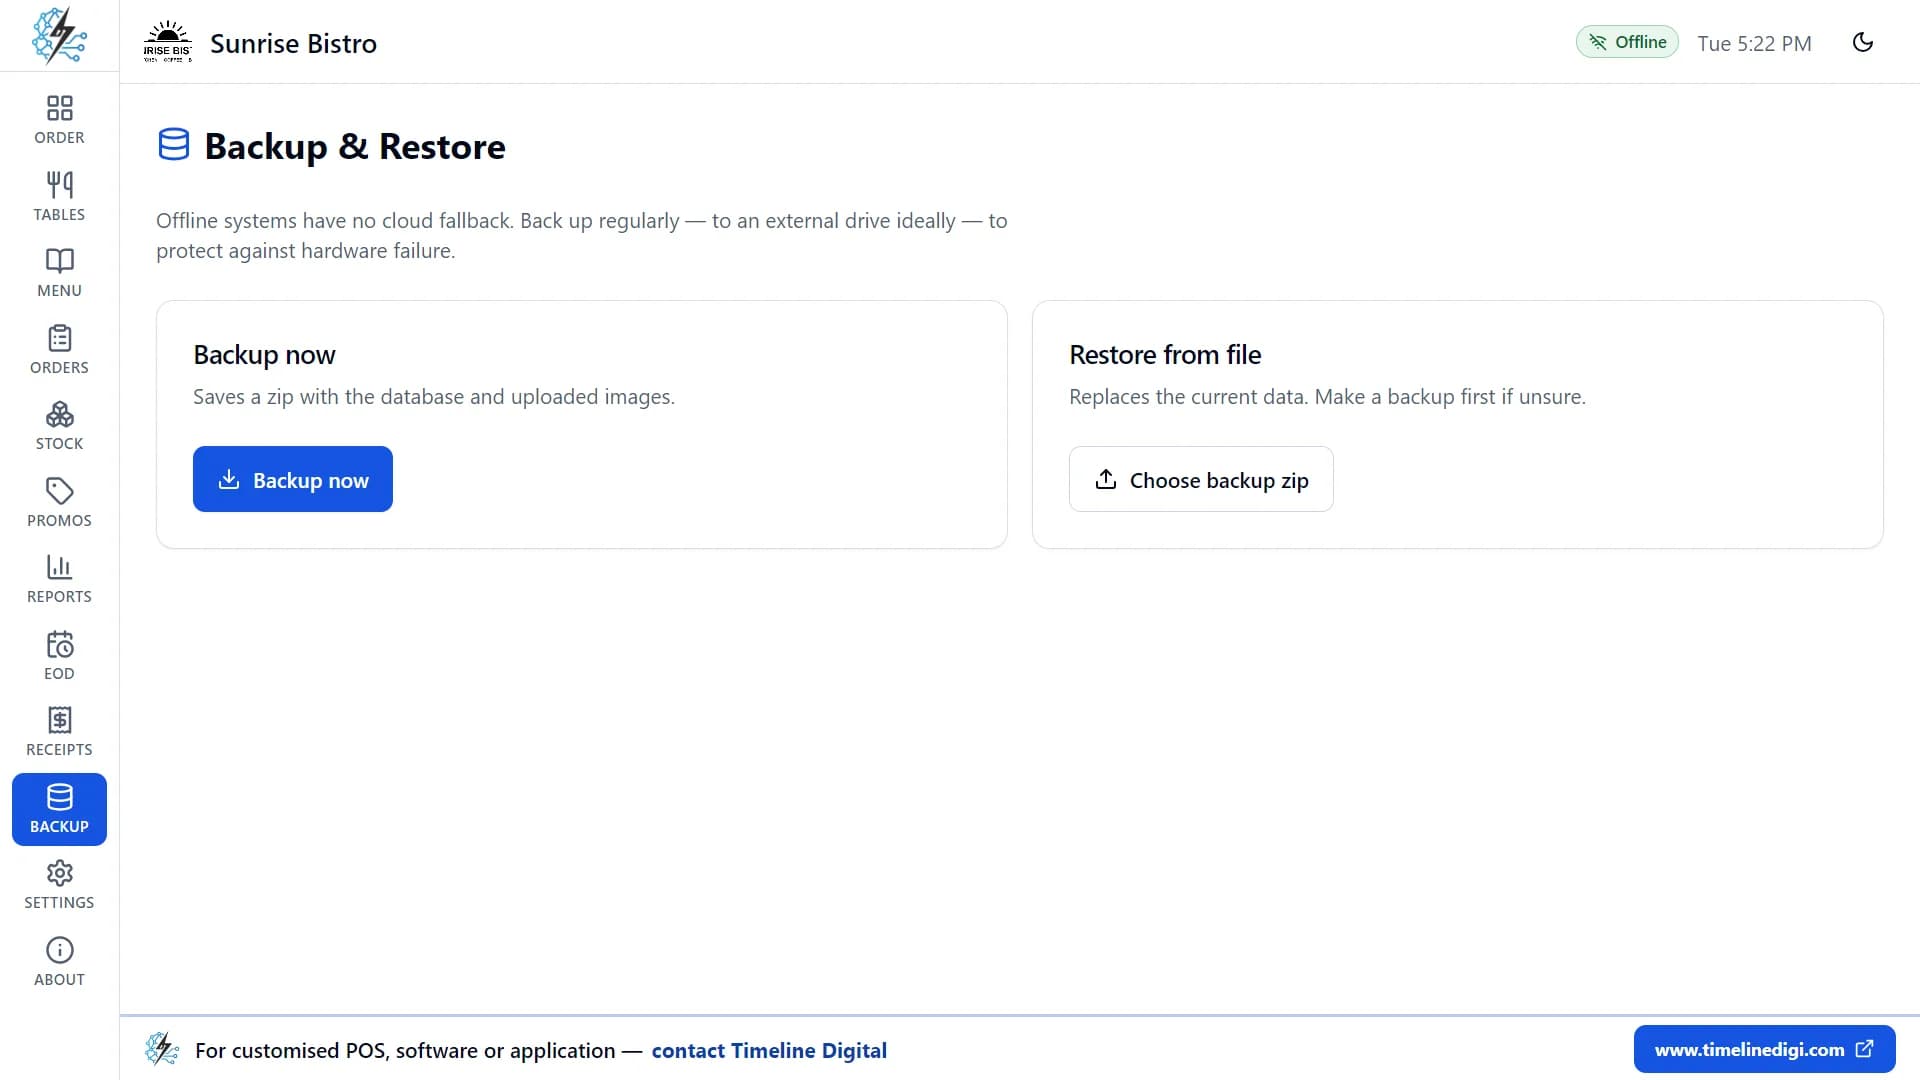
  1. Step 1: Open the Backup page and tap Backup now. Your whole restaurant (database and photos) is saved into one zip file.
  2. Step 2: Every backup gets the date and time in its name, so older backups are kept.
  3. Step 3: In Settings, on the Backup tab, choose where backups go, such as a USB drive. If the drive is not plugged in, the app tells you instead of saving somewhere else.
  4. Step 4: Turn on "Auto-backup on app close". A fresh backup is then made every time you close the app.
  5. Step 5: To restore, pick a backup zip. The app checks the backup first. It also saves a safety copy of your current data before replacing anything, and goes back to that copy if something goes wrong.
  6. Step 6: To move to a new computer, install the app there and restore your latest backup.
Timeline Restaurants POS: backup and restore page with a Backup now button
One-click backup and restore

Questions about learning the app

How long does it take to learn Timeline Restaurants POS?

About an afternoon. There are 18 short video lessons, about 74 minutes in total, and each one shows the real app step by step. Most lessons are between three and five minutes long.

Which lessons should I watch first?

Start with lesson 1 (first-time setup) and lesson 2 (a quick tour). Then watch lesson 3 (taking a dine-in order) and lesson 5 (billing and payment). After these four you can take an order and take payment. Watch the menu lessons (8 to 10) when you are ready to add your own dishes.

Can I practise without using my real menu?

Yes. During setup, turn on the sample data switch. It loads 34 menu items in 5 categories and 11 tables, so you can practise taking orders straight away. When you are ready, open Settings, go to the About tab and clear all data. This removes the sample menu and everything you entered while practising. Your settings are kept.

Do I need the internet to use the app or follow the lessons?

The app itself works without the internet. You need the internet to download it and to watch the videos. Every lesson on this page also has written steps, so you can follow along without watching.

Do the lessons work for both Windows and Mac?

Yes. Timeline Restaurants POS runs on one Windows PC or Mac, and the steps on this page are for both. Where a step is for Windows only, such as Windows printers and COM ports in the printer lesson, we say so. The app is not available for iPad, Android or Linux.

Are the videos and the app in English?

Yes. The videos have clear English narration and subtitles, and the app is in English. Prices, numbers and dates follow your country's format.

What if I need something the lessons do not cover?

The lessons cover every screen in the app. If your restaurant needs more than the free app can do, for example several tills that share data, Timeline Digital builds custom restaurant and POS systems. The pilot is free.

Free download · Version 2.0.1

Download the app and follow along

Timeline Restaurants POS is free. No subscription, no fees and no account. Pick the download for your computer.

Windows 10 or 11, 64-bit. On a Mac, choose Apple Silicon for an M1 or later Mac, and Intel for an older Mac with an Intel processor.

Install on Windows

  1. Download the installer and open it. The file is TimelineRestaurantsPOS-Setup-2.0.1.exe.
  2. Windows may show a blue "Windows protected your PC" message, because the app is new and not yet code-signed. Click More info, then Run anyway.
  3. Choose where to install, or keep the default, and finish. The app opens automatically.

Install on a Mac

  1. Download the .dmg file for your Mac and open it.
  2. Drag the app to Applications, then open it.
  3. If macOS says the app cannot be opened because the developer cannot be verified, right-click the app, choose Open, then Open again. If you do not see that choice, open System Settings, choose Privacy & Security, and click Open Anyway.

More about the files and installing them is on the free restaurant POS download page.

More about Timeline Restaurants POS