Free pilotSee working software before you commit to the full project.How the pilot works
User guide
How to use Timeline School Manager offline: 22 video lessons
Timeline School Manager is the free offline school management software from Timeline Digital for one Windows PC or Mac. Each of the 22 short lessons below has a video and written steps.
Watch lessons 1, 2 and 3 first. In under six minutes you will have installed the app, entered your school details, learned what the dashboard shows and set your logo, country and currency. Every other lesson builds on these three.
Getting started(1:45)Install the app, enter your school details and load sample data.
The dashboard(2:10)Counts, today's attendance, fee totals, reminders and shortcuts.
Settings(1:56)School details, logo, country and currency.
Want to practise first? At setup you can load sample data and try every feature on a made-up school before you enter your own records.
Before you start
The lessons run for about 46 minutes in total, and each one has written steps you can follow without watching. You can watch the full playlist on YouTube or play each video on this page.
Watch them in order, or jump to the one you need. The time beside each lesson is the length of its video.
Getting started and settings
Install the app, learn the dashboard and enter your school details. Lessons 1 to 3.
Lesson 1 of 22: Getting started (1:45 video)
How to install Timeline School Manager and set it up
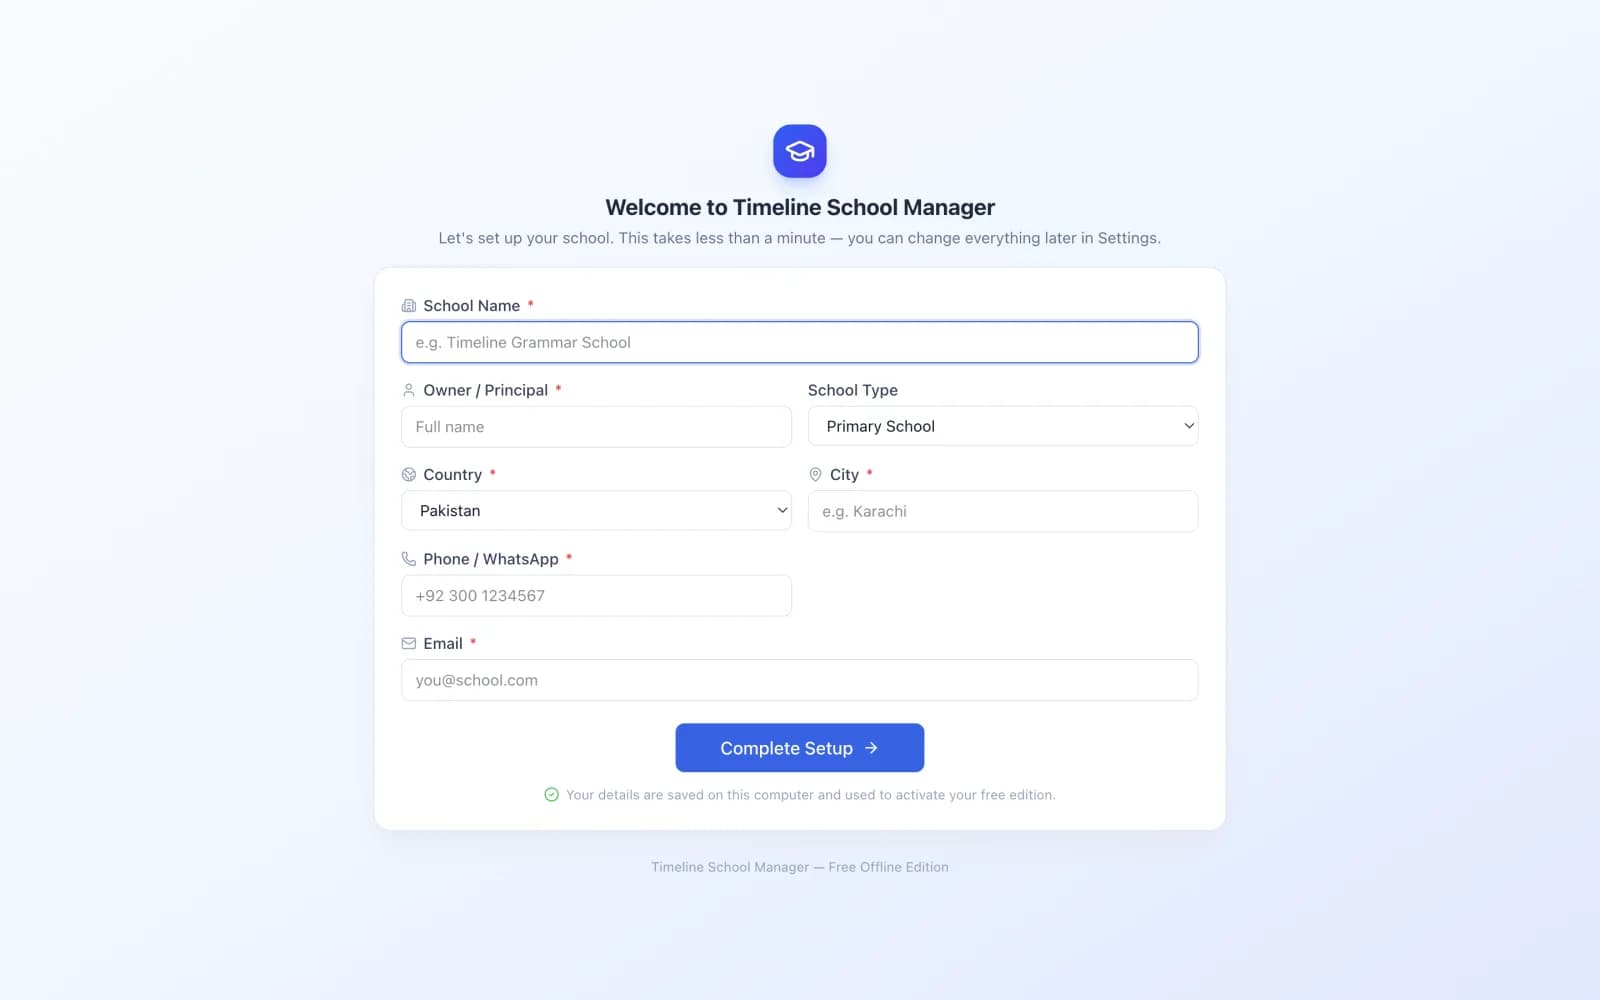
Setup takes about a minute. You type in a few details about your school and the app is ready.
In this video: Install the app, enter your school details and load sample data.
On Windows, download the installer, open the file and follow the steps. A shortcut is added to your desktop and Start menu.
On a Mac, download the DMG file, open it and drag Timeline School Manager into the Applications folder.
Open the app. The first-time setup screen asks for your school's name, principal, country, city, phone and email.
Fill in the details and finish. The app is ready to use.
Load the sample data if you want to try every feature before you enter your own records.
Good to know: The registration details you type in at setup (school name, principal's name, school type, country, city, phone and email) are sent once to Timeline Digital. No student, staff or fee records are ever sent.
First-time setup takes about a minute
Lesson 2 of 22: The dashboard (2:10 video)
How to read the dashboard
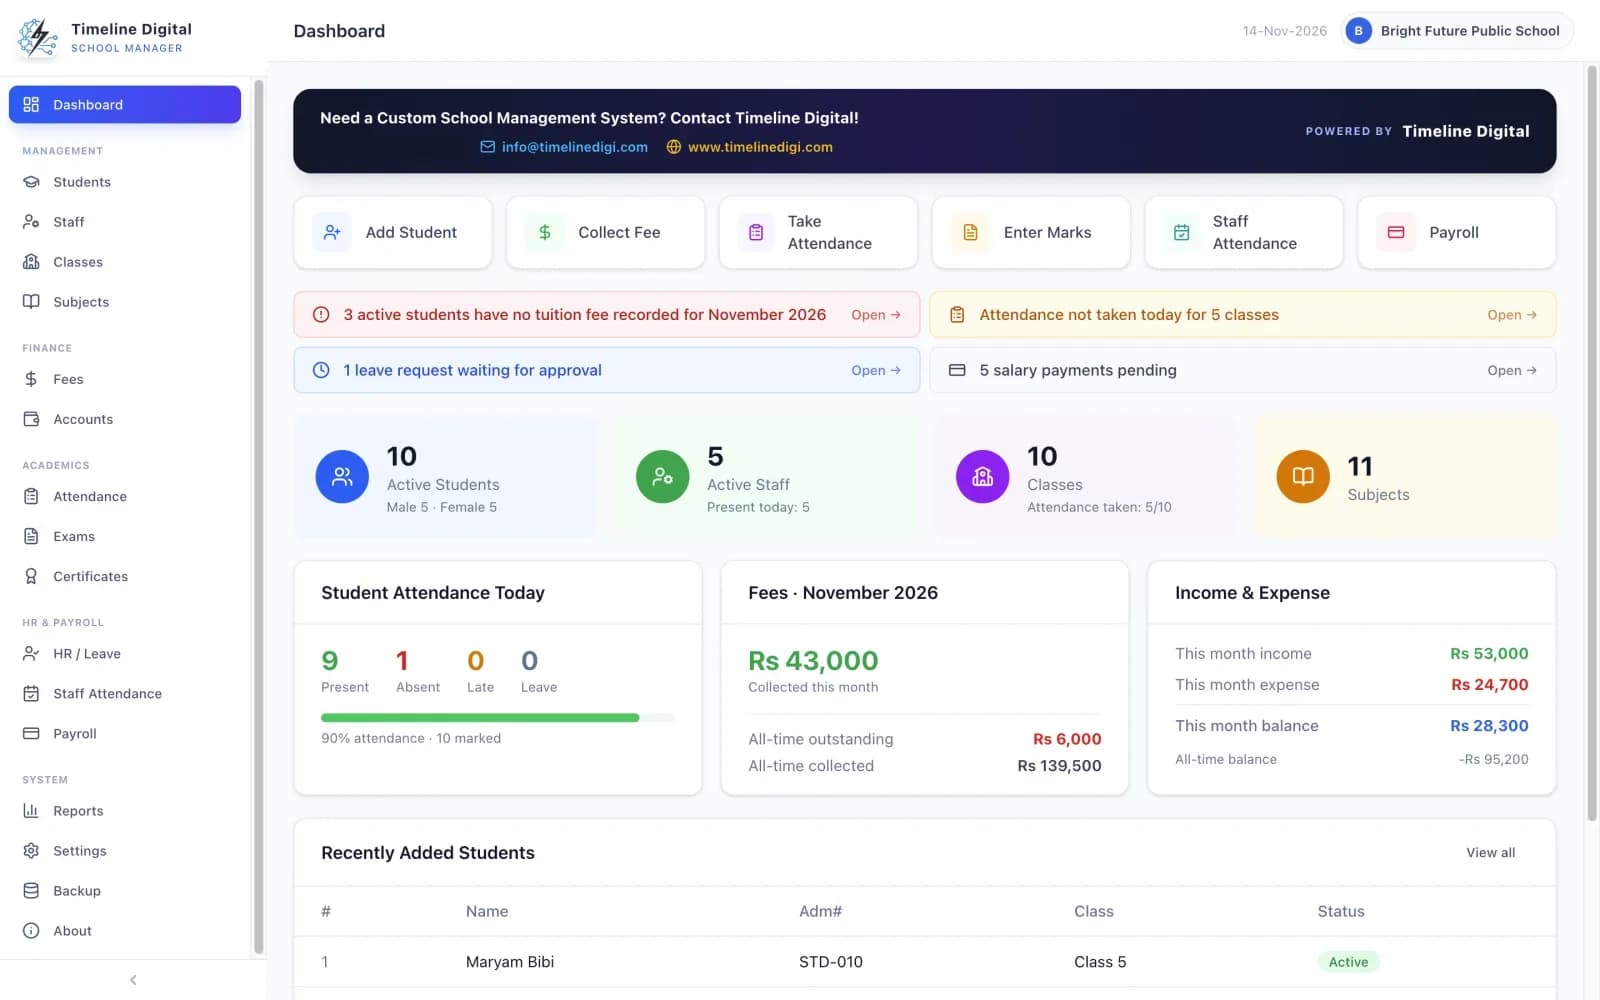
The dashboard is one screen that shows how the school is doing today.
In this video: Counts, today's attendance, fee totals, reminders and shortcuts.
Read the counts: active students (boys and girls), active staff, classes and subjects.
Check today's student attendance: present, absent, late and on leave, with a percentage.
Look at the money: this month's fee collection, total collected and total outstanding, plus this month's income, expense and balance.
Click a reminder to act on it. Reminders cover students with no fee recorded this month, classes whose attendance is not yet taken, leave requests waiting for approval, and salaries still pending.
Use the shortcut buttons for the daily jobs: Add Student, Collect Fee, Take Attendance, Enter Marks, Staff Attendance and Payroll.
Check the list of recently added students.
The dashboard: today's attendance, fees and reminders on one screen
Lesson 3 of 22: Settings (1:56 video)
How to enter your school details, logo and country
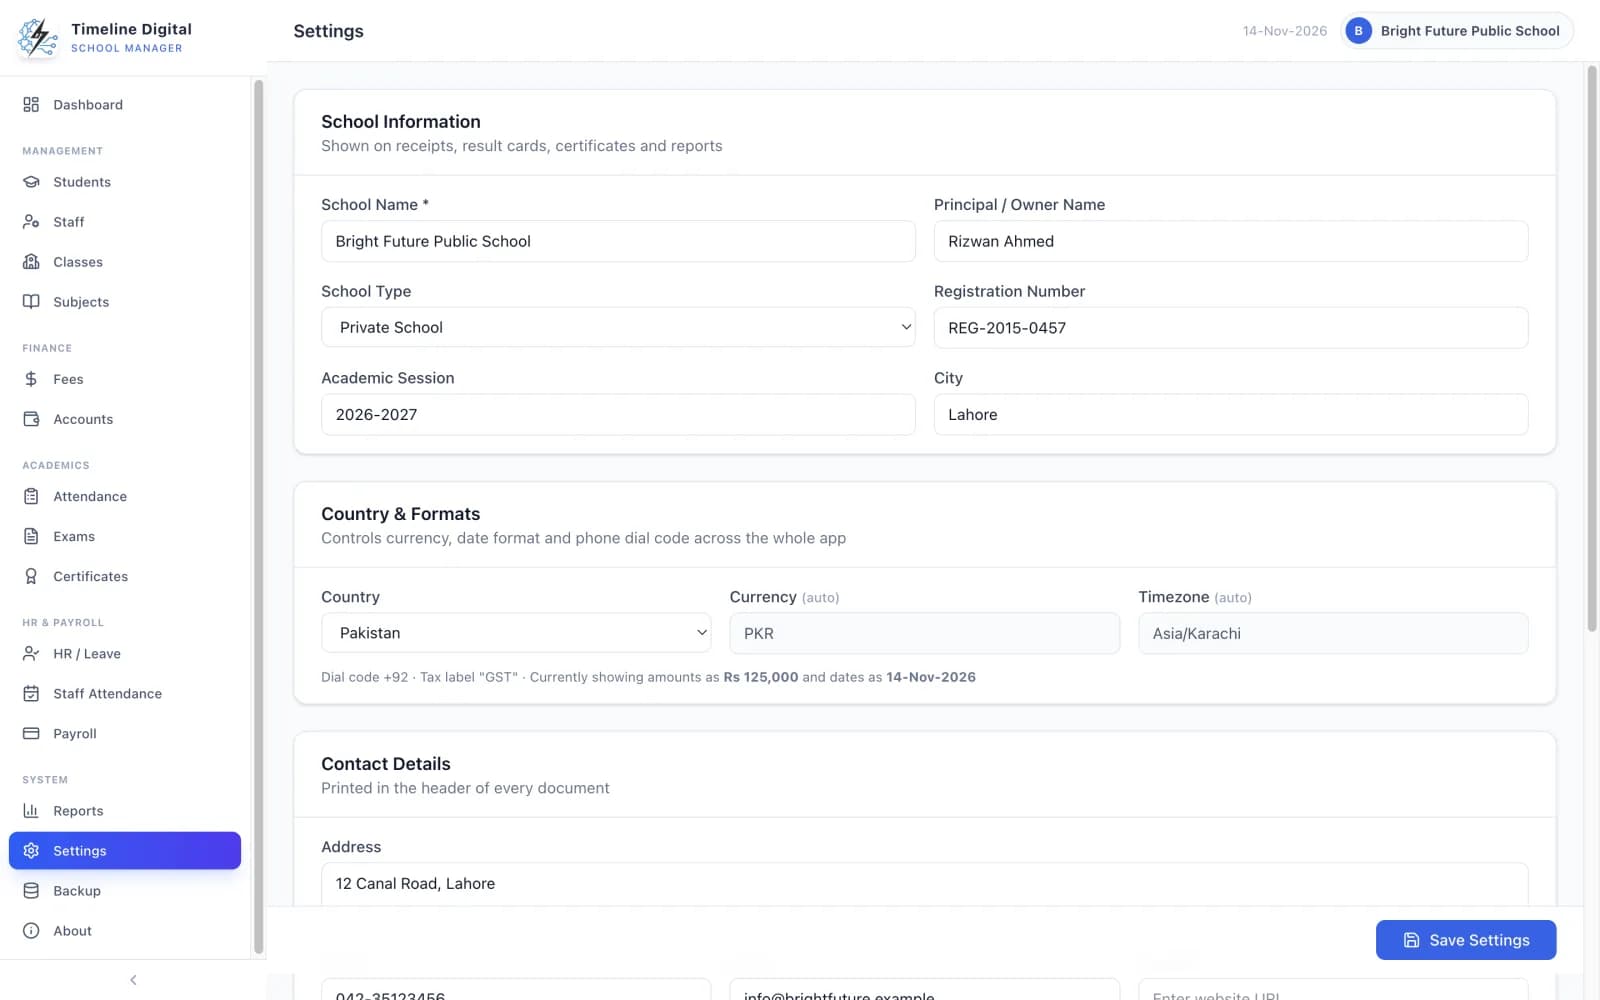
Settings holds the details that appear in the app and on every printed document.
In this video: School details, logo, country and currency.
Open Settings from the side menu.
Enter the school name, principal, registration number, academic session, school type, city, address, phone, email and website.
Upload your school logo. It appears in the app and on every printed document.
Choose your country from 84 options. The currency, date format and number format are set to match.
To lock the app with a password, see lesson 22.
School details, logo and country settings
Students, classes, subjects and staff
The records everything else is built on. Lessons 4 to 9.
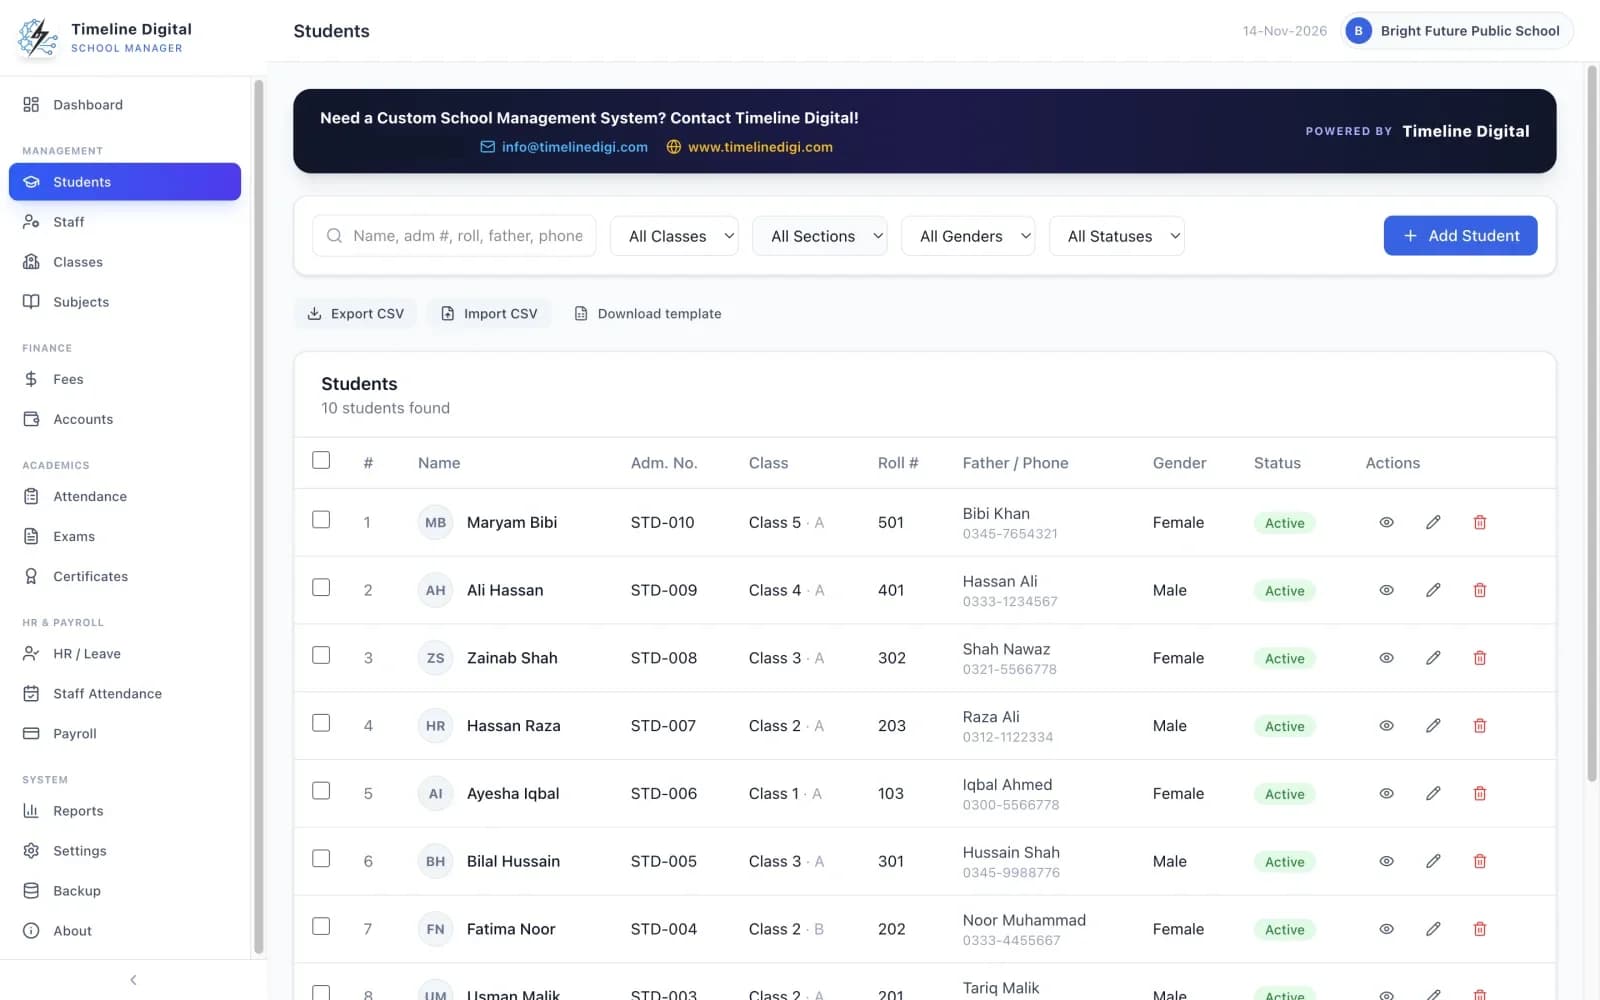
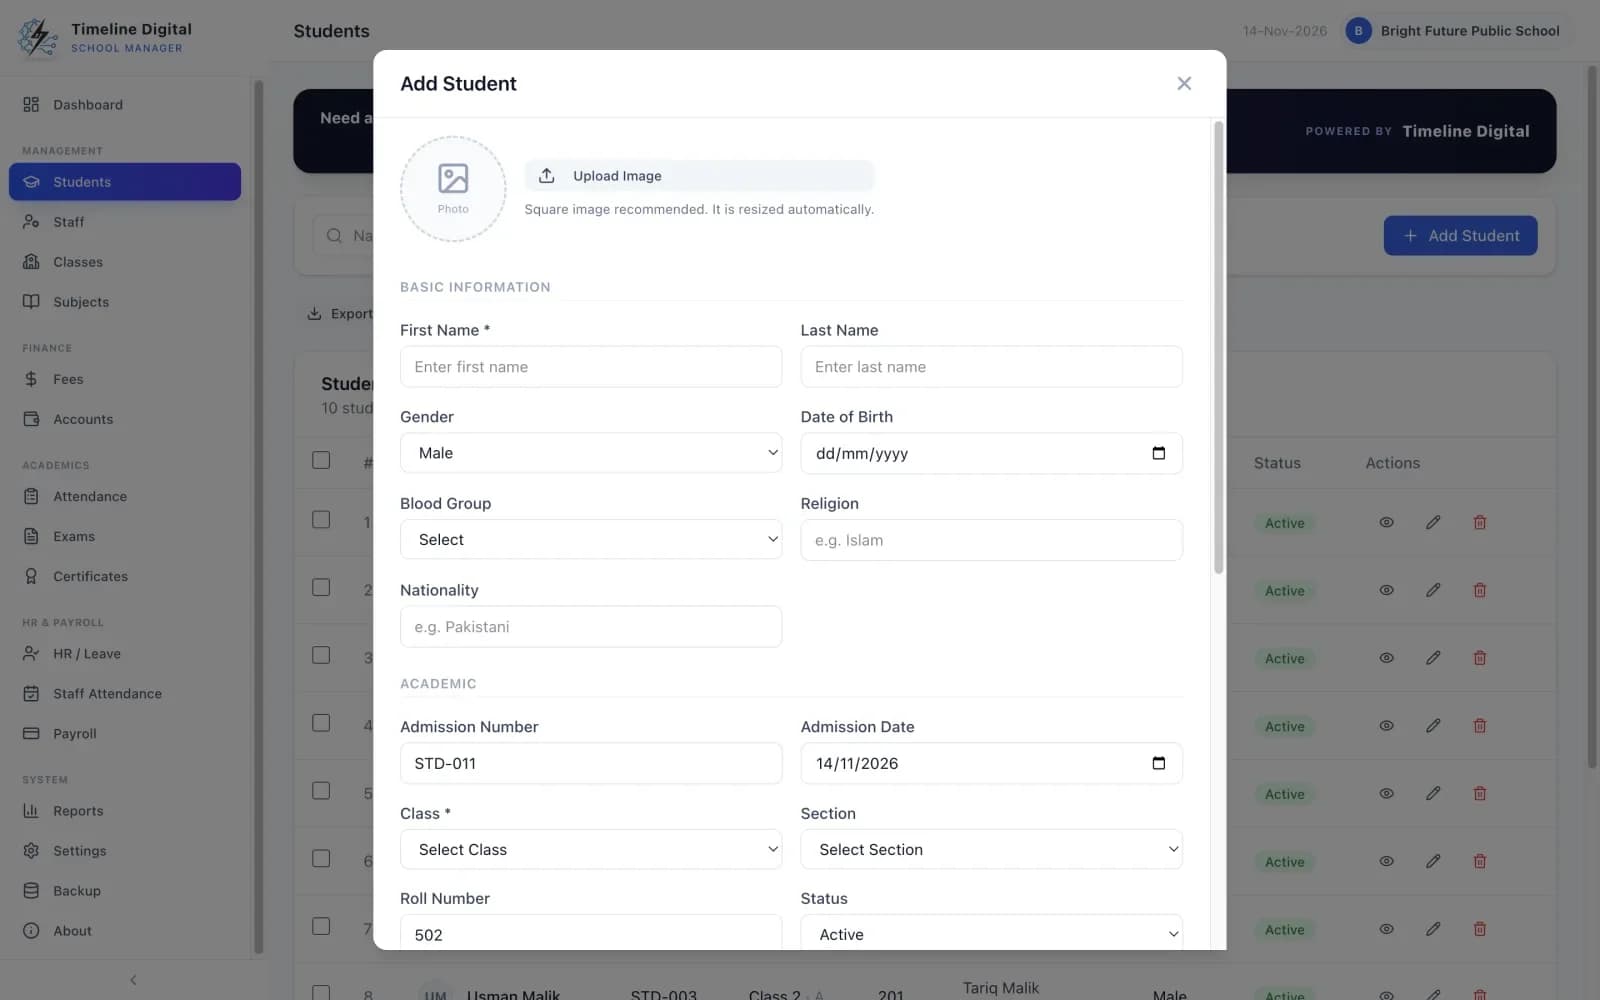
Each student has one record with three parts: student details, academic details and parent details.
In this video: Student, academic and parent details.
Open Students, or use the Add Student shortcut on the dashboard.
Enter the student's details: name, photo, gender, date of birth, blood group, religion and nationality.
Enter the academic details: admission number, admission date, class, section, roll number, previous school and status (Active or Inactive). The next roll number and admission number are suggested for you.
Enter the parent details: father's name and CNIC or ID number, mother's name, phone, email, emergency contact and address.
Save the student. If the admission number is already in use, the app warns you.
Add a student: personal, academic and parent details
Lesson 5 of 22: Managing students (2:04 video)
How to find, view, edit and print a student record
The student list has a search box and filters, so you can find any student quickly.
In this video: Search, filter, view, edit and print a profile.
Open Students to see the student list.
Search by name, admission number, roll number, father's name or phone.
Filter the list by class, section, gender and status.
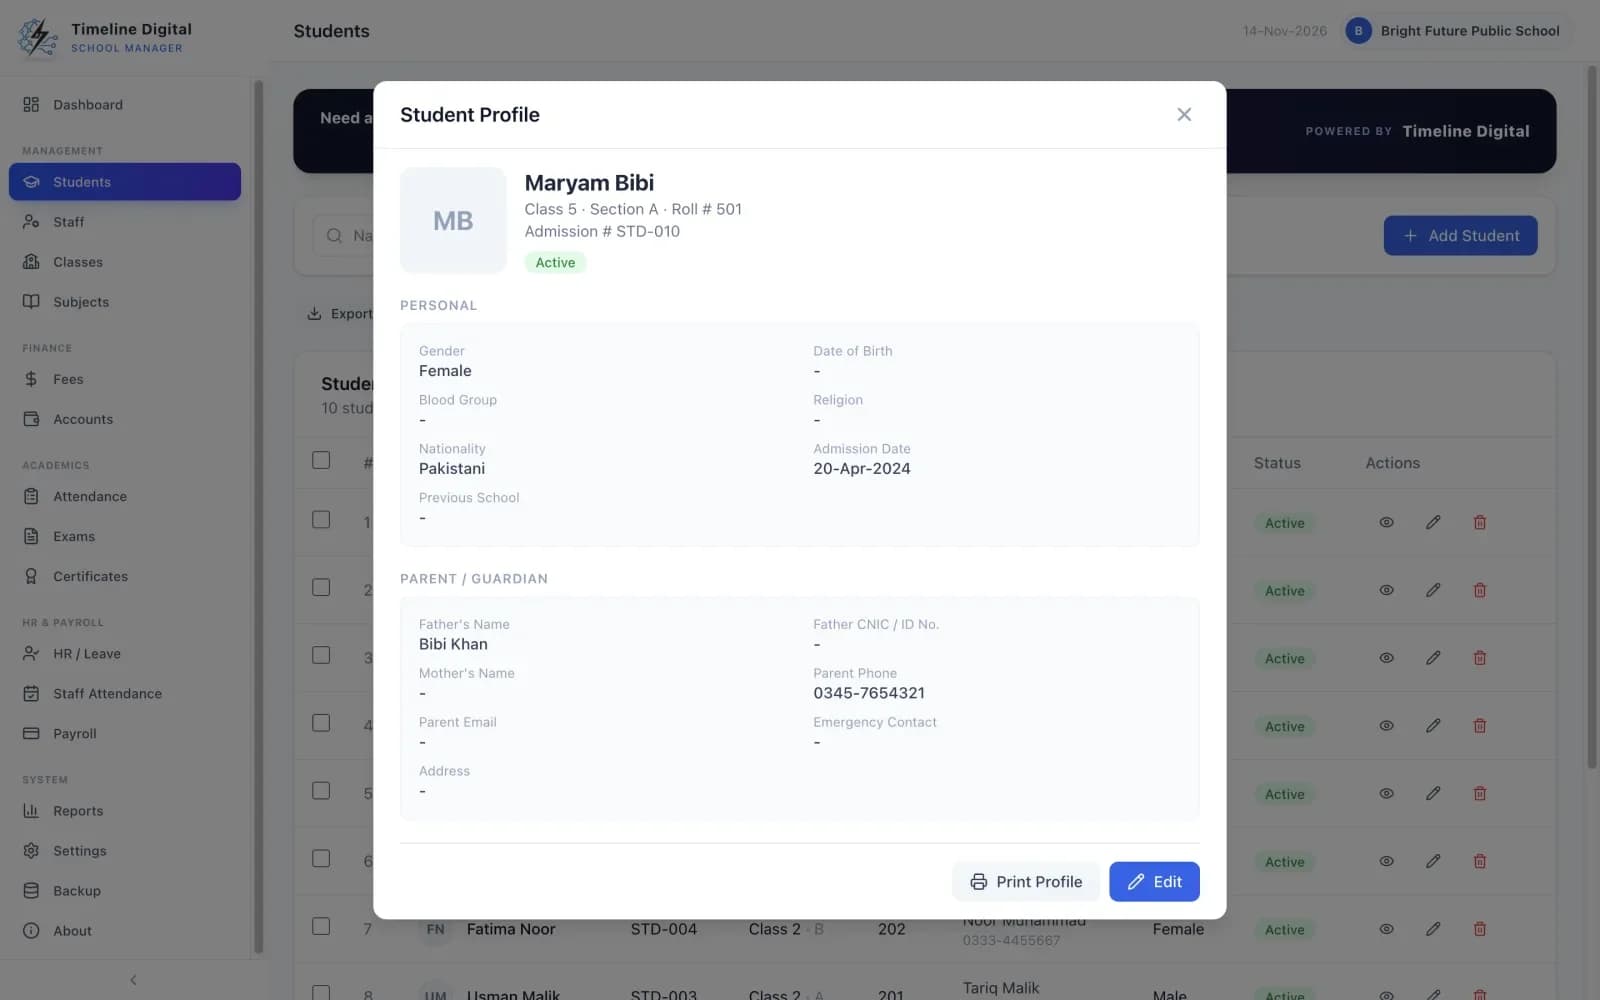
Open a student to view the full profile, and edit the record when a detail changes.
Print the student profile. The printed page has signature lines for the parent and the principal.
A student's full profile
Lesson 6 of 22: Importing and promoting students (1:54 video)
How to import students from a CSV file and promote a class
You do not have to type every student in by hand, and you do not have to move students to the next class one by one.
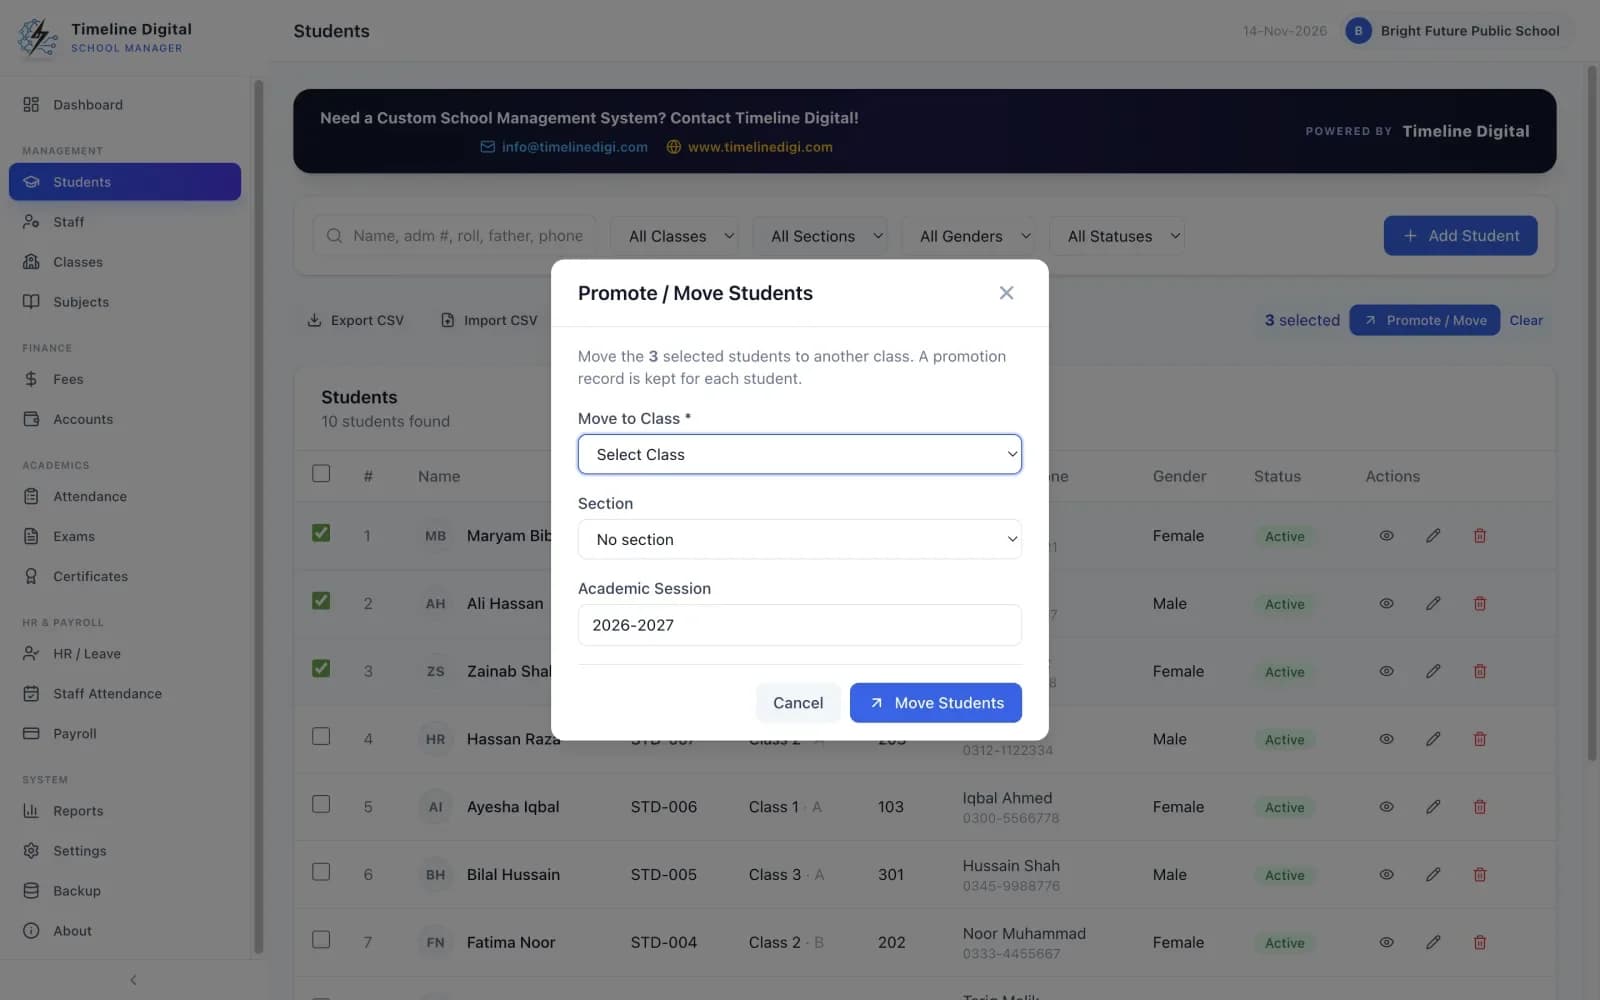
In this video: CSV import, CSV export and moving a class to a new session.
Put your existing student list into the ready-made CSV template that comes with the app. You can fill it in with Excel.
Import the CSV file in Students. Your students are added to the list.
Export the student list to a CSV file whenever you want to open it in Excel.
When a new session starts, choose several students and promote or move them to a new class and session in one step.
Promote a whole class in one step
Lesson 7 of 22: Classes and sections (2:02 video)
How to set up classes and sections
Set up your school's structure the way you run it. The class order you choose is used throughout the app.
In this video: Add, rename and order classes and sections.
Open Classes & Sections from the side menu.
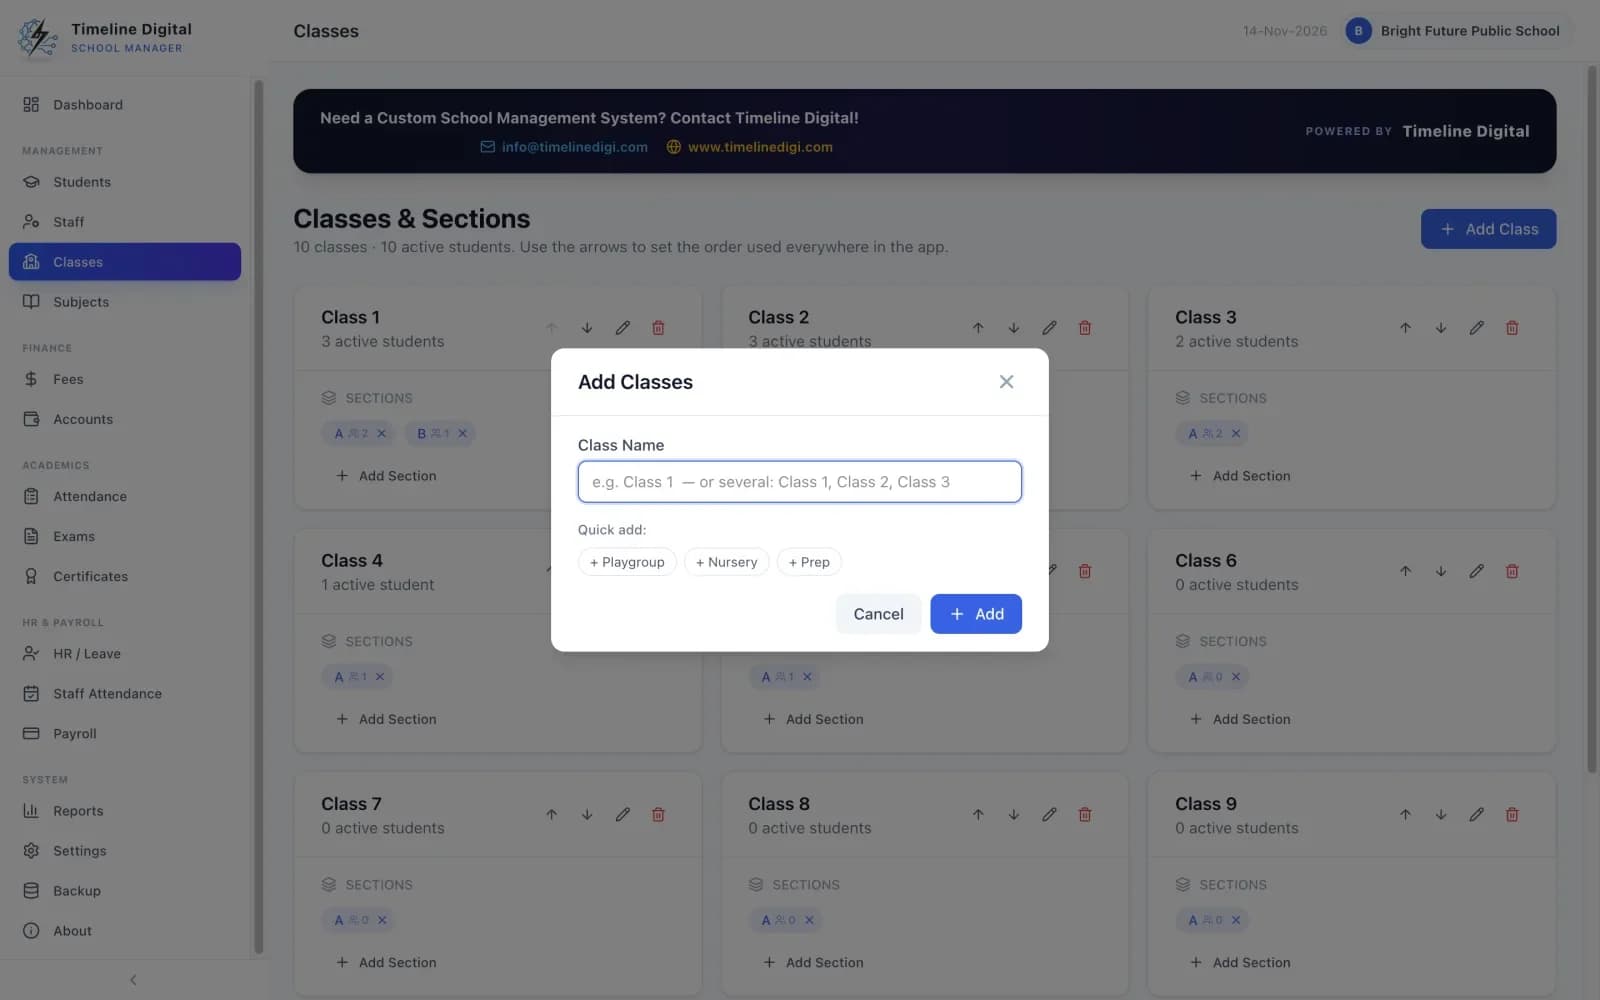
Add classes one at a time, or many at once with the quick-add buttons from Playgroup, Nursery and Prep up to Class 10.
Add as many sections as you need to each class.
Rename a class or section when you need to.
Put the classes in the order you want.
Check the numbers. Each class and section shows how many students it has.
Add many classes at once
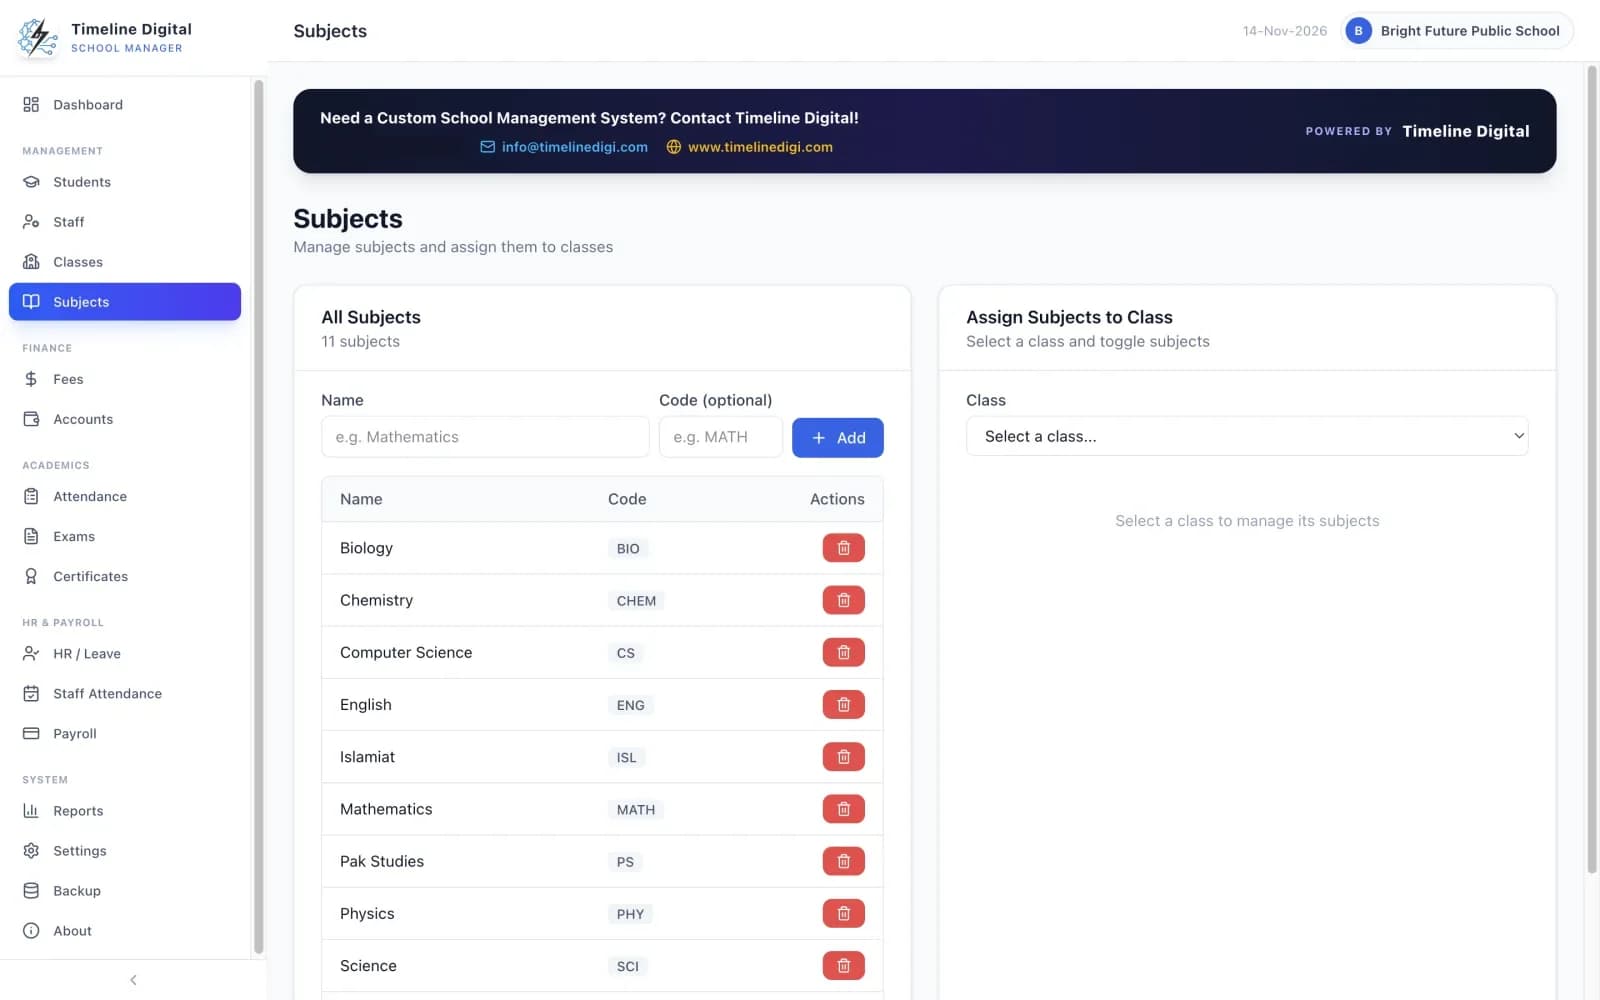
Lesson 8 of 22: Subjects (1:45 video)
How to add subjects and give them to classes
Subjects are kept in one list. You then choose which subjects each class studies.
In this video: The subject list and which classes study each subject.
Open Subjects from the side menu.
Add your subjects to the list, each with a short code.
Choose which subjects each class studies.
Remember that these are the subjects that appear when you enter exam marks for the class (lesson 14).
Subjects and the classes that study them
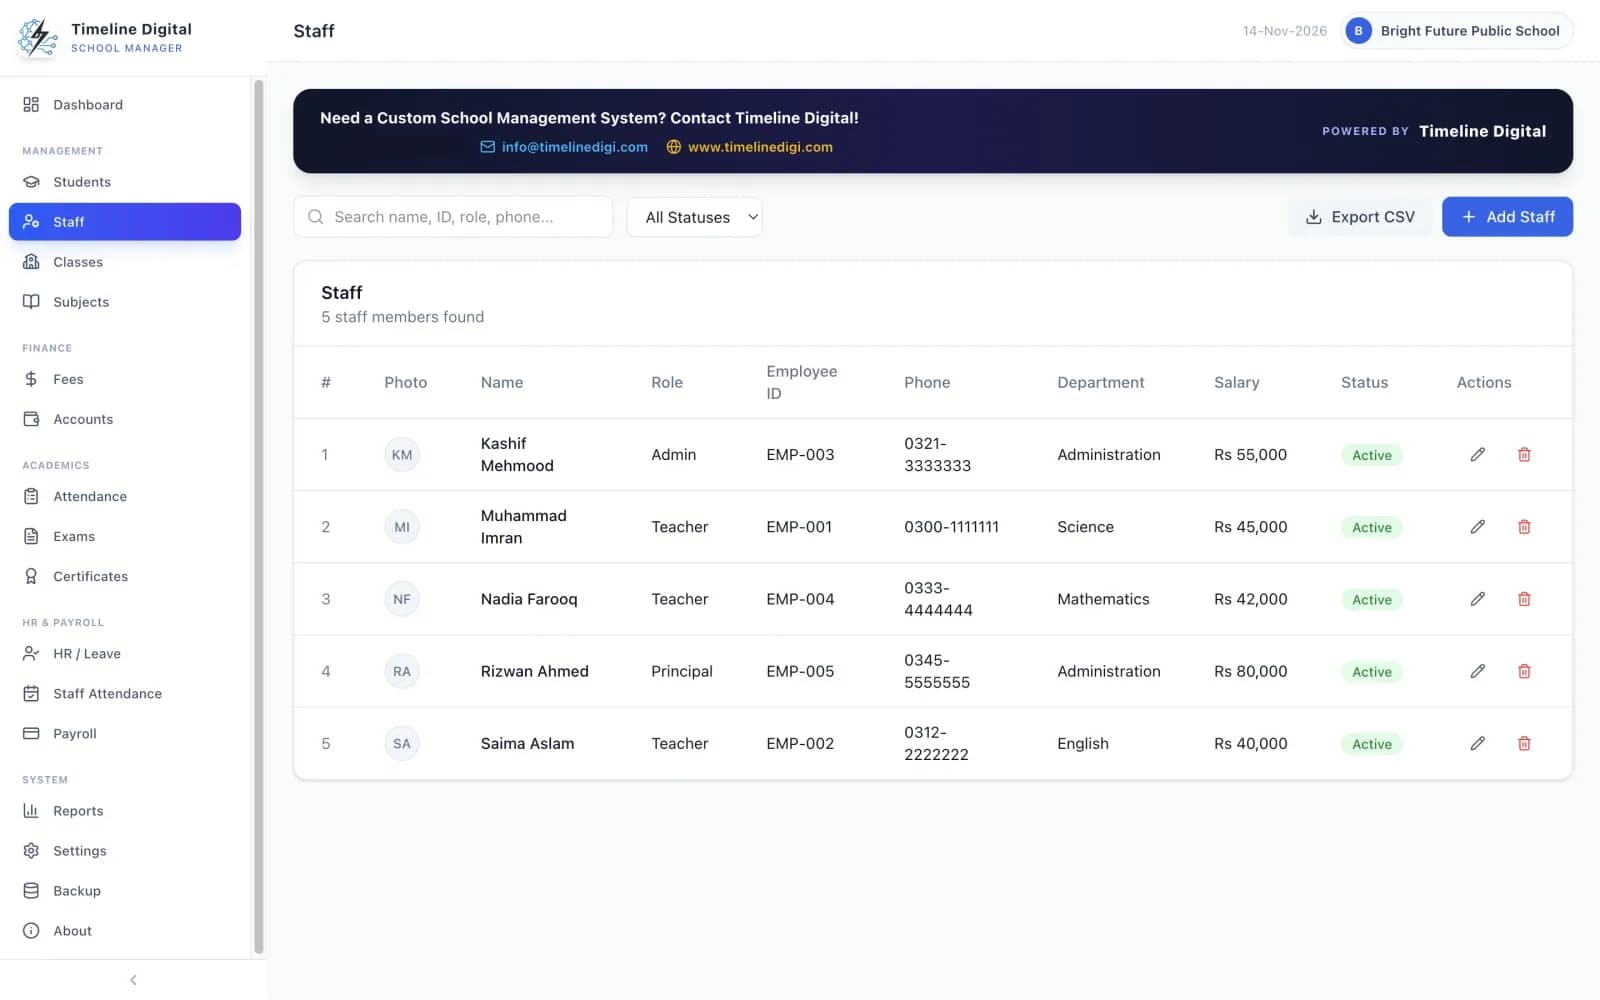
Lesson 9 of 22: Staff (2:25 video)
How to add teachers and other staff
Staff holds the records for teachers and every other employee.
In this video: Staff records, roles and monthly salary.
Open Staff from the side menu and add a staff member. An employee ID is suggested for you (EMP-001, EMP-002 and so on).
Enter the name, photo, department, qualification, phone, email, joining date, CNIC or national ID, bank account and address.
Choose the role, such as Teacher, Principal, Vice Principal, Admin, Accountant, Coordinator, Librarian, Clerk, Driver, Guard or Support Staff.
Enter the monthly salary. Payroll uses it as the basic salary (lesson 19).
Search the list by name, ID, role or phone, filter it by status, and export it to CSV when you need it in Excel.
Teachers and other staff in one list
Fees and accounts
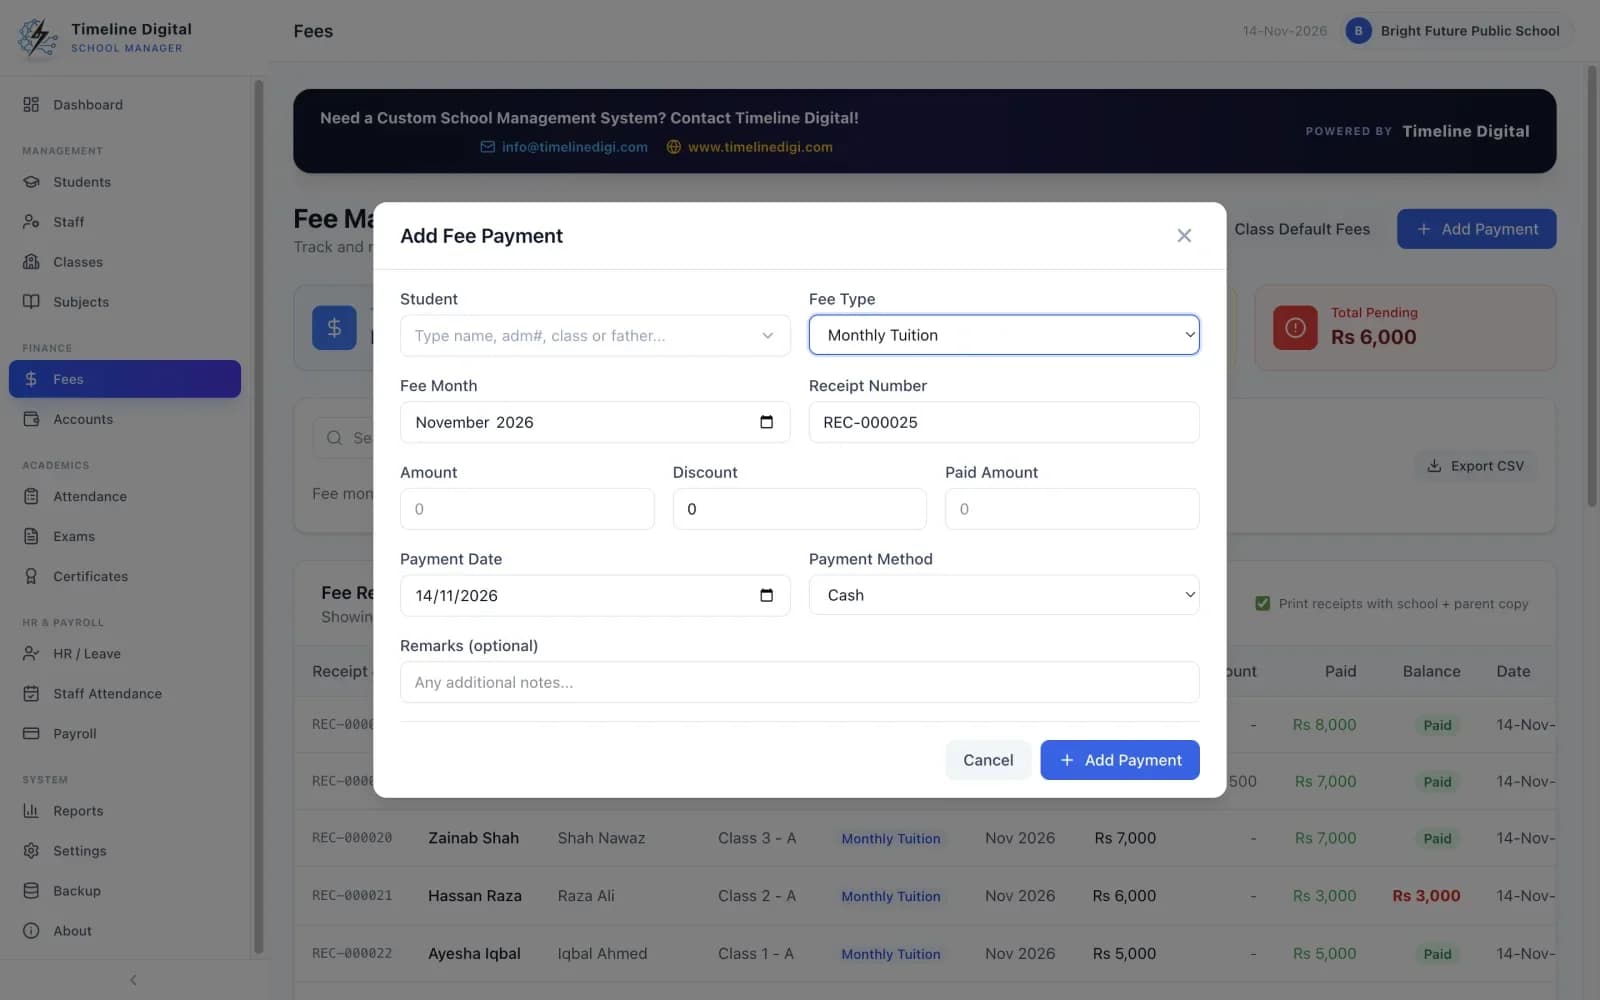
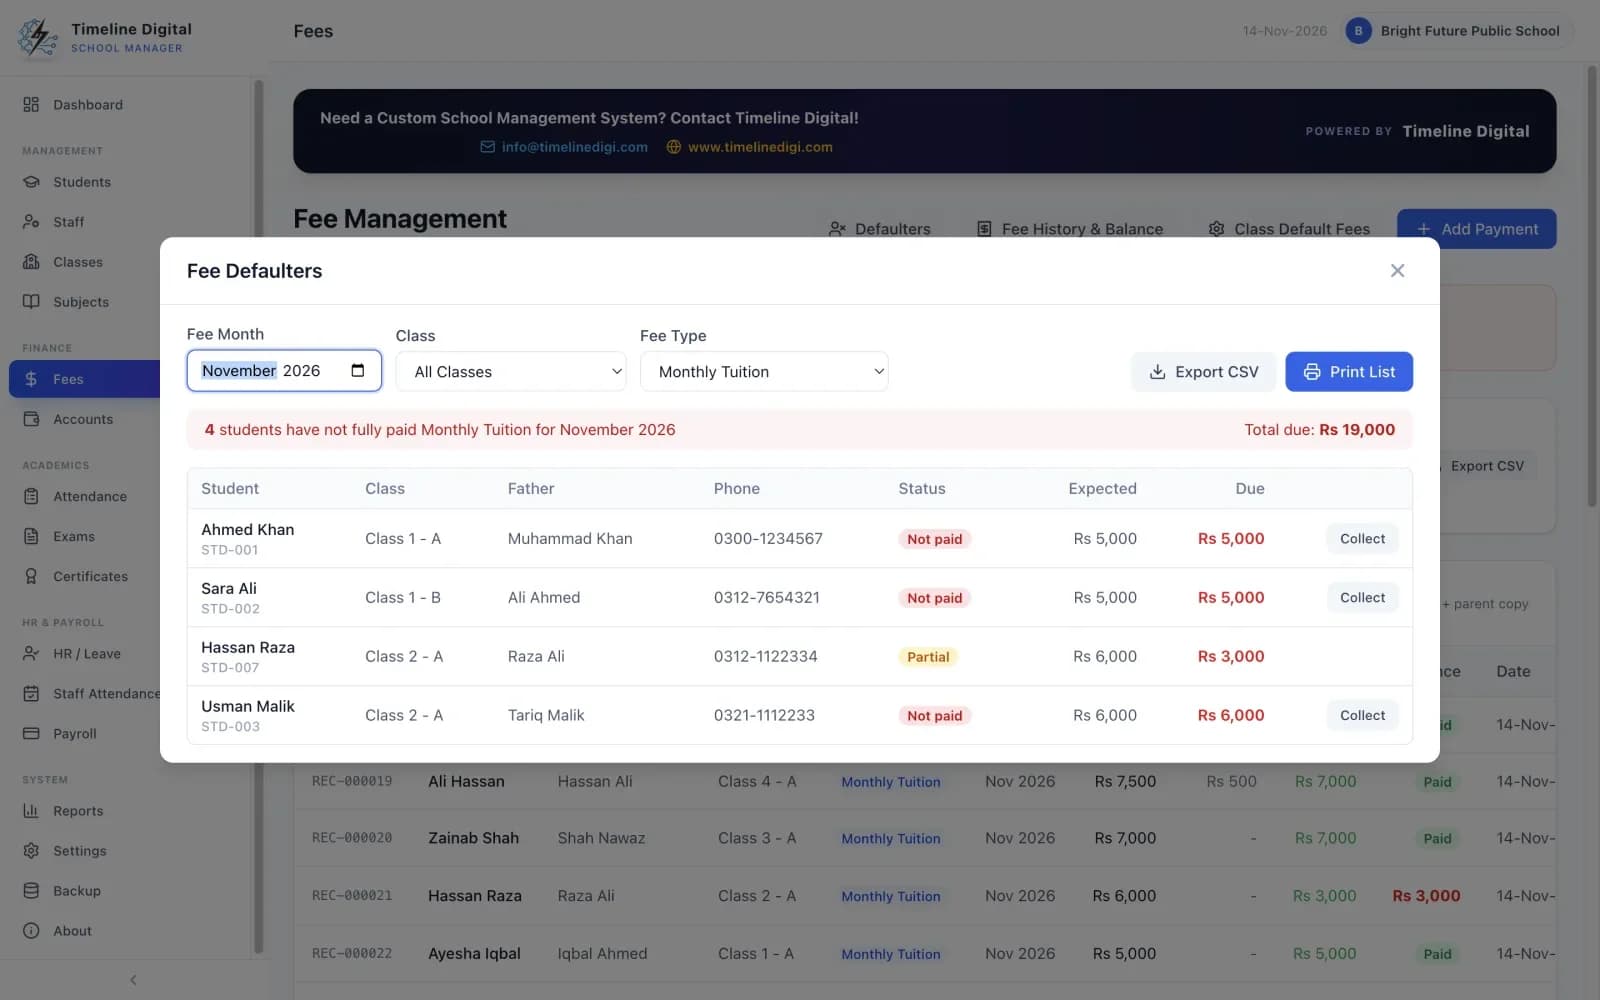
Collect fees, print receipts, chase balances and keep the income and expense book. Lessons 10 to 12.
How to take student attendance and print the register
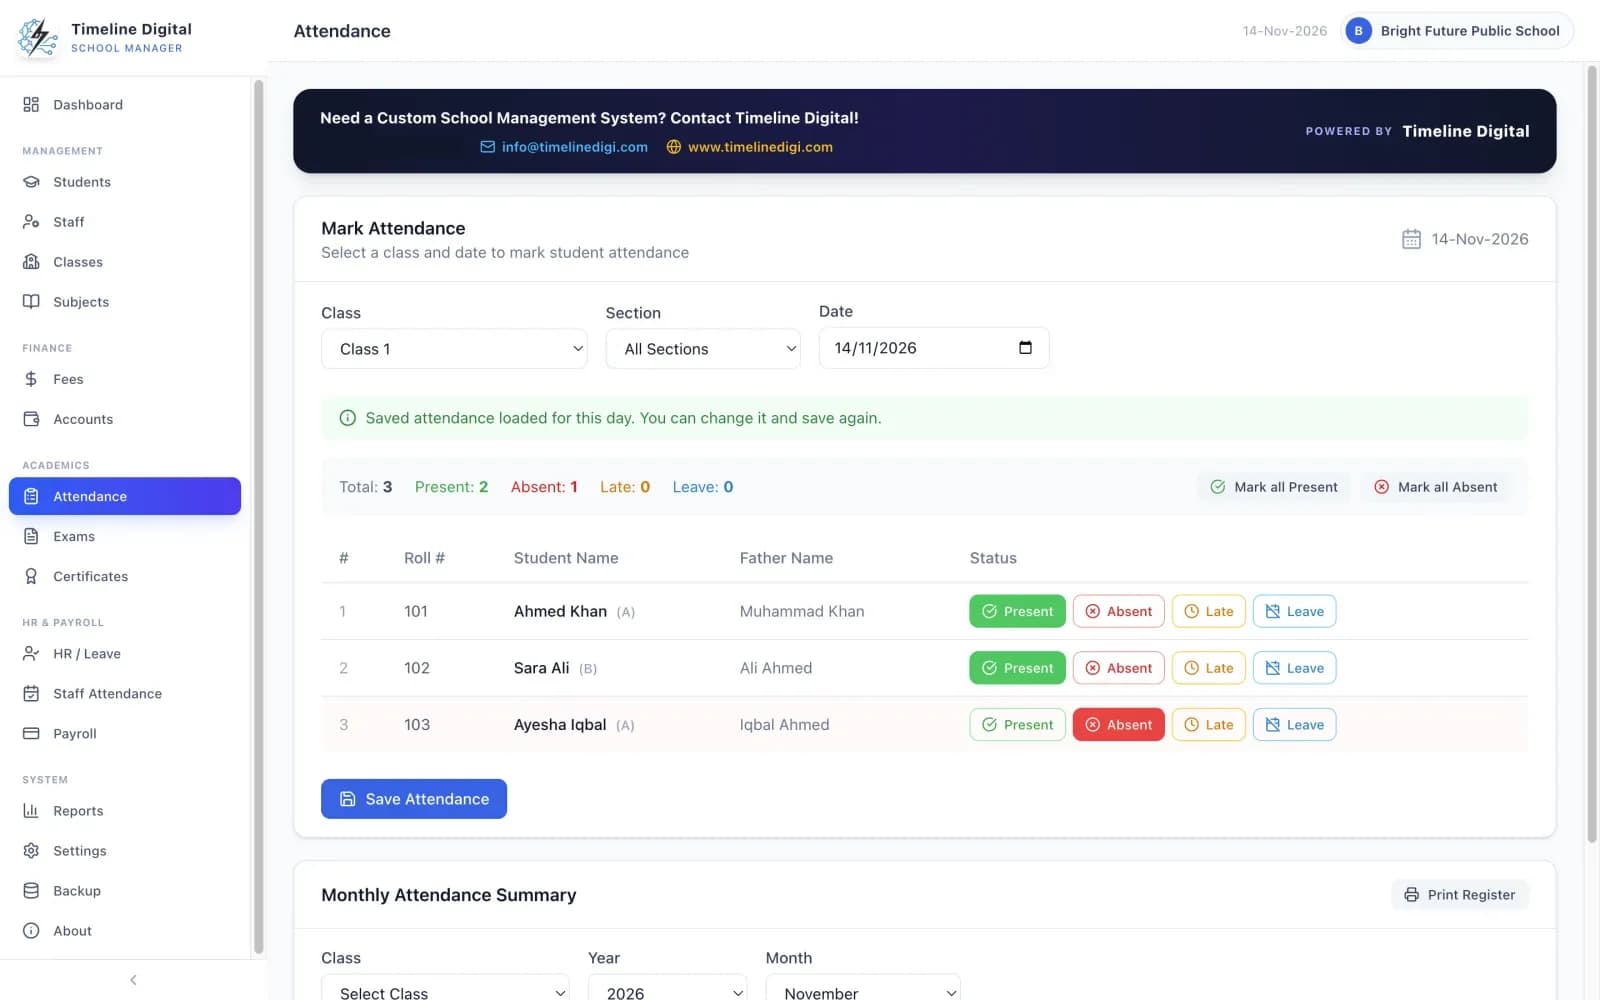
Attendance is taken class by class. One click marks the whole class, then you change the exceptions.
In this video: Mark a class, correct a past day and print the register.
Open Student Attendance, or use the Take Attendance shortcut on the dashboard.
Choose the class, section and date.
Mark the whole class present or absent with one click.
Change the exceptions. Each student can be Present, Absent, Late or on Leave.
To correct a past day, choose that date and change the marks.
Open the monthly summary for the class, then print the monthly attendance register with every student and every day of the month.
Mark a class present, absent, late or on leave
Lesson 14 of 22: Exams and entering marks (2:30 video)
How to create an exam and enter marks
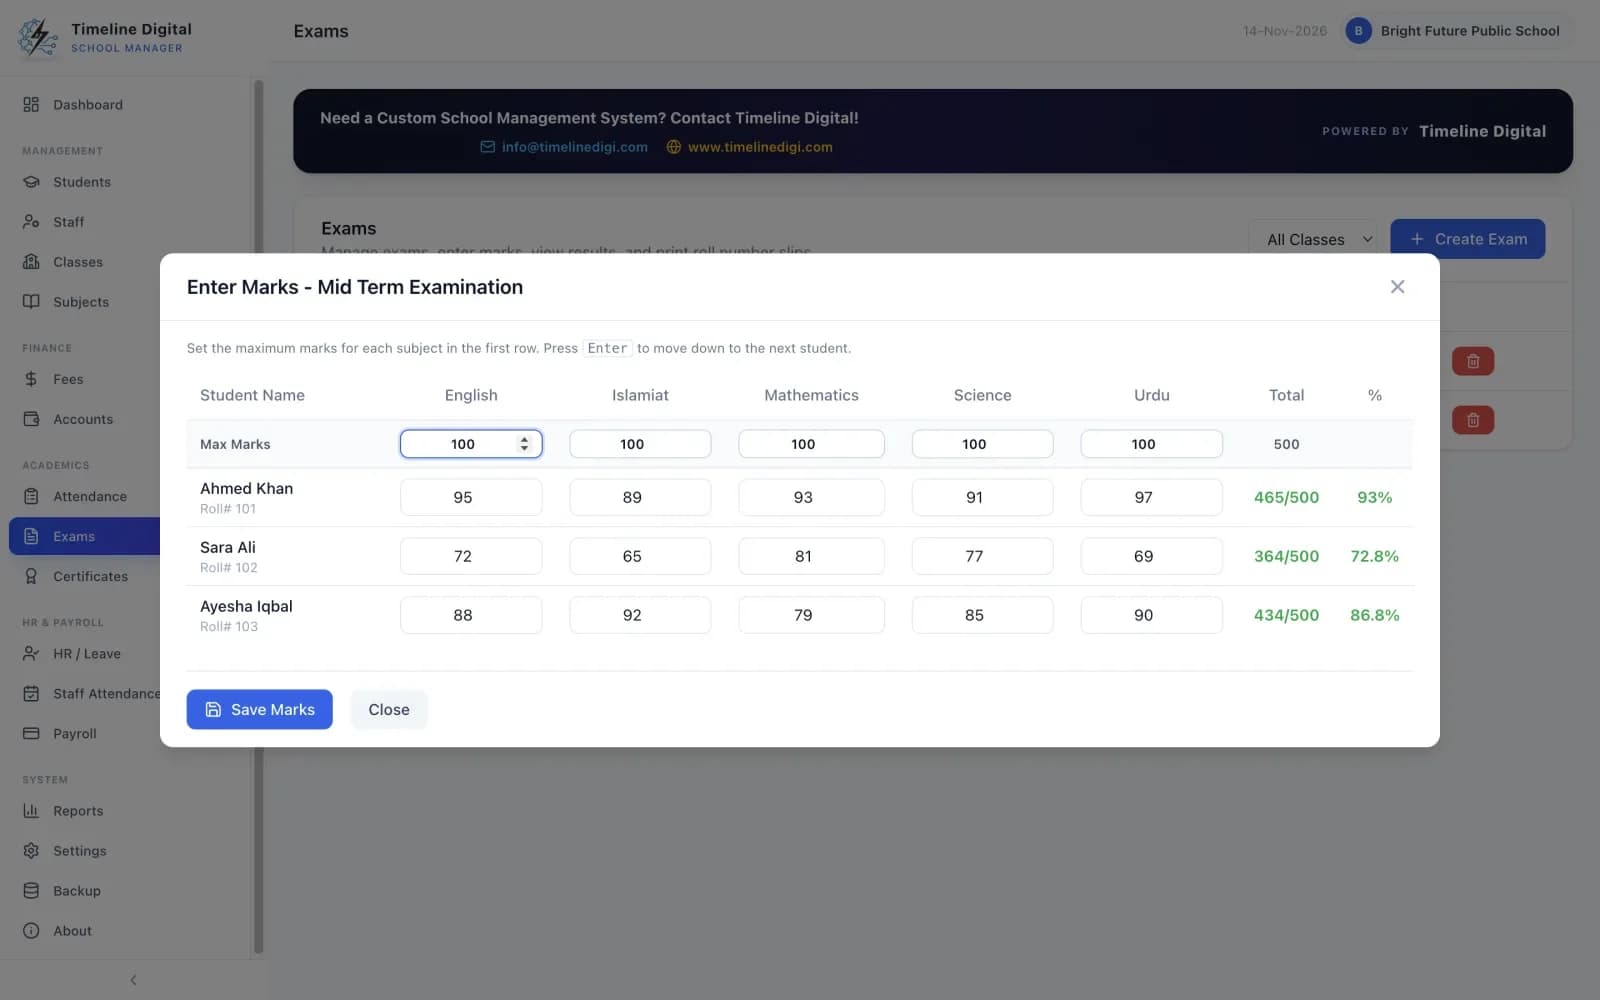
You create the exam once, then enter the marks for the whole class on one screen.
In this video: Create an exam and enter marks for a class.
Open Exams & Results and create an exam for a class, with a date and academic session.
Open the marks entry screen, or use the Enter Marks shortcut on the dashboard.
Set the maximum marks for each subject. The subjects are the ones you gave to the class in lesson 8.
Enter the marks for all students and subjects on one screen.
Leave the sums to the app. Totals, percentages, grades, pass or fail, and class positions are worked out automatically.
Enter marks for a whole class on one screen
Lesson 15 of 22: Exam results (2:04 video)
How to see exam results and print result cards
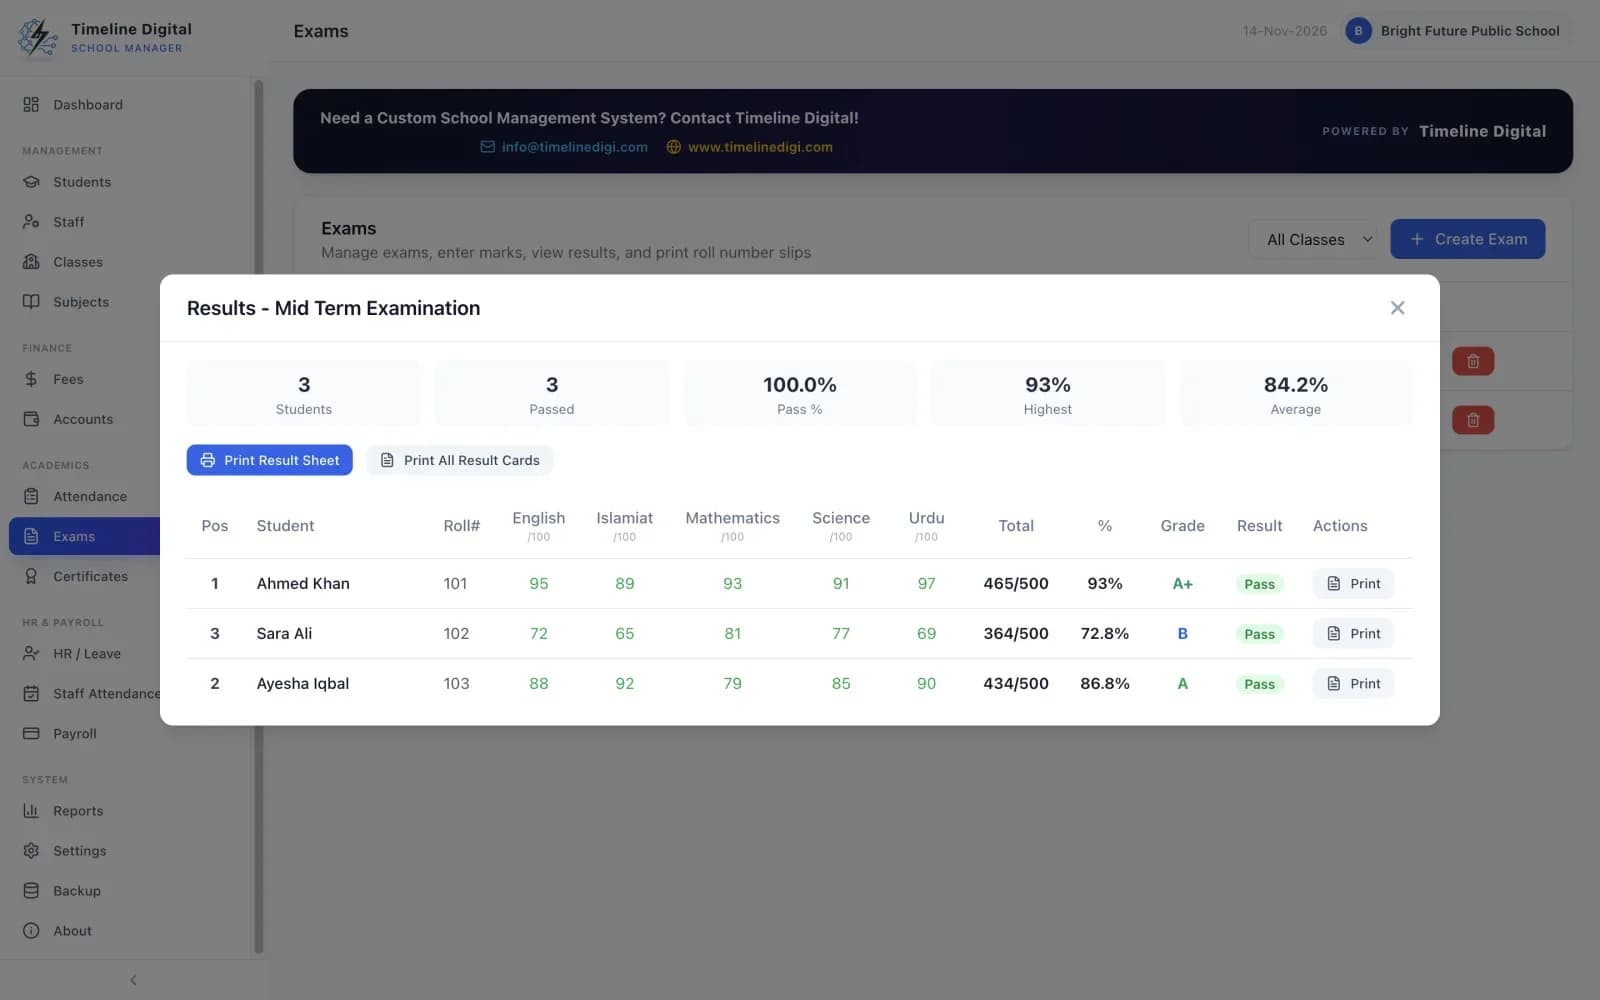
Once the marks are in, the results are ready to read and print.
In this video: Grades, positions, result cards, result sheet and roll number slips.
Open the results screen for the exam. It shows the number of students, number passed, pass percentage, highest score and average.
Check each student's total, percentage, grade (A+ to F), pass or fail, and class position.
Print result cards, one student at a time or the whole class at once.
Print the class result sheet.
Before the exam, print roll number slips for every student in the exam.
Results with grades, positions and pass percentage
Lesson 16 of 22: Certificates (2:00 video)
How to issue and print a certificate
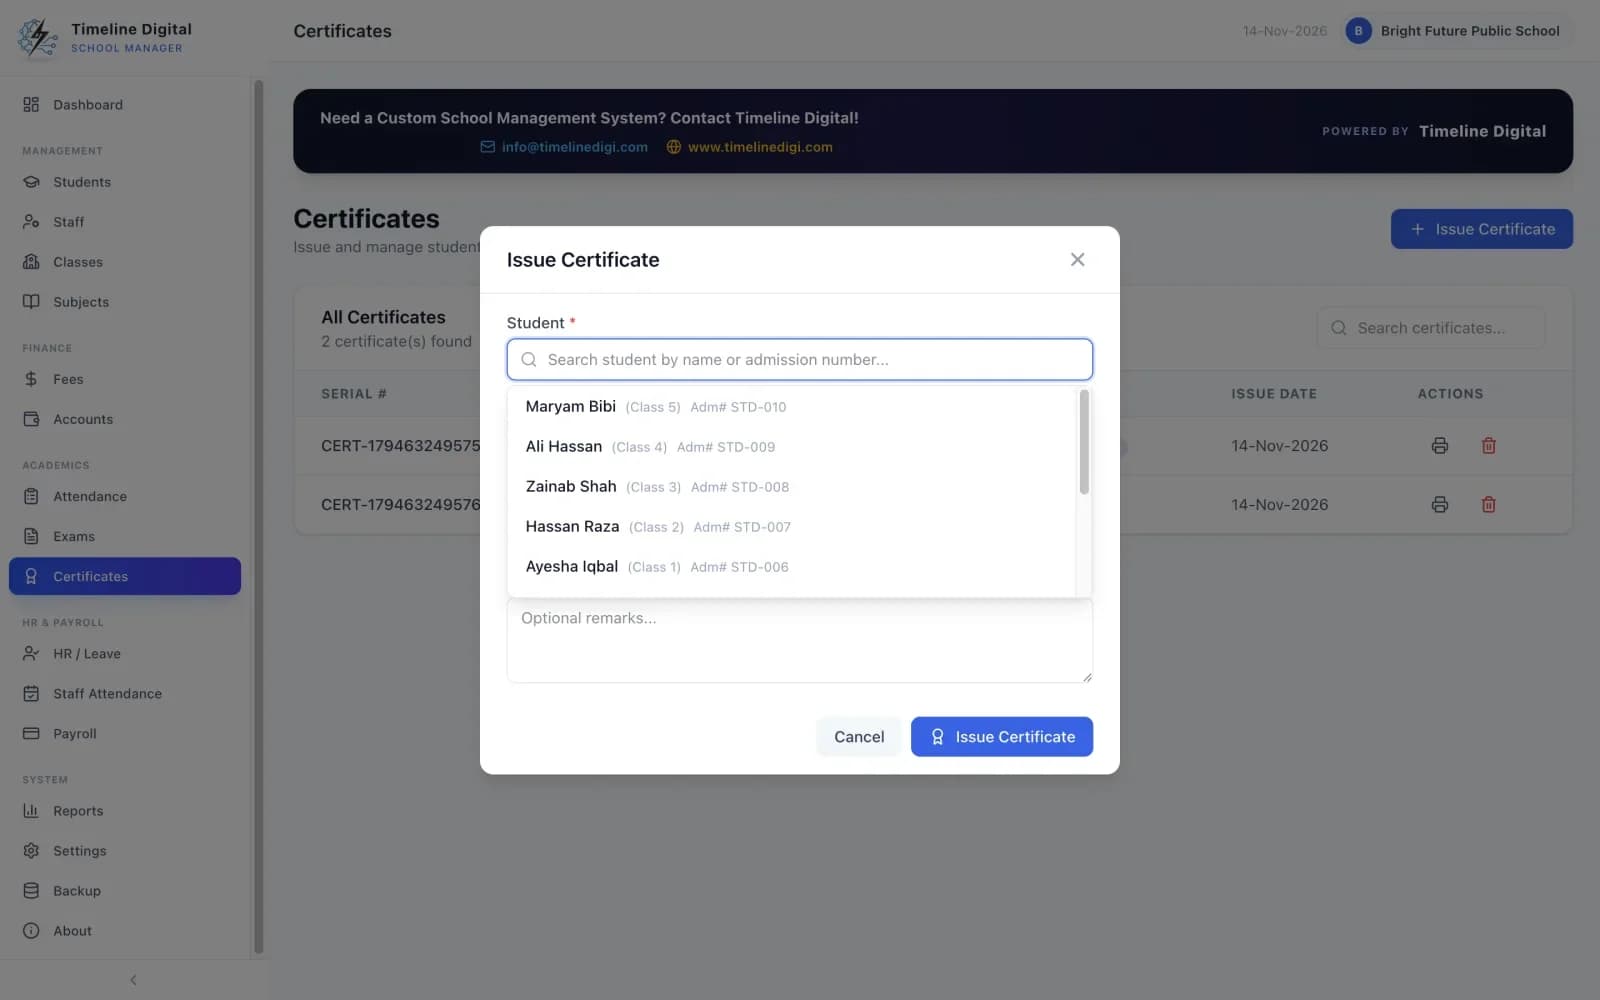
The app issues 5 kinds of certificate: Character, Transfer, Bonafide, Study and School Leaving.
In this video: Issue and print five kinds of certificate.
Open Certificates from the side menu.
Issue a certificate and choose the kind: Character, Transfer, Bonafide, Study or School Leaving.
Print it. The certificate carries your school's name and logo, a serial number and the issue date.
Have it signed and stamped. The printed certificate has space for the principal's signature and the school stamp.
Search the record of issued certificates whenever you need to find one again.
Issue one of five certificate types
Leave, staff attendance and payroll
Staff leave, staff attendance, monthly salaries and salary slips. Lessons 17 to 19.
Lesson 17 of 22: Staff leave (2:06 video)
How to record and approve staff leave
Leave requests are recorded in HR / Leave, then approved or rejected.
In this video: Record, approve and reject leave requests.
Open HR / Leave from the side menu.
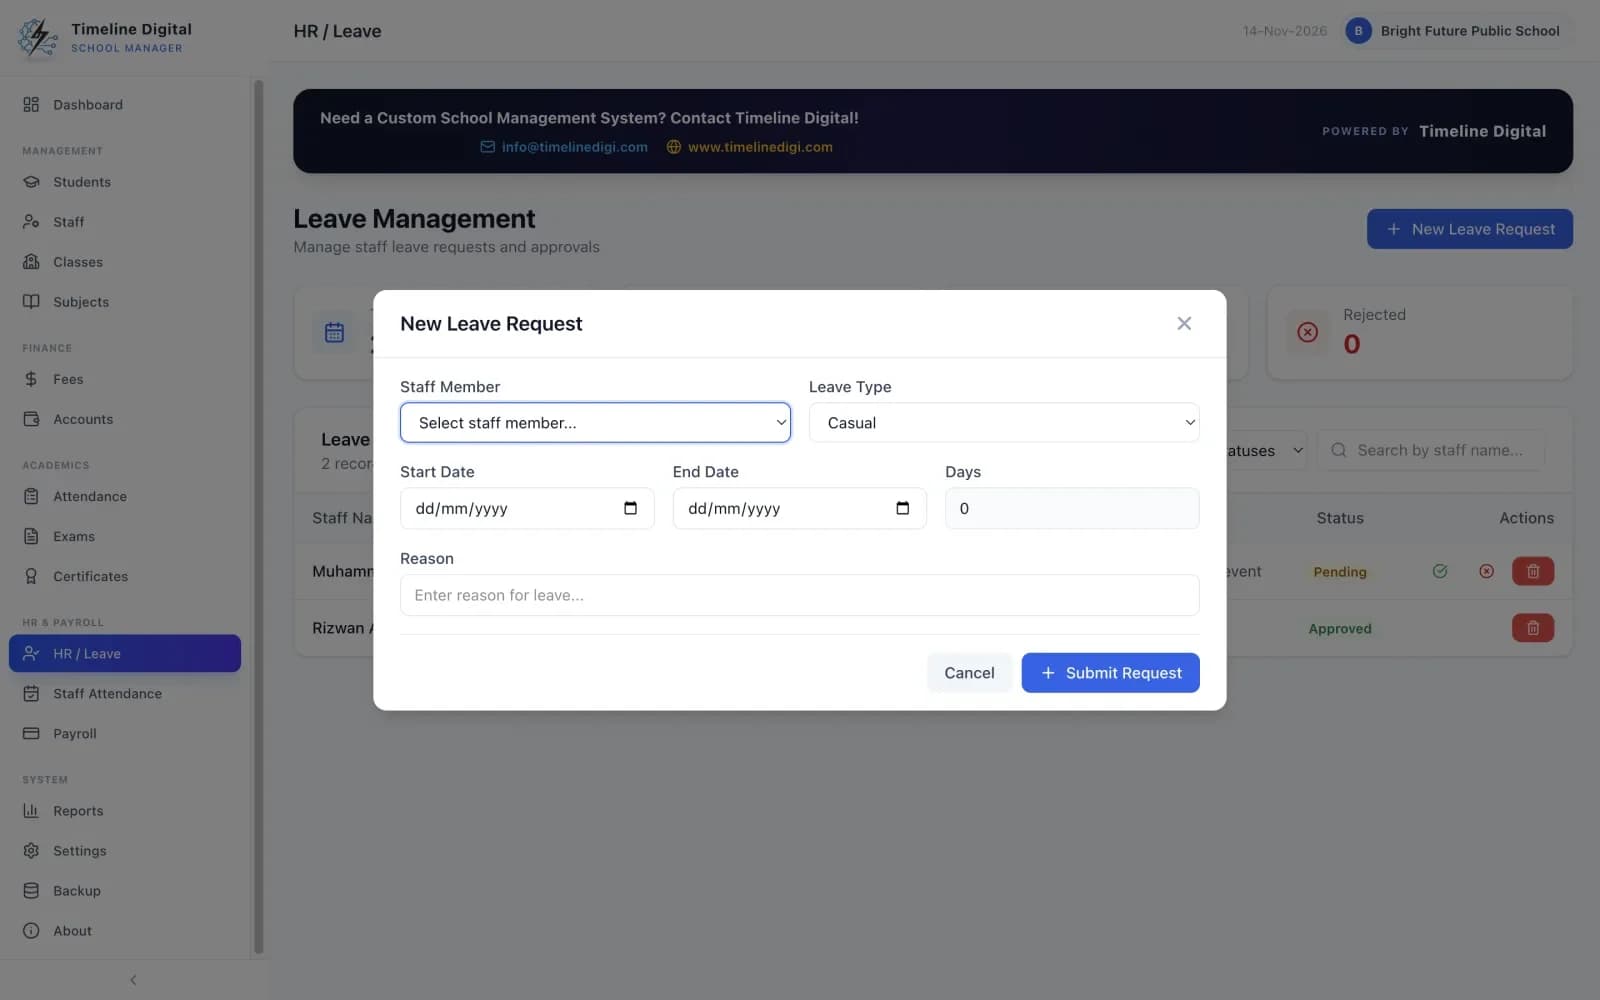
Record a leave request for a staff member and choose the type: Casual, Sick, Annual, Maternity or Other.
Enter the dates. The number of days is counted for you.
Approve or reject the request.
An approved leave is marked in staff attendance automatically, so you do not mark it again.
Read the totals of approved, pending and rejected requests.
New leave request, with days counted for you
Lesson 18 of 22: Staff attendance (2:08 video)
How to take staff attendance
Staff attendance works like student attendance, with one list for all staff.
In this video: Mark staff present, absent or on leave.
Open Staff Attendance, or use the Staff Attendance shortcut on the dashboard.
Choose the date.
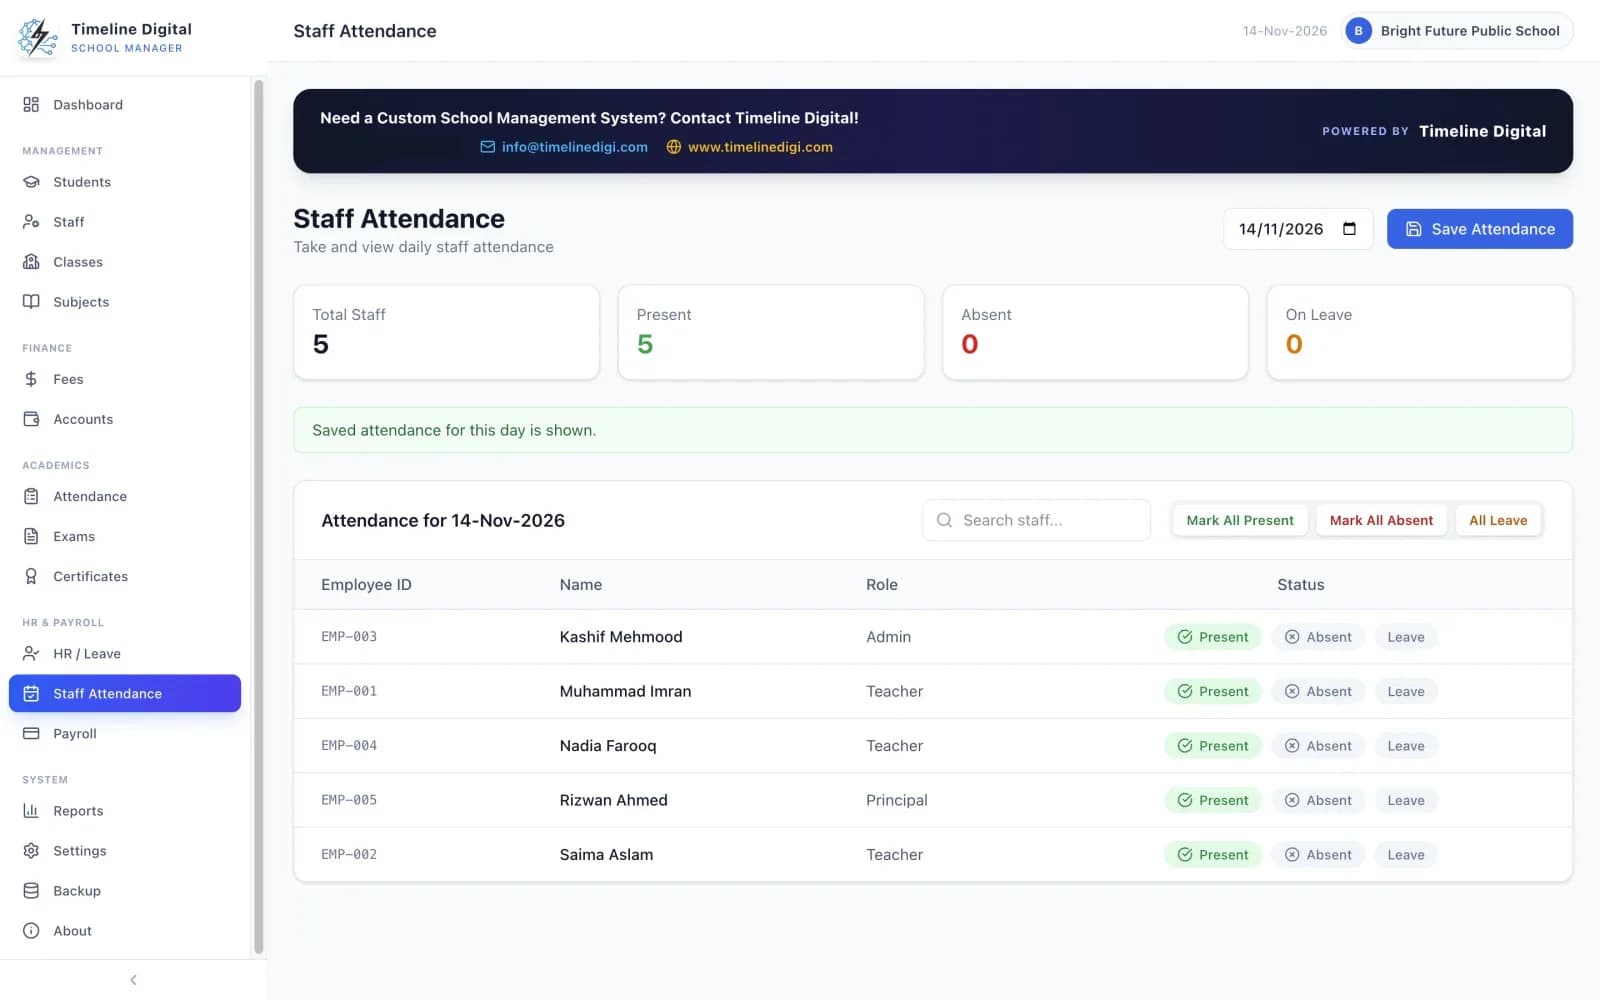
Mark everyone at once, then change the exceptions.
Each staff member can be Present, Absent or on Leave.
Read the daily totals of present, absent and on leave.
Daily staff attendance
Lesson 19 of 22: Payroll (3:04 video)
How to run payroll and print salary slips
Payroll creates the monthly salaries from your staff records, and paid salaries go into Accounts by themselves.
In this video: Create salaries, add allowances and deductions, print salary slips.
Open Payroll, or use the Payroll shortcut on the dashboard.
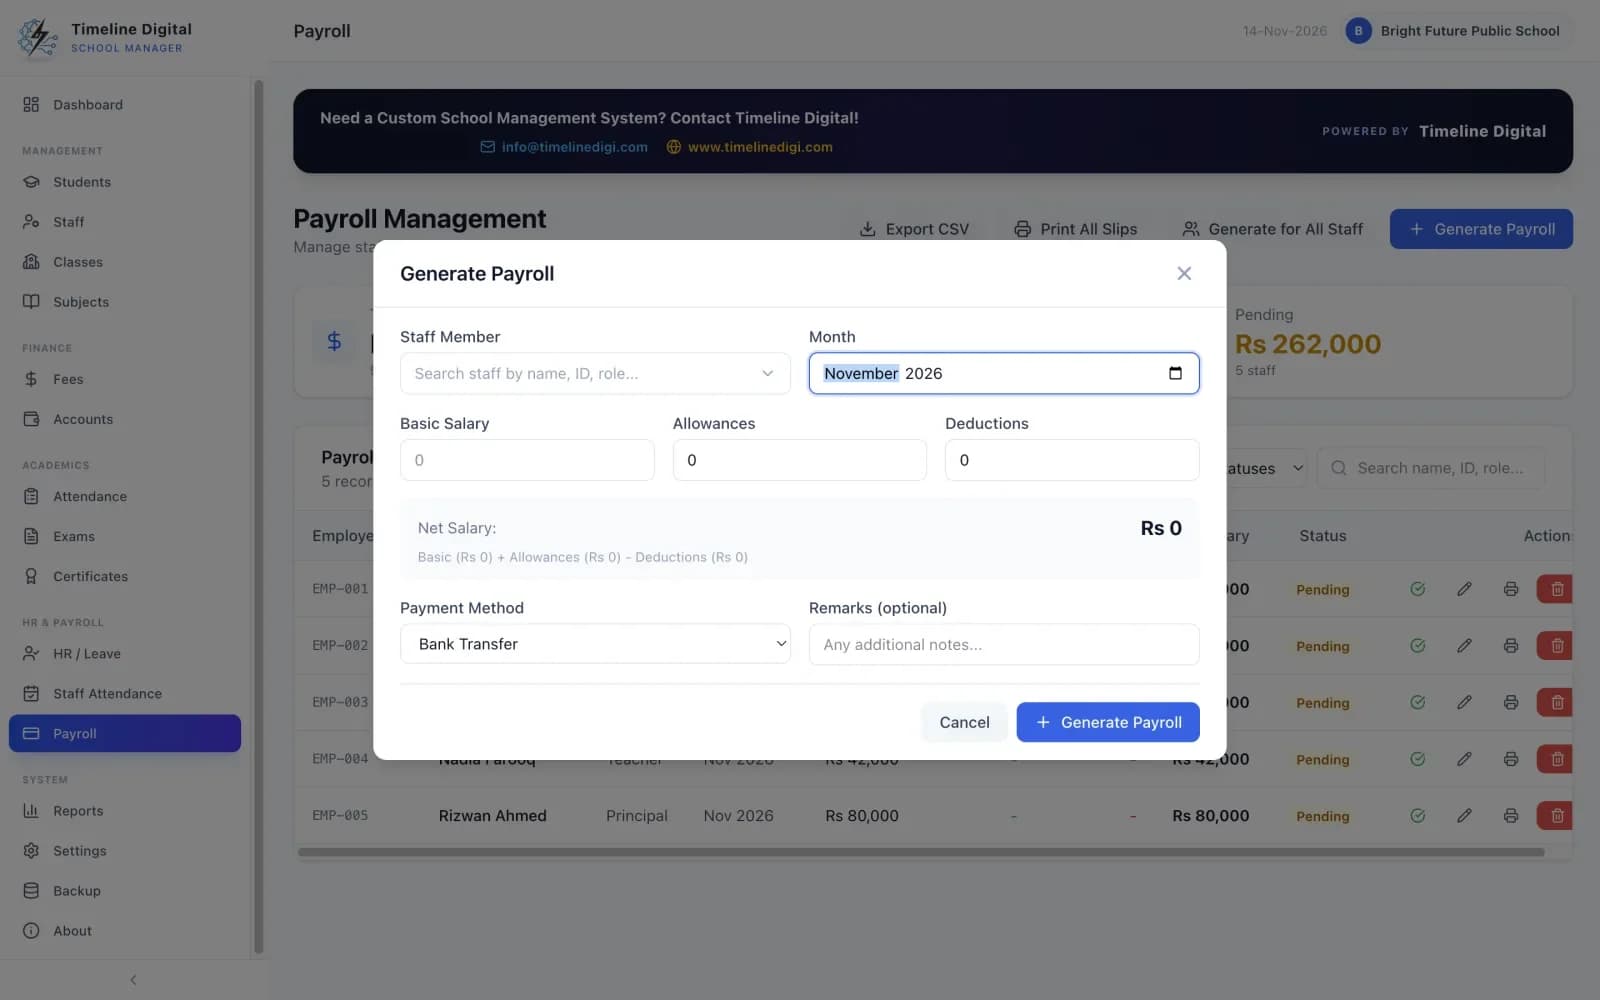
Create the salaries for the month: all staff in one click, or one person at a time.
Check each salary. The basic salary comes from the staff record. Add allowances and deductions, and the net salary is calculated.
Mark each salary as Paid or Pending. A paid salary is added to Accounts as an expense automatically.
Print salary slips, one at a time or for everyone.
Use the totals of payable, paid and pending amounts, filter by month and status, and export to CSV.
Create every salary for the month in one click
Reports, backup and security
Print reports, keep your data safe and lock the app. Lessons 20 to 22.
Lesson 20 of 22: Reports (2:23 video)
How to print reports
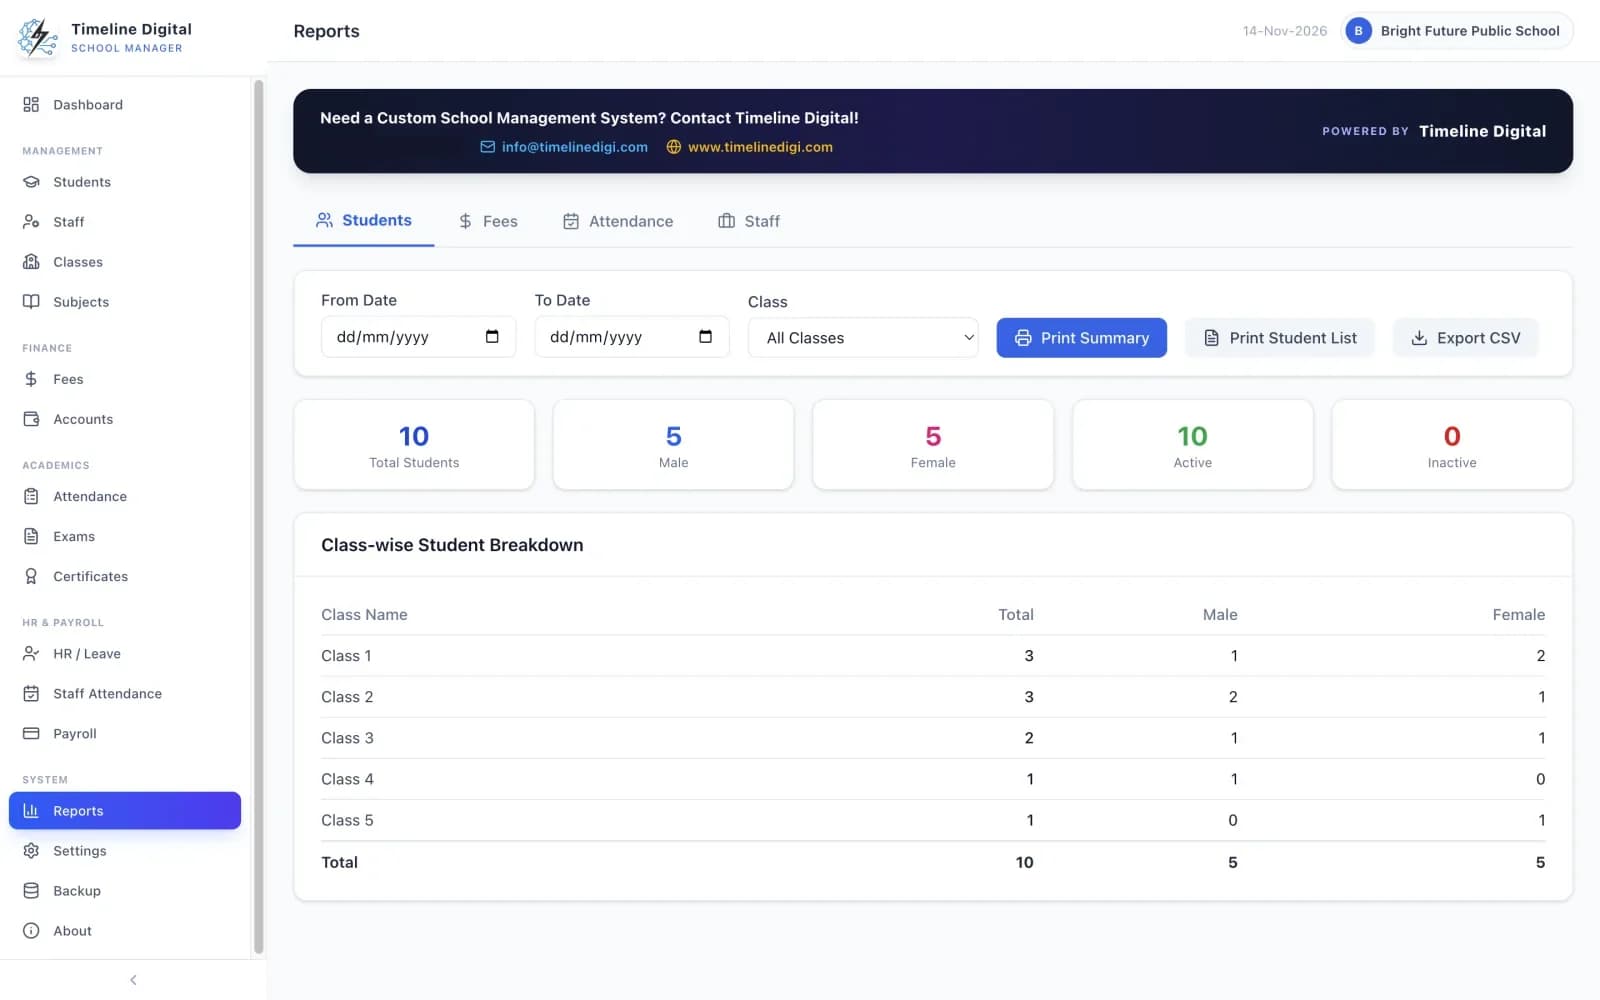
There are 7 printable reports in four groups: Students, Fees, Attendance and Staff.
In this video: Student, fee, attendance and staff reports.
Open Reports from the side menu.
Students: open the Student Report (totals by class, boys and girls) or the Student List. The student report can also be exported to CSV.
Fees: open the Fee Report and choose the date range, class and fee type.
Attendance: open the Attendance Report or the Attendance Register.
Staff: open the Staff Report or the Monthly Staff Attendance report.
Print the report. To save it as a PDF instead, choose "Microsoft Print to PDF" (Windows) or "Save as PDF" (Mac) in the print window.
Seven printable reports in four groups
Lesson 21 of 22: Backup and restore (2:03 video)
How to back up and restore your data
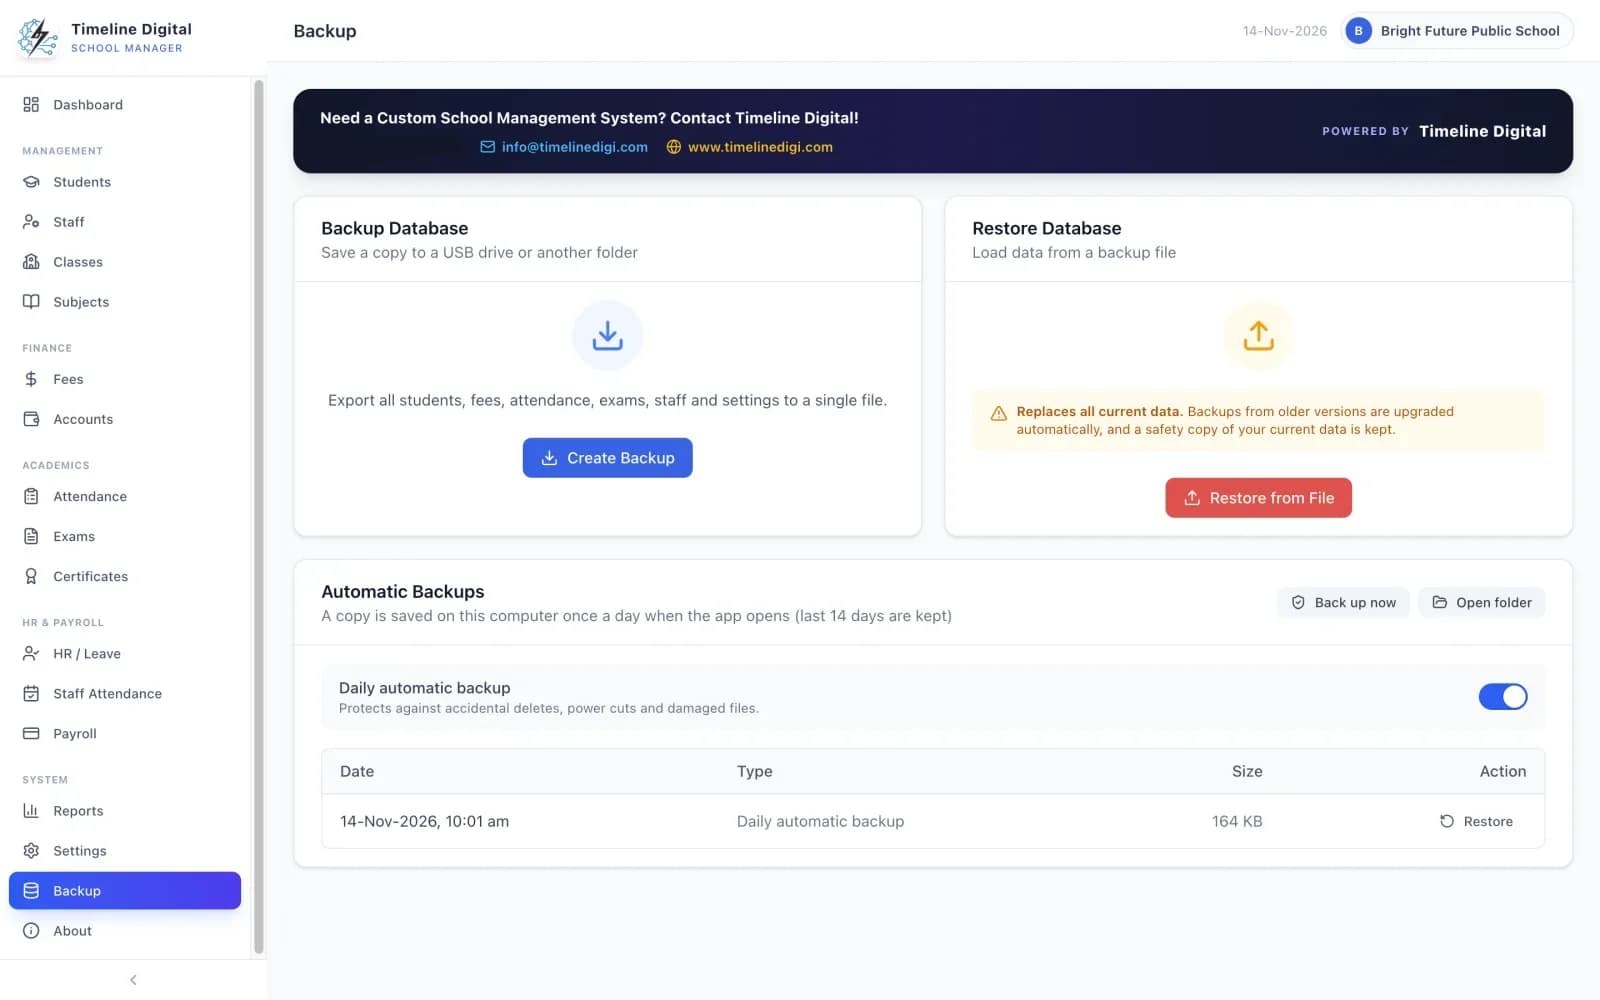
Your records live in a file on your own computer, so backups matter. The app makes one for you every day you open it.
In this video: Automatic daily backups, manual backup and restore.
Open Backup & Restore from the side menu.
Check the automatic backups. A copy of your data is saved each day you open the app, and the latest 14 are kept.
Make a manual backup to any folder or USB drive, whenever you want.
To restore, choose a backup file. A safety copy of your current data is made first, so a restore can be undone.
Automatic daily backups, manual backup and restore
Lesson 22 of 22: Password and security (1:52 video)
How to lock the app with a password
A password stops other people opening the app on your computer.
In this video: Lock the app with a password and use the recovery code.
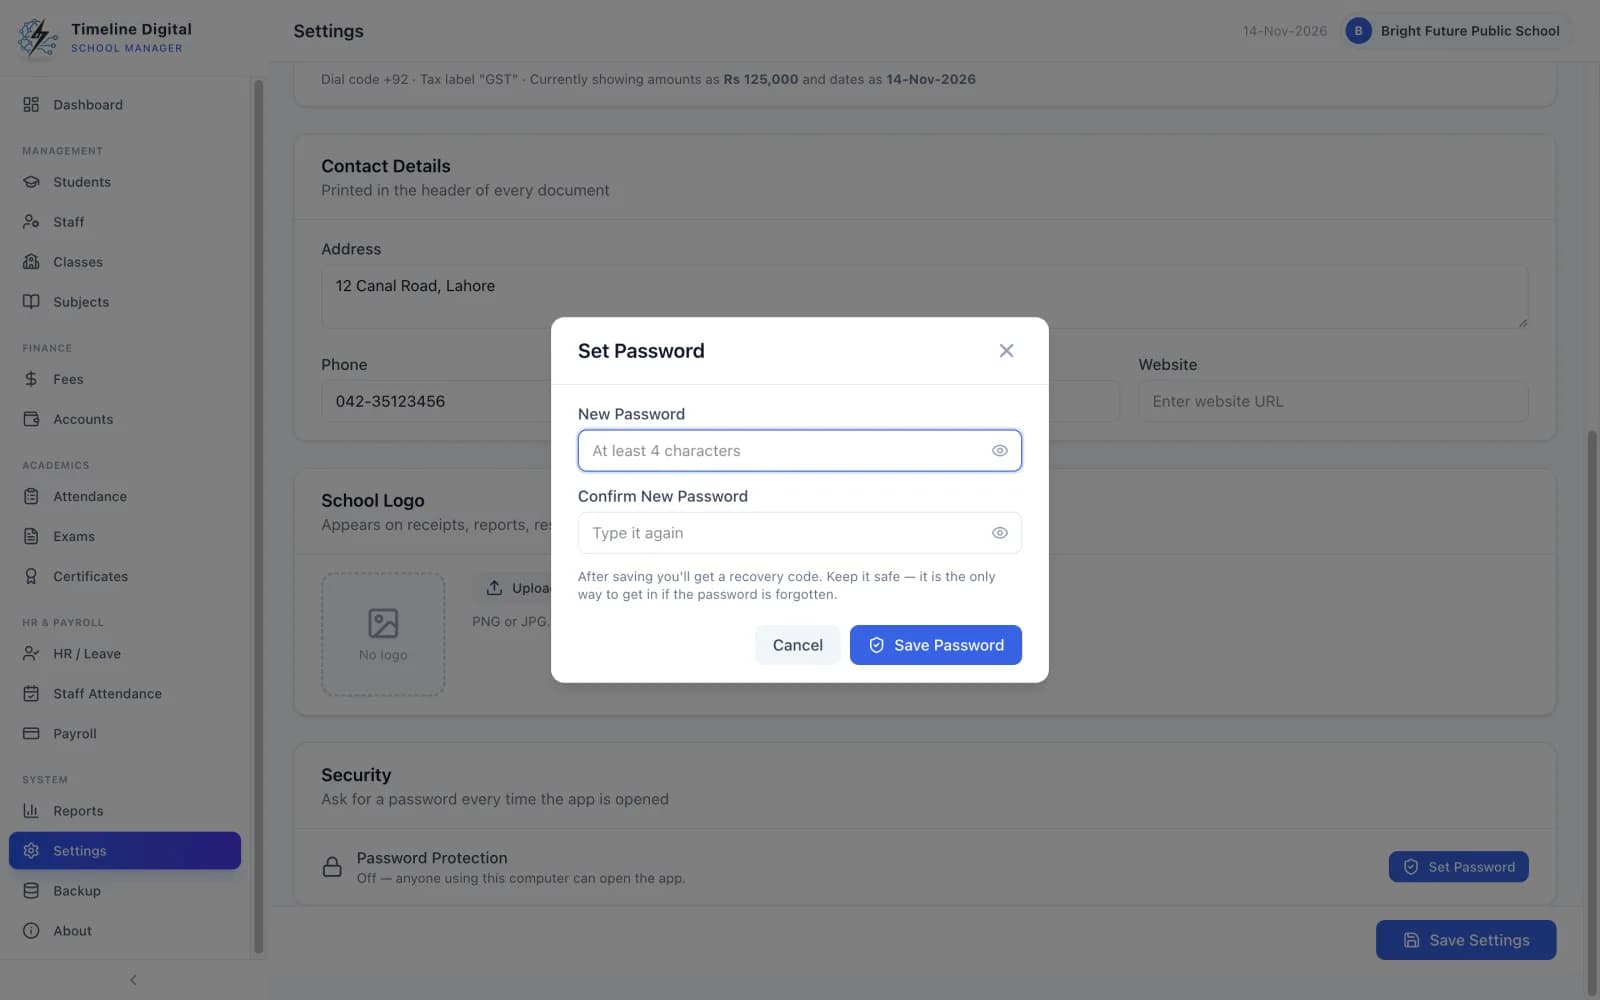
Open Settings and set a password.
Write down the recovery code you are given when you set the password, and keep it somewhere safe.
Close the app and open it again. The lock screen asks for the password every time the app opens.
If you forget the password, use the recovery code.
Good to know: There is one password for the app. The free edition does not have separate logins for different staff.
Lock the app with a password and keep the recovery code
Which lesson covers the job I need to do?
Most schools do the same jobs in their first week: set up classes, bring in students, collect fees and take attendance. Find the job in the table and open the lesson beside it. Each lesson is a short video with written steps.
Common first-week tasks and the lesson that covers each one
How long does it take to learn Timeline School Manager?
Less than an hour of watching. There are 22 short video lessons, about 46 minutes in total. Each lesson covers one part of the app, and most are about two minutes long. Every lesson on this page also has written steps.
Which lessons should I watch first?
Start with lesson 1 (getting started), lesson 2 (the dashboard) and lesson 3 (settings). Then watch lesson 7 (classes and sections) and lesson 4 (adding a student). After that, pick the lesson for the job you need to do, such as lesson 10 for collecting fees or lesson 13 for attendance.
Do I need the internet to follow along?
The videos need the internet, because they play from YouTube. The app does not: it works offline for daily use. You also need the internet once to download the app. If your connection is poor, read the written steps under each lesson instead of watching.
Can I practise safely before I enter real records?
Yes. At first-time setup you can load sample data, which fills the app with a made-up school so you can try every feature before entering your own records. The screenshots on this page show that sample school.
Do the lessons work for both Windows and Mac?
Yes. Timeline School Manager runs on Windows 10 or 11 (64-bit) and on macOS 12 (Monterey) or newer, Apple Silicon or Intel. The install steps and the save-as-PDF choice in the print window differ between the two, and this page gives both.
Is the app in English?
Yes. The app is in English only. Currency, dates and numbers follow the country you choose in Settings, from 84 options.
Can I move my student list from Excel into the app?
Yes. Save your list as a CSV file using the ready-made template that comes with the app, then import it in Students. Lesson 6 shows how. You can also export students, staff, fee records, fee defaulters, accounts and payroll to CSV files that open in Excel.
How do I save a receipt or report as a PDF?
Print the document as usual, then choose "Microsoft Print to PDF" on Windows or "Save as PDF" on a Mac in the print window. The app does not make PDF files directly; the PDF comes from the system print window.
What happens if I forget the app password?
Use the recovery code. The app gives you a recovery code when you set the password, in case you forget it. Write the code down and keep it somewhere safe. Lesson 22 covers the password and the recovery code.
Can several staff follow the lessons and use the app at the same time?
Anyone can watch the lessons, but the app itself is for one computer and one office user at a time. The free edition does not have separate staff logins or use on several computers at once. If your school needs that, Timeline Digital builds custom school systems.
What if I need something the lessons do not cover?
The 22 lessons cover all 16 modules of the app. If your school needs something the free edition does not include, such as a parent portal, SMS messages, a timetable or online fee payment, Timeline Digital builds custom school management systems. The pilot is always free.
Download the app and follow along
Timeline School Manager is free. No licence key, no trial period and no locked features. Pick the download for your computer. The Mac file works on both Apple Silicon and Intel Macs.
Download the installer. The file is Timeline School Manager Setup 2.6.0.exe.
Open the file. The installer is not code-signed, so Windows SmartScreen may show a warning. If it does, click More info, then Run anyway.
Follow the steps. A shortcut is added to your desktop and Start menu.
Install on a Mac
Download the disk image. The file is Timeline-School-Manager-2.6.0-mac-universal.dmg.
Open the file and drag Timeline School Manager into the Applications folder.
Open the app. The app is not notarized, so the first time macOS may say it could not verify the app. If so, open System Settings, choose Privacy & Security, scroll down and click Open Anyway. You only need to do this once.